A milestone on the Gentleman’s Nightcap, and an experiment
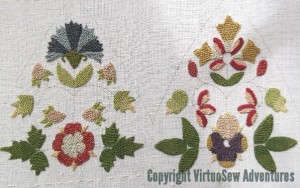
I’ve now finished the silk work on the main sections of the Glittering Gentleman’s Nightcap. The next stage is to work the metal thread embroidery, because I want everything on this side of the fabric done before I take it off the frame, turn it over and work on the brim. In the end, I found that the last few bits went quite quickly, perhaps because I had a whole day when I did nothing else and found the stitching speeding up. It’s taken me a while to realise it, but I now think that Detached Buttonhole Stitch With Return is one of those stitches which requires “flow”, which in turn doesn’t happen if you sit down with only time to do one leaf before doing something else!
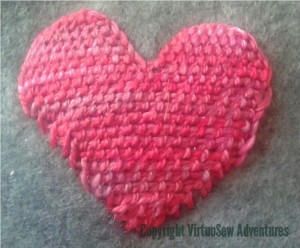
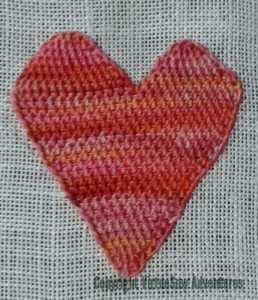
Up until now, I have tended to regard the Online University projects I have done as a sort of salutary discipline, and worked them exactly according to the instructions (something I rarely do, even when I have instructions!), but during my last visit to a stitching show, I spent some time on Jacqui Carey‘s stand, talking to her, and acquiring her books about Elizabethan Stitches and Sweet Bags. One of the stitches she found, and “reverse-engineered” is effectively the “Detached Buttonhole stitch with Return” which forms so much of the stitchery on this piece, but it incorporates a border within the method of stitching. So I thought maybe on the brim I could used this bordered stitch instead of the standard stitch.
In another departure from my usual procedure I decided to practise the stitch first, and it’s really just as well.
Perhaps because Jaqui is primarily a braid maker and not an embroiderer, it took me some time to adapt my way of thinking to make sense of her diagrams. She also shows the stitch as worked upwards, whereas I have worked downwards with this sort of stitch all my life – or at least ever since my first attempt, when I worked the Needlelace Embellished Blouse.
The fact that version one was worked on felt didn’t help, either, since the needle kept snagging it, and the felt sagged under the weight of the stitching.
So version two was worked on linen, using a mercerised cotton instead of pearl cotton. This time I think I have got to grips with the stitching and the way to create the border. The linen survived much better, but the mercerised thread kept trying to tie itself in knots!
Furthermore, try as I might to work the stitch as diagrammed – upwards and away from me – I kept turning the frame and working it sideways or downwards instead.
I probably will choose to use the stitch for at least some of the areas on the brim, but it will be interesting to see how I cope when I simply can’t turn the frame around!


This stitch is on my list to practice and work. Unfortunately for me, this Summer is not bringing forth much stitching time. It’s a joy to read your trials and triumphs so I don’t feel completely out of the loop. I just received my first Jacqui book a few months ago and I’m interested in the modified mechanics of the stitch so Thank YOu!
Congratulations on complete the silk on the main part. Your stitching is very even and regular, it looks great.
I have managed to book a place on a class co-taught by Jacqui. The class is on Elizabethian sweetbags and will be held at the Ashmolean Museum in early August 🙂
Oh how I love needle lace! You are inspiring me to get back into the studio and play.
That looks wonderful! Great job, as always.
I also need to really practice this stitch. Thanks for showing your not so successful attempt. The second heart is lovely.
That second heart is looking lovely…
I like to practise a stitch first. It defines all the things I could do wrong and those things that are right for my way of stitching. I think the ‘my way’ of stitching is important and always have students find this first then ‘attack the other person’s way.’
Your journey through these projects has inspired me to enrol in the Online University’s Goldwork class. So glad you have all those past posts I can look at.
Those colours on the Gentleman’s Nightcap really appeal to me – the greyish-blue, the brownish-red. I suppose it might be because they are two colours often found in early colonial quilts, which I love looking at. The second heart is stunning and the colours in that are just lovely. xCathy
Oh, the Gentleman’s Cap is really looking lovely these days. Its always nice when we have some ‘real’ time to sit down and work (or play). The first heart looks almost knitted or crocheted to me, probably because of the felt – its lovely in its own right. The second one is perfect! Its always nice to master a new stitch or technique, even if you have to turn it upside down to do it!
The nightcap will be a triumph, Rachel! As for the practice pieces, yes, the border adds another dimension and it’s good to have two ways of doing the stitch so you can decide when a border is best. I think you are close to having two almost ready made Valentine’s cards for next year!
The second heart looks better with the defined edge. I was interested in your remarks about the direction of the stitching and turning the frame round. One of my friends constantly tells me that I work applique upside down/back to front!
It’s coming along nicely. And I like your practice heart, too 🙂
I love both hearts…..even if you have decide one doesn’t come up to scratch!