A Class Piece Finished!
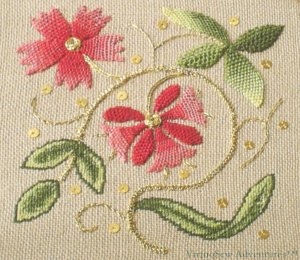
In October last year I went up to Durham for a weekend course in Elizabethan Embroidery with Tracy Franklin. She provided us with a kit of materials, including the design ready-traced onto a coarsely-woven canvas-like fabric fused to a muslin backing, and a good deal of tuition, advice, and demonstration, all fairly easy to see because there were only twelve of us on the course.
The leaves in the lower section of the design are worked in tent stitch, and here the challenge was to create the right shaded effect on the leaves. Tracy showed us some photographs of original Elizabethan embroidery so that we could see what they did then. Tent stitch is not really one of my favourite stitches, but making up the shaded pattern as I went along was much more fun.
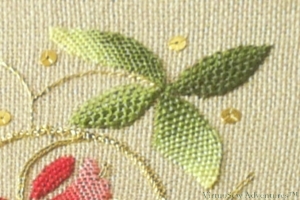
Then we moved on to Corded Single Brussels Stitch. I’ve found a whole list of the needlelace stitches in this family here at Lacemakers Lace. This also seems to be a stitch much used in the Plimoth Jacket (story told in full on the Thistle threads blog), and it’s fairly straightforward, although made trickier in this case because we were using two plies of stranded cotton. That produced some more even blending of colours because we could mix colours in the needle, but it’s a bit more difficult to keep tidy because you have to make sure that both plies are picked up in each stitch.
You can see in this shot that I played around with my Corded Brussels stitch. Two of the leaves are shaded and worked conventionally, from tip to stem. The other two are worked longways, from the centre outwards, producing a marked vein. You see what I mean about having fun with it?
The main stem was supposed to be worked in Plaited Braid Stitch. Now, I can do Braid Stitch – just ( I have to keep the book open all the time while I do it!) – but so far I’ve not nailed Plaited Braid Stitch. In the interests of finishing the piece, releasing the frame, and starting on the project that has been nagging me for the past ten years or so, I’ve done the stem in the ordinary Braid Stitch, and filed Plaited Braid Stitch under “Must Try Harder”.
I’m not the only one. Mary Corbet posted about the stitch last year, and a quick Google shows that there’s more than one stitch out there called plaited braid stitch – just to make things more difficult. And there is a description of the stitch on this page as well.
Still, now this is finished – if not entirely according to the original plan! – I can find a box top to mount it in, and move on…


It’s lovely – quite different from the Elizabethan ambroidery I’ve seen (and tried) in the past, which was several shades of the same colour plus black.
Glad you like it – it seems that the Elizabethans really liked colour as well!
Your detached stitch is excellent! (Better than mine – but I’ve only just learn that as a LH, I’m supposed to stitch from the right all the time – yet to try it out.) You have more even tension.
A lady did a whole long booklet on Plaited Braid Stitch – I did a review of it at http://elmsleyrose.blogspot.com/2008/08/plaited-braid-stitch-instructions-from.html
PinkLeader (an SCA Elizabethan embroiderer) refers to that ‘two colours in the needle’ as “heathering” tho I haven’t seen that word used elsewhere.
I’m starving, want breakfast, but enjoying reading your blog too much. Was reading the Jacobean Firescreen entry before landing here. That’s lovely too! I want to do some Jacobean stitching.