
Category: Large Embroidery Projects
The Camberwell Panel – Five
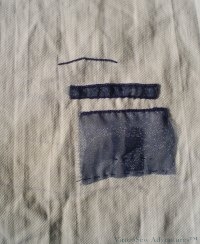
Gauze on the Superstructure
This shows the start of the work on the cotton twill which will form the basis for the hull and superstructure. I have used two layers of navy gauze where the shadows need to be darker and cut sections out of one of the layers where I want a lighter shade. The transferred outline – made using an iron-on transfer pencil – barely shows at all, and fades with age, so there is little risk of anything showing where it should not.
As the additional slip for the hull will cover the raw ends of the fabrics, I decided only to sew down firmly those elements that will be unprotected. I found that as I added embroidery and fabrics to my slips-in-preparation, they shrank – not something my books had ever mentioned, although it really should have occurred to me. That is why I ran the gauze down into the area which would be covered by the hull, although I only caught it down lightly. Although there will be padding under the hull, I was afraid that a strongly stitched line might show where it wasn’t wanted.
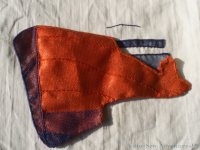
Camberwell Hull
It is hard to see what I’m aiming for in these photos of the work in progress, so in this picture I have overlaid the slip made for the hull on the cotton drill in approximately the correct place to show the general effect I hope to achieve.
It was at about this point that the project woke up and started talking to me.
Before you book my place in an asylum, let me explain: that’s how I describe the feeling of having a near-absolute certainty of what to do next or how to achieve the next stage. Some of my projects never really do wake up, but the Camberwell chattered incessantly for the next several months, even when I decided to undo and redo some elements. When I was in doubt, I found that if I could in some way lay out the choices, they became blindingly obvious as soon as they progressed from imagination to fabric.
That made the Camberwell enormous fun to work on!
Dreams of Amarna – Approaching The Final Decision on the Map
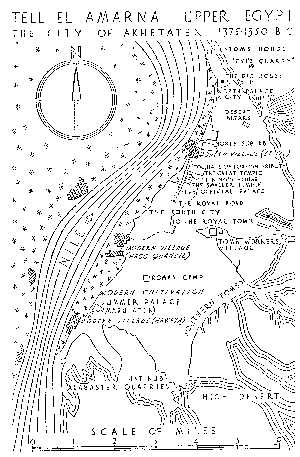
Map of the dig site at el-Amarna
You may recall that the first large element of the panels for Dreams of Amarna that I am stitching is a map of the site shown in Mary Chubb’s book.
It was easy to decide that I wanted to use reverse herringbone stitch for the contours of the high ground around the site, and unbroken lines of chain stitch for the Nile.
The compass rose and the titles were more difficult, although I made a decision eventually.
Now, however, I am near to finishing the text, and I can’t really put off my final decision any longer.
Areas of cultivation are shown on the original map using stars drawn roughly using four strokes. The obvious choice is to use Star Stitch, which exactly replicates the symbol used by the cartographer, but I don’t want to do that.
The aim of my stitching is not to reproduce a painting or a drawing, or even to reproduce those effects. I want to use embroidery techniques to produce impressions and effects that couldn’t be produced any other way, but that are inspired by the subject.
Tricky.
I finally settled on a stitch, after considerable thought and several hours leafing through my (never-ending shelf of) embroidery books – tête de boeuf stitch. But I’m still trying to work out what thread to use, and at what scale. So I’ve worked several test patches, and when I’ve finished the other stitching (the text and the villages), I’m going to wash and iron the whole thing and then sit back and look at them for a while…
Dreams of Amarna – More Research
This weekend I went to the exhibition “Tutankhamun – His Tomb and His Treasures” at the Museum of Museums near Manchester’s Trafford Centre. Partly just for fun, and partly because Mary Chubb mentions the huge excitement over Howard Carter’s discovery of Tutankhamun’s tomb as some of the “social background”, if you will, in her book “Nefertiti Lived Here”. I was hoping to catch some of the flavour of that excitement as well…
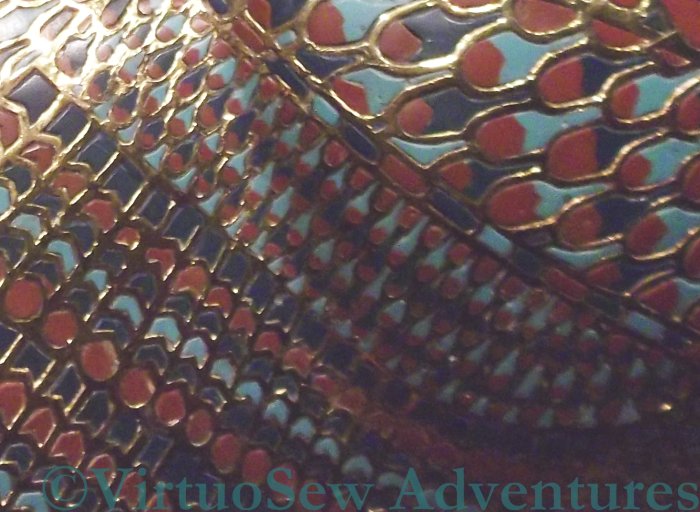
Cloisonne Feather Pattern on the Sarcophagus
It was an excellent exhibition. The usual introductory hall, with panels describing ancient Egypt and the development of Egyptology, but this one also included a reproduction of the Rosetta Stone. I knew that one of the languages was hieroglyphic and the other was Greek, but I hadn’t quite registered that the third was demotic, which was the “workday” script of ancient Egypt, as it were. Then there were films about Tutankhamun, and about Howard Carter, and then we turned a corner and found ourselves face to face with a reproduction of the antechamber of the tomb, just as Carter would have seen it. There is a British Museum page showing one of the original photos here. Except that doesn’t begin to give you any sense of the impact, because nearly every item is covered in gold. It speaks volumes for the self-discipline of Carter and his colleagues that the whole affair did not degenerate into a snatch and grab. I was too startled and overwhelmed to take a photo at this point, although non-flash photography was permitted.
Although I knew, of course, that the tomb contained a mixture of Amarna-period pieces and later pieces, I wasn’t aware that the cloisonné on the middle sarcophagus (close-up above) was an explicitly Amarna period design. So maybe I need to do a small patch using that pattern.
I took quite a lot of photos, which came out, on balance, much better than I expected them to, and may even turn out to be interesting and useful.
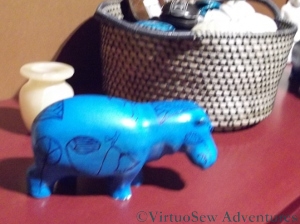
The Hippo In The Shop
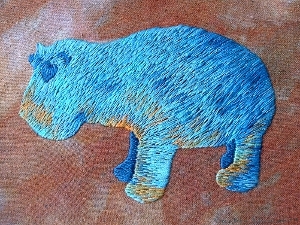
The Faience Hippo Finished
There was a short exhibition at the end which included some of Howard Carter’s watercolours – he was clearly a very fine archaeological artist and illustrator, and then we were sent out though the inevitable shop. Where I couldn’t fail to take one final photo…!
The Camberwell Panel – Four
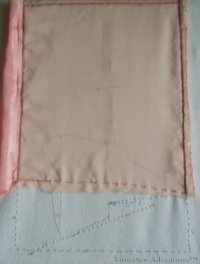
Cotton And Satin
This shows the cotton twill with the basic outline transferred to it for embroidering. I decided that the whole ship would be made on this cotton twill and then the twill applied to the background fabric over the sky and sea fabrics, with some padding to raise it. I checked with my client (my cousin, remember!) to be sure that she was happy with raised and padded appliqué, rather than wanted something very flat, and on receiving an intrigued and enthusiastic “Go for it” started planning what would be padded and by how much.
The photo also shows the satin that I chose for the hull, with the design, again, outlined in running stitches.
Progress on the hull
The next stage was to apply a layer of navy net and a layer of navy gauze to the satin where the hull was in shadow, and stitch over those edges in navy satin stitch. I built up several layers of net at the forefoot, with lines of stitching to add form.
Then I added a layer of tawny net to the light side of the hull to cloud the colour slightly and stitched along the main plating lines of the hull to help reveal the shape.
The next stage on this piece was to stitch over all the edges that will not be covered by other stitches and fabrics to ensure that no raw edges show. At various stages in the project I chose different stitches for this job, but in this particular case I used buttonhole stitch to make the edge crisp and clear.
The Camberwell Panel – Three
The Sky being sewn into place
I could have left the background until I had made some progress on the Camberwell herself, but I wanted to be sure I kept the design balanced, and having the background ready so I could lay the cut outs on it to think about seem the best way of achieving that.
The fabric for the sky is a pale apricot coloured georgette. At this stage I still had not decided whether there should be two layers, to create a deeper colour and more dramatic effect, but as I was going to be working on the ship herself on a separate piece of fabric and applying it later, that decision could be delayed. I used a zigzagged back stitch in rust coloured embroidery cotton to attach the georgette to the backing.
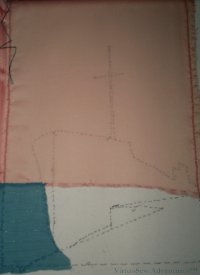
The Sea and Sky
The blue-green fabric I chose for the sea has a glittering thread running through it at intervals. I was hoping that this would create the effect of sunlight sparkling on the water, without drawing unnecessary attention to itself.
I also found a piece of white cotton twill – slightly lighter in weight than the material used in uniform “tropical whites” but very similar – which seems the perfect choice for the base fabric (for so many reasons). This fabric provided a sturdy basis for the superstructure and the hull, which would involve both fabric appliqué and embroidery.
Still More Work on the Map of Amarna

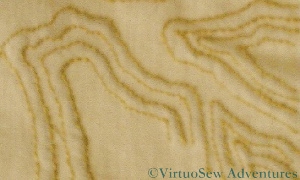
Section of the Amarna Map
This photograph shows a completed section of the Amarna Map, which demonstrates most of the design choices I have made as I went along.
The long lines to the left in the picture are worked simply in Chain stitch and represent the Nile that runs beside the site. Small tête de boeuf stitches represent the cultivation, represented by hatched stars on the original map.
The text is worked in Back Stitch. It isn’t perfectly regular, but it isn’t really intended to be, either. I knew that all my favourite line stitches would be too heavy and detailed for the scale and the intention I have, so it is deliberately chosen to be as simple as I can make it.
Remember there will be areas competing for attention here and that what I want is a general impression that the viewer can then look at more closely if they want details.
There is at least as much again to do before the Map is finished – that’s why I have tagged this post “Perseverance”!
A final look at the Piano Shawl
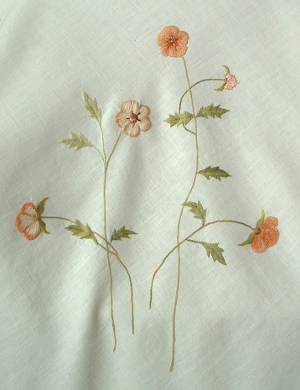
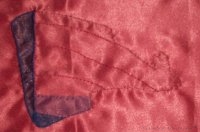
Corner Motif on the Piano Shawl
The Piano Shawl was only a metre and a half square (only!), so there wasn’t really space for a stave in each corner, even if Elaine had wanted four melodies included! At the same time, there was enough space in the corners that without something there, the whole thing looked half-hearted and unbalanced.
So I had to do something. I traced some of the stems and devised a very light floral motif, consisting of four stems and a few leaves. The main stems are worked in Broad Chain Stitch, using a plain stranded linen thread, which I used in the stems on the main design elements too, but the shorter, smaller stems are worked in Portuguese Knotted Stem Stitch, using a variegated silk thread. I used several different variegated silk threads for the leaves throughout the Piano Shawl. Again this is by no means a naturalistic treatment – the flowers are something like dog-roses, but the leaves (all worked in Fishbone Stitch) aren’t like any I’ve ever seen in a garden before!
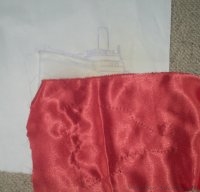
Initials in Morse Code on the Piano Shawl
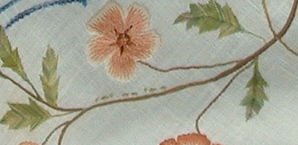
My final picture is a shot to show my initials in Morse Code in one corner, pretending to be a caterpillar!
The picture also shows the centres of flowers, which were the same across the piece. The thread is a variegated, almost untwisted rayon thread, and it is used only in the centres of the flowers. It’s very like the thread I used for the headdress of the Prince’s Companion in the Persian Fantasy companion piece.
Now that I have seen the Piano Shawl in its destined place, I am happy with it. The overall effect is light-hearted without being entirely frivolous, and the time spent in Elaine’s music room pulling threads, and draping them over the furniture to make sure that they would all match nicely, wasn’t wasted.
However eccentric it might have seemed at the time!
Some Work On The Map of Amarna
Contour Lines on the Map of Amarna
Fortunately for me, I’d already had plenty of ideas for working the Map of Amarna for the first of the background panels, and in fact, as soon as I decided to include it there was one section about which I was absolutely certain – the contour lines. I’ve worked them in Reverse Herringbone Stitch. The fabric between the lines is thus slightly raised – padded by the threads behind it. I got this far on the map quite some time ago and was very pleased with myself when it turned out Just As I Hoped.
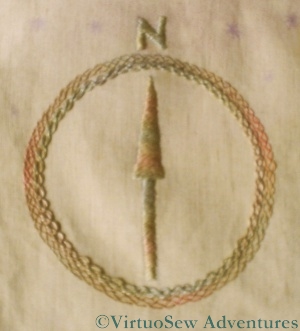
Compass Rose on the Amarna Map
Then I moved on to another section and found myself struggling. In the drawn map, the compass rose is indicated by three lines. When I tried that, it looked clunky and rather sad. So I returned to my stitch dictionaries, and looked for line stitches. Cable Chain Stitch was an obvious choice, as it has been a favourite of mine for years, and the outer ring is worked in Closed Feather Stitch. I used two Caron Collection threads in the same colourway here – a single strand of the heavy pearl cotton type which has three strands (Watercolours, I think it is called), and the much finer one, which I think is Wildflowers. It is interesting to watch the colour changes as they appear very different and have different emphases in the different threads.
I may yet decide to run a “shadow” to one side or the other of the arrow, using a simple stitch such as stem stitch, to throw the satin stitch into stronger relief, but for the moment I am happy that the flatter outer ring creates the illusion of a raised compass rose, while still being clearly something stitched.
Dreams of Amarna – The Title on the Map
I described the first of the background panels I am planning for the Dreams of Amarna a few months ago. I will describe some of the other stitching I have done on it in another post, but I have been racking my brains since I began stitching, trying to work out how to embroider the title.
The challenge I am facing with the whole map is that I want it to be clear that it is embroidered, not screen-printed, but at the same time, I don’t want to show off every stitch I know or produce something that is so heavily stitched that it pulls the final pair of panels out of balance. So far, every time I have tried something it has been too prominent or too fiddly or Just Plain Wrong. While this is disheartening, one of the advantages of the butterfly mind is that I could stow the piece away and work on something else while waiting for inspiration.
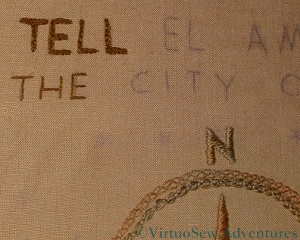
A Corner Of The Map Of Amarna
Then suddenly, a few days ago, the Gordian Knot was loosed. I’m using ordinary stranded cotton (two strands) in the darkest shade I am allowing myself. It’s not overdyed or textured, and I am using the same thread for both rows of text.
The large text uses the Chain Stitch with Buttonhole Edging that I learnt in Month Five of the Tudor and Stuart Goldwork Masterclass. I knew it would be useful as soon as I saw it! It is slightly fiddly to work at this scale, especially using stranded thread, but importantly, it doesn’t look fiddly when it is in place.
The smaller row of text below it is in split stitch. This provides a narrow, unbroken line, again clear enough to be readable, but equally not drawing attention to itself. If I decide later that this row is a little too unassuming I can always whip the split stitches!
This now means that I know what I am doing with this panel for a while yet, and can just get stitching on it. Unfortunately the transfer that I made has worn off the centre of the fabric so a large section of map will have to be retraced and reapplied, but that can wait until I have finished the titles.
I’m greatly relieved. I’ve now got plenty to work on while I think of the next idea…
The Camberwell Panel – Another Long Project
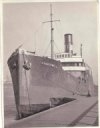
Photograph of the Camberwell
The Camberwell Panel was a commission from my cousin. I documented the design and progress of the work for her while I was doing it, and she has given me permission to share it with you as well.
The Camberwell was the ship her grandfather retired from in 1938, and when we found this photo in the family home, we thought it would make an ideal subject for an embroidered panel. Although the Camberwell was a merchant vessel (a collier, in fact), the looming prow in the picture reminded us of the liner posters of the 1930s, so that was to be the inspiration for the panel.
That idea in turn lead me to decide to use appliqué as the basic technique, embellished with embroidery. The flat blocks of colour used in the posters of the period would be most easily produced by appliqué, and it is a technique that I’ve never used seriously before. I thought it would be fun to try.

Camberwell "Sketch"
So I began by scanning the photo and then tweaking it digitally to get a sketch. With Master Mariners on both sides of my family tree, the last thing I wanted was to get the rigging wrong!
Once I knew what size the panel was to be (decided on the basis of where it was to hang) I could use a projector to project it at the appropriate size and create a basic pattern.
Then I spent some time playing with colour schemes. We settled on something vaguely reminiscent of the the Art Deco period …