
Category: Large Embroidery Projects
The Camberwell Panel – Another Long Project
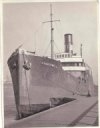
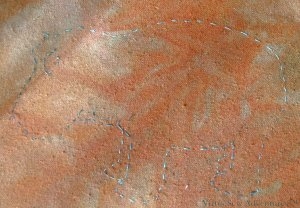
Photograph of the Camberwell
The Camberwell Panel was a commission from my cousin. I documented the design and progress of the work for her while I was doing it, and she has given me permission to share it with you as well.
The Camberwell was the ship her grandfather retired from in 1938, and when we found this photo in the family home, we thought it would make an ideal subject for an embroidered panel. Although the Camberwell was a merchant vessel (a collier, in fact), the looming prow in the picture reminded us of the liner posters of the 1930s, so that was to be the inspiration for the panel.
That idea in turn lead me to decide to use appliqué as the basic technique, embellished with embroidery. The flat blocks of colour used in the posters of the period would be most easily produced by appliqué, and it is a technique that I’ve never used seriously before. I thought it would be fun to try.

Camberwell "Sketch"
So I began by scanning the photo and then tweaking it digitally to get a sketch. With Master Mariners on both sides of my family tree, the last thing I wanted was to get the rigging wrong!
Once I knew what size the panel was to be (decided on the basis of where it was to hang) I could use a projector to project it at the appropriate size and create a basic pattern.
Then I spent some time playing with colour schemes. We settled on something vaguely reminiscent of the the Art Deco period …
More details about the Piano Shawl
Since I had some requests for more details about the Piano Shawl, I rummaged around in my photographs to try to come up with pictures that might explain a little more of what I did and how I approached it.
I knew that I would be using some variegated threads and some plain ones, so the first decision I made was that I would use each in particular places. In that way there would be a scheme of sorts that would guide me.
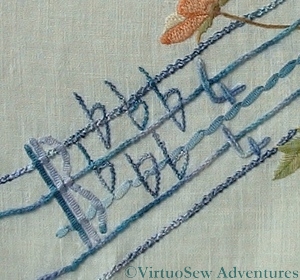
Five Flats on the Piano Shawl
First of all, the ribbon stave was definitely going to be variegated. It would help to create a ripple of life around the design, and incidentally, since it felt like miles of stitching, I would be able to feel the progress I had made in an afternoon in the colour changes. Then I felt that the colour alone did not provide sufficient structure, so I developed the scheme further – the chainette ribbon was couched down as the middle line on the stave, and also used for bar lines and clefs. The next two lines of the stave (one on each side of the central one) were worked using pearl cotton, in Portuguese Knotted Stem Stitch, which is a favourite of mine. I used it elsewhere for some of the stems, in a very fine silk thread which produced a very different effect. The two outer lines of the stave were stitched in ordinary chain stitch using a rayon bouclé which was serious trial to stitch with, but which looks really effective.
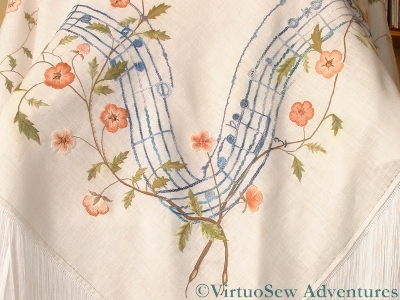
Melodic Corner on the Piano Shawl
The flowers themselves I worked in ordinary stranded cotton, using about six different shades of browny-pink, and creating an entirely un-naturalistic variety of light edges and dark edges, strong and weak colour variations. There was the risk of producing something too stately if I tried too hard, and since the Shawl was destined for a grand piano, the surroundings were going to be pretty stately already. A grand piano is a pretty dignified and imposing piece of furniture!
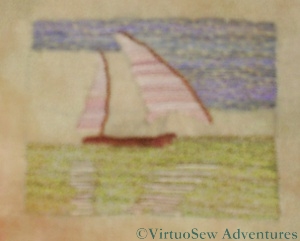
The Felucca Is Finished

The Felucca
I have finished the first trial of the Felucca design. As I always say of these design fragments, I do not yet know whether they will make it to the final piece.
You can barely see the stitching on the coastline – I used a fine thread and spaced the stitches far apart. For the cargo, I crammed the stitches as close to one another as I could. The sails are worked in Satin Stitches rather than darning, and the spars in Stem Stitches. I’ve decided I am happy with the pinkish tinge on the sails, and the greenish Nile is just as I imagined it would be.
I think it has worked. The reflections of the sails bring the whole piece to life, and I added some small stitches to provide an impression of a reflection of the spars.
The Felucca – Second Stage
The Felucca - the Second Stage
I’m afraid that this photo isn’t as good as I hoped it would be, but it does show the progress I am making on the Felucca.
I realised that not only did I need to have the sails completed before I put all of the sky in, but I needed to put the Nile in before I put in the reflections.
So I’ve done the Nile – nearly. If you look carefully you will see that there is a small section of Nile behind the Felucca which hasn’t been finished yet. I’ve used the same irregular darning stitch as I used for the sky, and run in the reflections using long straight stitches in the spaces between the rows of green. I need to put a few more stitches in yet, but I’ve run up against rather a headache which I need to resolve.
I need to do the land behind the Felucca. I was intending to use a paler version of the reddish-brown thread I’m using for the hull and the spars. However, when I put it in, it really didn’t work. No, I mean it. Not At All. I’ve since tried a couple of other threads with no marked success, so I need to spend some time finding a suitable thread.
If you look at the photo on the original post, the tones of the sky, the Nile and the elements of the felucca are not quite correctly reproduced in my embroidered piece. Part of this is because the base fabric isn’t white so everything is turning out a little darker than I expected. I think it will work in spite of the changed tones, but I am anticipating working the design again in a different form or scale, maybe using different threads, so if in the end I don’t like it I will still feel I have learnt something useful!
Beginning the Felucca

The Felucca On Turban Cotton
I’ve begun to work on the Felucca design I have already described. As I am not at all sure about the colours or the stitching that I will want on the final panels (remember this is to be a design element for the edging panels I described a little while ago), or even the scale, I am thinking of working this design several times on different fabrics, with different threads and at different scales, to see which one I like best. I’m sure I will find something to do with any leftover pieces of embroidery!
This version is about two and a half inches by one and a half inches, and it is worked on turban cotton, just like the fabric I used for my earlier experiment with the Dig House. I’m using similar stiff overdyed linen threads as well, but this time I have learnt from the trouble I had with the Dig House. The fabric has been hooped up over a piece of calico, and although it is slightly irritating to have two layers to stitch through, it has a lot more body and is much easier to stitch.
I’ve put the design onto the fabric using a transfer pencil and began with the sky, using a sort of irregular darning stitch. Then I realised that if I were to work the sails first it might be easier to fill in the sky afterwards. I’m not entirely sure about the thread I am using for the sails – it may be a little too pink – but I think it will be hard to be sure before I have finished. I have a dark blue-green thread that will do the Nile perfectly (I hope), and I will be able to run lines of stitching in the hull and sail colours into the water section to make reflections.
This might become my evening stitching until I have finished it. Although it is small, the colours are distinct from one another, and the stitches don’t have to be as precise as they would if it were a counted piece.
EDIT: spelling improved!
The Felucca

Sailing Felucca from Egypt Exploration Society photograph
The photograph here is a close up from one of those that the Egypt Exploration Society made available to me, and shows a Nile felucca in passage with a cargo.
Mary Chubb describes in her book the expedition’s arrival at the site on a felucca, one of the traditional sail-driven freighters of the Nile and Eastern Mediteranean. As she also mentions in the book (when they go on a tour of the Pyramids on first arriving in Egypt) that she is somewhat claustrophobic, it seemed to me that an open sailing vessel and the broad sky over the Nile were probably very important to her. As the felucca also took their finds back to Cairo for inspection by the Museum Director, it was very important to the Expedition as well.
So clearly the felucca should figure at least once in my Dreams of Amarna panels! Equally, however, I need to develop the styles of embroidery I will use for the panels and their assorted images. So I am never sure, when working on these small elements, whether they will end up as part of the final piece or not.
I’ve not even started stitching the Felucca yet, but I have decided that it will be another experiment. I am going to try to stitch the whole thing using straight horizontal stitches. This should emphasize the breadth of the space, which would have been so important to Mary. I am not going to attempt to fill the space, either, so the picture will look slightly sketchy, rather like a photocopy of a memory, perhaps.
Dreams of Amarna – More Planning
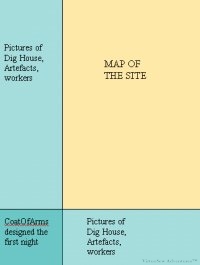
First Panel - basic design layout
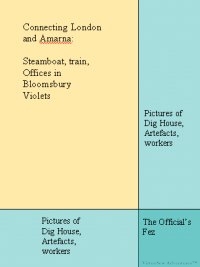
Second Panel - basic design layout
It occurred to me that now would be a good time to create some diagrams to show the design ideas that I have, so that when I refer to “backgrounds” or “side panels” it is clear what I mean.
The basic fabrics are dress-weight linens, one in a sandy colour (the High Desert is not that far away from the site) and the other two are in different turquoise shades, rather like faience.
I have not decided how wide the side panels will be, or how they will be attached. In some cases the design elements will be stitched separately (as the Faience Hippopotamus was) and then applied as a patch, and in others they will be stitched straight onto the base cloth. Again, I am not sure how I will decide what happens in each case. At present the project is progressing on those bits that I have made a decision on, and the more difficult matters are being left to one side.
John Pendlebury was fascinated by the medieval period as well, and over dinner the first evening they were at the site, Mary Chubb describes how they doodle a coat of arms for the dig. When I was a teenager I was fascinated by heraldry, so that was definitely going to be part of one of the panels; the fez is for an official at the Cairo Museum who acted as the intermediary between the Egypt Exploration Society and the Museum. The violets spring from Mary’s efforts to learn Arabic. More about that when I get there!
In reading the book, one feels as though Mary is haunted by the leading characters of the past – Akhenaten and his Queen, Nefertiti. She even finds herself imagining a visit by Nefertiti to the Dig House in the days when it was merely one of the houses of Aketaten. That is why all the activity on the panels will be overlaid by a faded “head shot” of either Akenaten or Nefertiti, screenprinted onto the finest and most transparent gauze I can find. I may decide to offset these a little so that the heads are over the tawny linen and all the bright elements around the outside have only the merest veil over them.There’s going to be a finishing problem right there, because I want the gauze to hang in front of the panels and not be stretched over them.
Still, we all like a challenge, don’t we?
The Faience Hippo Finished
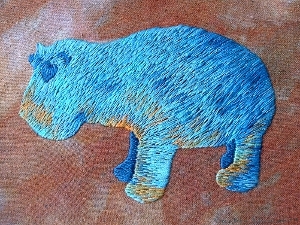
The Faience Hippo Finished
So here is the Faience Hippopotamus finished. That is, unless I decide to go over him with another layer of long and short stitch to break up some of the patterning even further…
I’m reasonably pleased with him, as a matter of fact. The loose weave of the base fabric was sometimes challenging to work on, and it isn’t at all a hardwearing piece – some of the stitches are half an inch long, which would be bound to catch on something – but as it will be part of a carefully protected wall panel if it makes the final piece, this is not going to be a problem.
I enjoyed doing it, as well. It was fascinating to see the colours change more subtly when I started using the thread turned end-for-end, and this vibrant turquoise/teal colour is one of my favourites.
And, yes, I did manage to work an entire piece in long and short stitch. It is fair to say, I think, that it will never be my favourite stitch, but it does have its place, and I am certainly happier to use it now I have had Tricia’s instructions on the Floral Glove Needlecase Course.
Dreams of Amarna – The Faience Hippopotamus, Second Stage
The reason I am calling this poor fellow an experiment is that I’m working him in long and short stitch. I have said that working on the Floral Glove Needlecase project has been illuminating and that I am warming to long and short stitch – well, we’ll see what I think when I’ve worked an entire piece in long and short stitch!
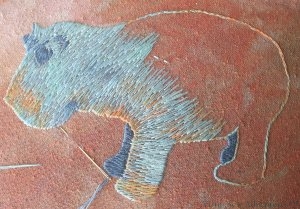
Half Done Hippo
In the meantime, here he is, half done. The darkest and lightest shades are ordinary stranded cottons, but the middle three use overdyed threads. One of them shades from turquoise blue to russett, and the others are both fairly subtle variations on a dark and a light turquoise.
I am using two strands, with one of them turned end-to-end in comparison with the other. I’ve never done this before, but it means that the shading of the overdyed colours is slightly more spread out and more subtle than it would be if I left them both as they came off the skein. It also means that the twist in one strand runs counterwise to the twist in the other so one strand shortens during stitching. I’ve chosen not to mind about that, but if you did happen to mind I think the way to achieve the same effect would be to buy two skeins and start them at different points in the cycle of colours.
I’m also working in slightly untidy sections of the body, with two or three needles ready to go, depending upon the colour I need. I’m using long stitches, and aiming to cover the fabric beneath without packing the stitches too closely.
I’m really pleased with this so far. The colours are working well, and the variations will give a bit of modelling without attempting to create a needle painting.
Dreams of Amarna – The Faience Hippopotamus, First Stage
I have two Amarna projects already on the go (one of the backgrounds, and the Dig House) but they are both monochromatic, and you will have gathered that I like colour. So I thought I would experiment. Again!
Small Hippo Outlined
My rule for the panels and motifs is that I may only depict items that Mary Chubb mentions, or that she would have known about, or which were excavated in Amarna about the time she was there. That means that anything seen in Howard Carter’s excavation of the tomb of Tutankhamun or excavated by Flinders Petrie is also allowed. So a faience hippo is just about permissible, as they seem to have cropped up in a lot of excavations, not just those of the Egypt Exploration Society. I’ve also just purchased (courtesy of Alibris, since it is out of print) “Tell el-Amarna”, by JDS Pendlebury, who was Director of the Excavation when Mary was Secretary. It should give me more ideas about what was known or thought at the time, which in turn will help me to plan more illustrations.
The background fabric is an overdyed silk noil from Stef Francis, and I will be using some of her stranded cottons as well. I began by copying the outline onto tissue paper and then went over the outline in running stitch. I rather like this technique for marking designs, at least where the design is relatively simple (see Ruth O’Leary’s Spirograph hangings for a less than simple design using the same transfer method – eek!).
I then stitched around the edges using split stitch to make the edge of the design clear, and took a deep breath…