
Category: General Embroidery
Little Jacket – still more foliage
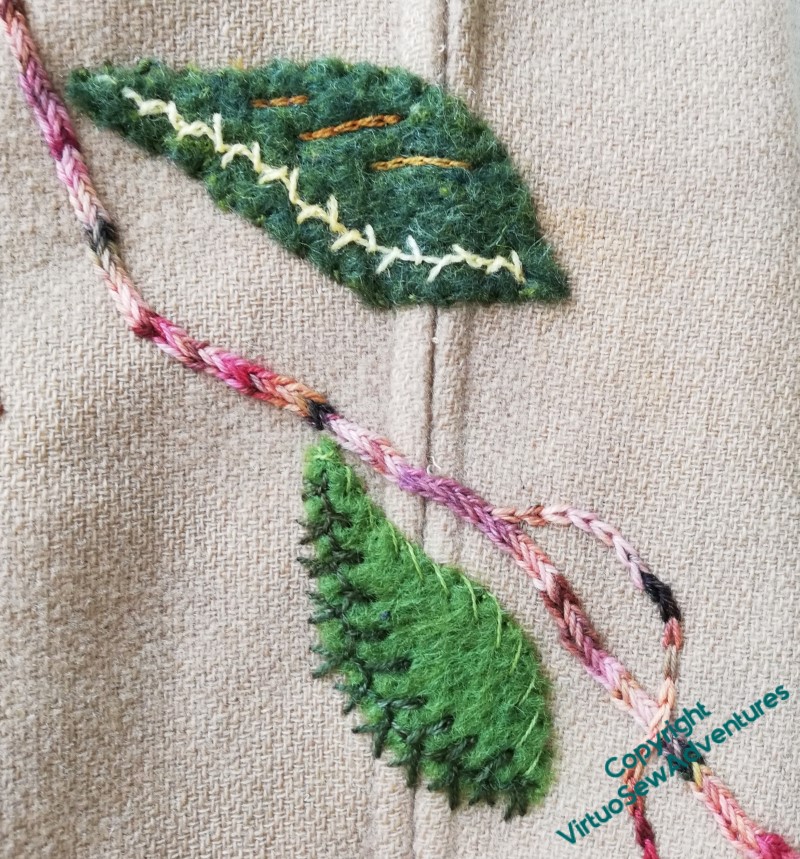
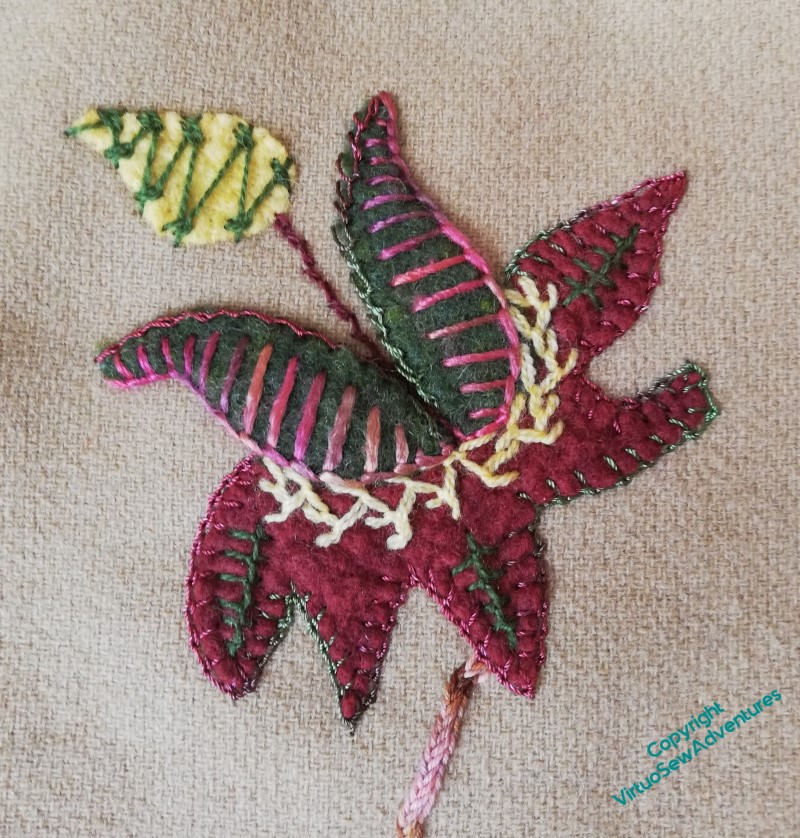
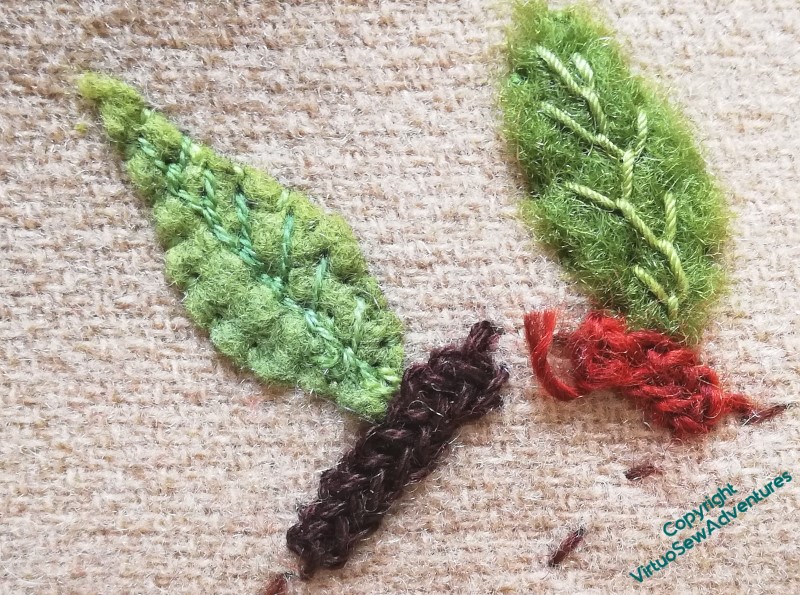
Adding the large leaves involved some thinking, because I wanted to keep the variations going. Some of them are edged, some of them emphasise “veins”, and some, like these two, are asymetrical.
The darkest green felt helps the pale yellow (alternating twisted chain, I think) to shine, and the three lines of darker yellow just add another variation which ties in with some of the colours in the yarn I used for the stem.
I found the middle shade of felt a little harder, always. I wanted to ensure there were contrasts and changes of texture, but middling shades are just trickier to balance. The different textures here help a bit – mercerised cotton as against a fine crewel wool.
Wheatsheaf stitch down the centre of the lower leaf turns into chain stitch as the leaf narrows, and the Cretan Stitch in the upper leaf presents a nice contrast, dark red-browns in a finer yarn opposed to the fluffy wool of the lower leaf.
All of these leaves also run over one or other of the seams I had to release to do most of the stitching, so they were a bit trickier for that reason as well. I will have to steam-press these when I’ve finished, to settle the seams back the way they should be.
This picture also shows that I am adding chain stitch tendrils. One of the things I learnt from all the Online University courses with Thistle Threads is that sometimes More Really Is More. As most of the stitching came together, the jacket still didn’t look quite luxuriant enough or joyful enough, so again, my Mam modelled it for me, and I drew in tendrils in chalk to stitch over later. That way I could be sure they made some sort of sense when the garment was on..
Some of the leaves over seams were to cover patches of wear, and as I looked over the jacket, I found more wear, on the top of one of the pockets and down the pocket edges.
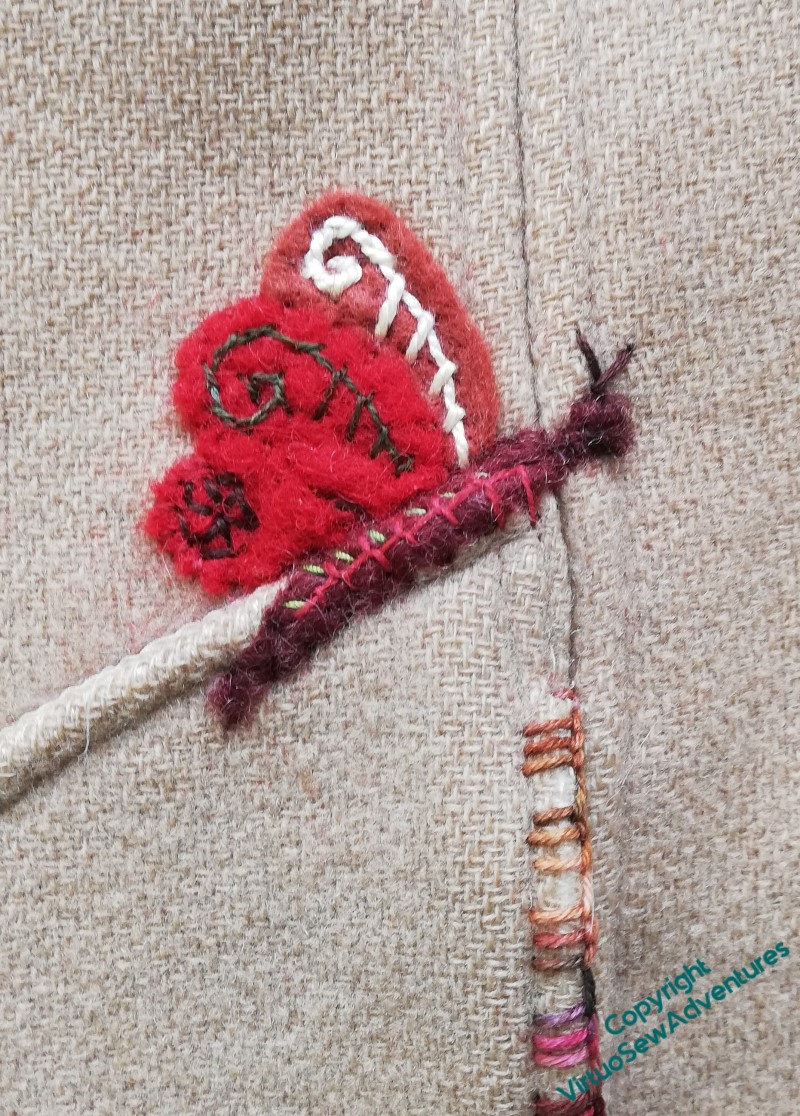
Taking the pockets off wasn’t a good choice, as the fabric would look different underneath them, so I had to think of something else to do, and this is it. Grouped blanket stitches down the edges of both of the pockets, and a sneaky little butterfly to cover the bit of wear on the top of one of them.
You can see that the butterfly is one case where I’ve added lots of little details, including tiny little stitches on the body to break up the fragment of dark felt that I needlefelted in place as the starting point.
Who would think the top of the pocket was worn right through the top layer of fabric?
Watermill Stitchery – Finishing Stones of Verrucola
You may recall that I was planning to use this design as a way to explore stonework in various forms, and to demonstrate stitches that might be chosen in each case.
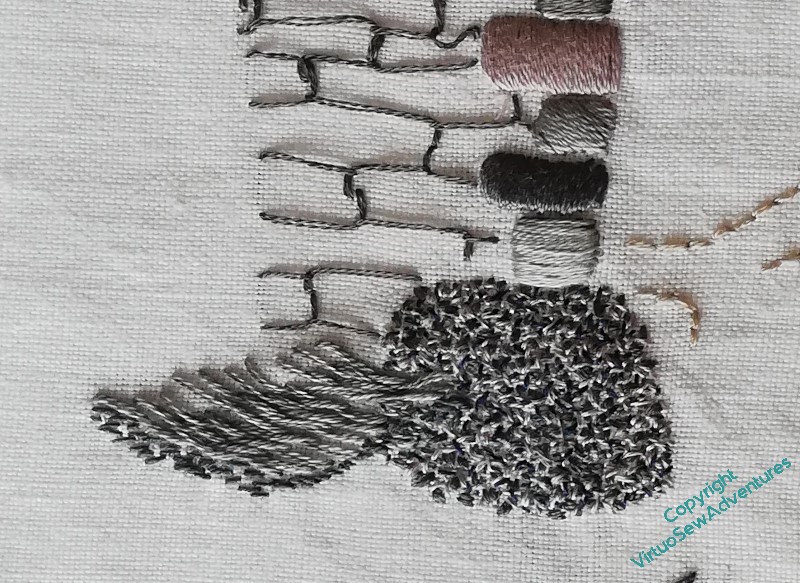
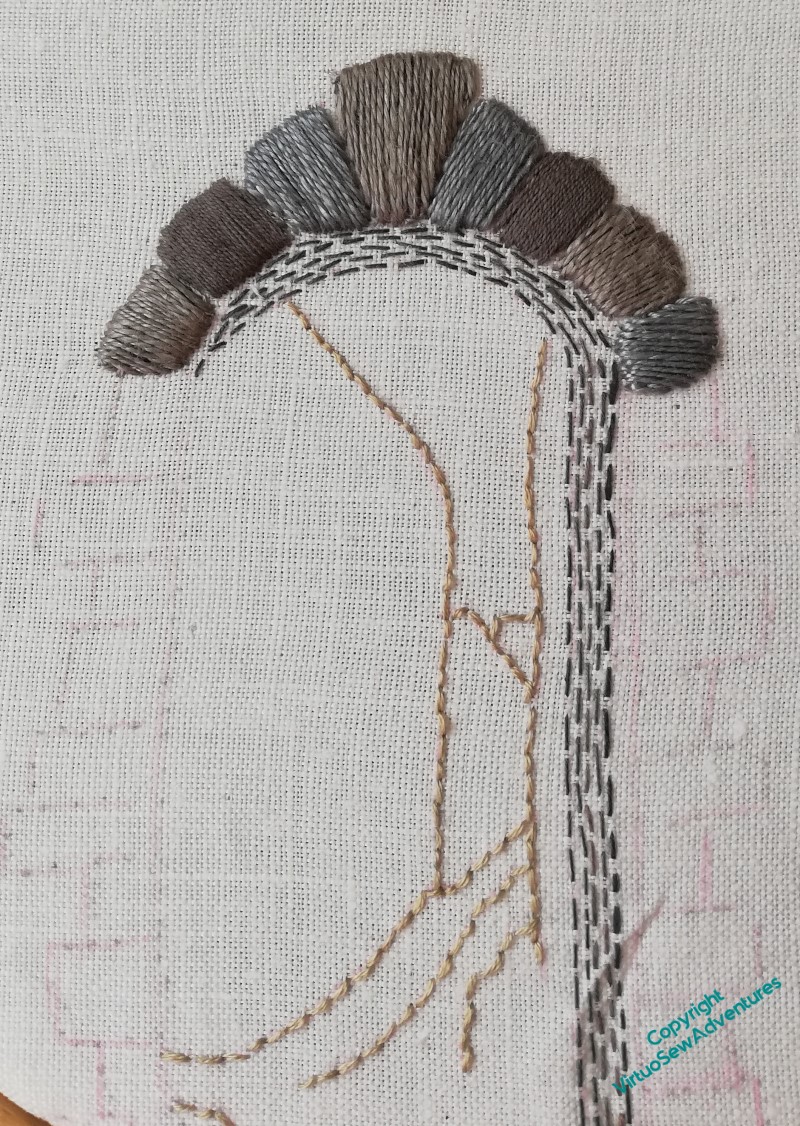
So here we have padded satin stitch for the cut and dressed stone of the arch, and seed stitch for the boulder beside it. The seat and the blocks of the wall around the arch are both in Cretan Stitch, the one spaced out and turned into a filling stitch of sorts, and the other compressed and set at a slight angle to represent the slightly dished stone seat.
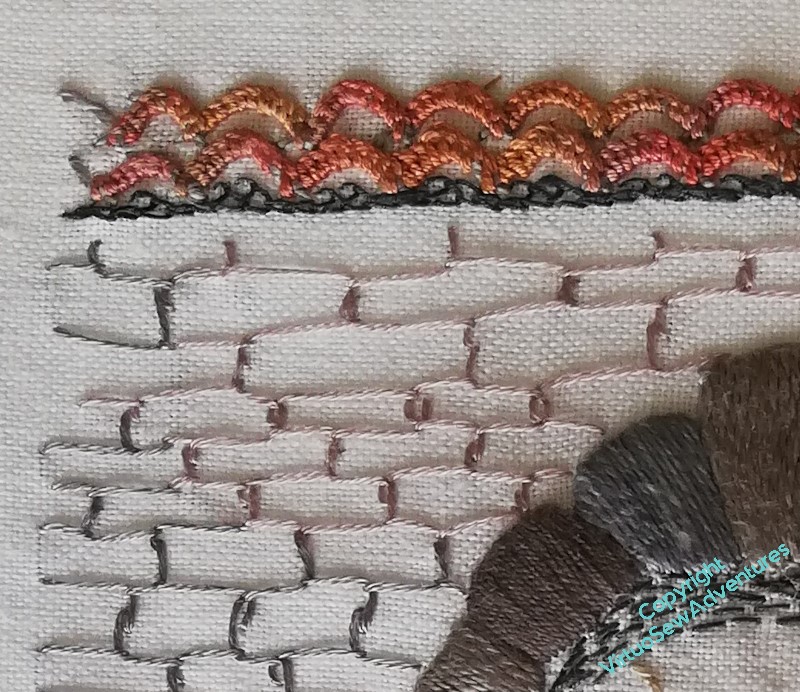
This view shows the height of the padding on the keystone and the line of dark stitching under the tiles, which is a line of chain stitch feathered on one side only to get one crisp edge and one which suggests the darkness of the arch. You can also see from the shadows just how strongly raised the blanket stitched herringbone stitch appears.
The Cretan Stitch rows are carefully varied in length and depth to show how the rows of cut stone are not all the same height or length. This was a stitch much more easily worked in a hoop, where you can see the layout, than in the hand – even though I prefer working in the hand where I can.
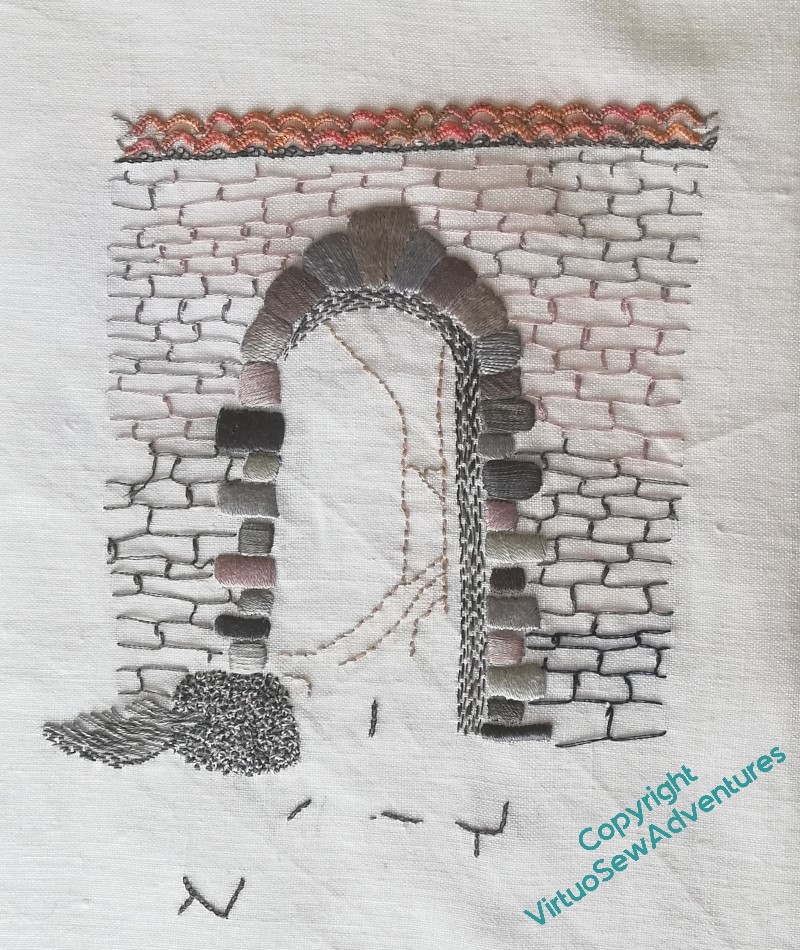
And here is the finished “Stones of Verrucola”.
There are some elements which work much better than others. The outlines through the arch and the chain stitch edges of the flagstones may not be necessary, and the shadow under the seat is a little too small.
The seed stitches could have been bigger, maybe even grouped, and maybe emphasizing one of the lighter colours more, but I am very happy that all of the different textures are truly differentiated.
Besides, all that I am seeking to do is to demonstrate ideas that the students can take on or not as they choose. If at the end of the week I have a classful of mini-mes, I will have failed. What I want is a group who’ve tried, experimented, and each of them produced, maybe even only a fragment, but still something that makes me think, “Goodness, I wish I’d thought of that!”
Little Jacket – dealing with a difficulty
Remember this one?
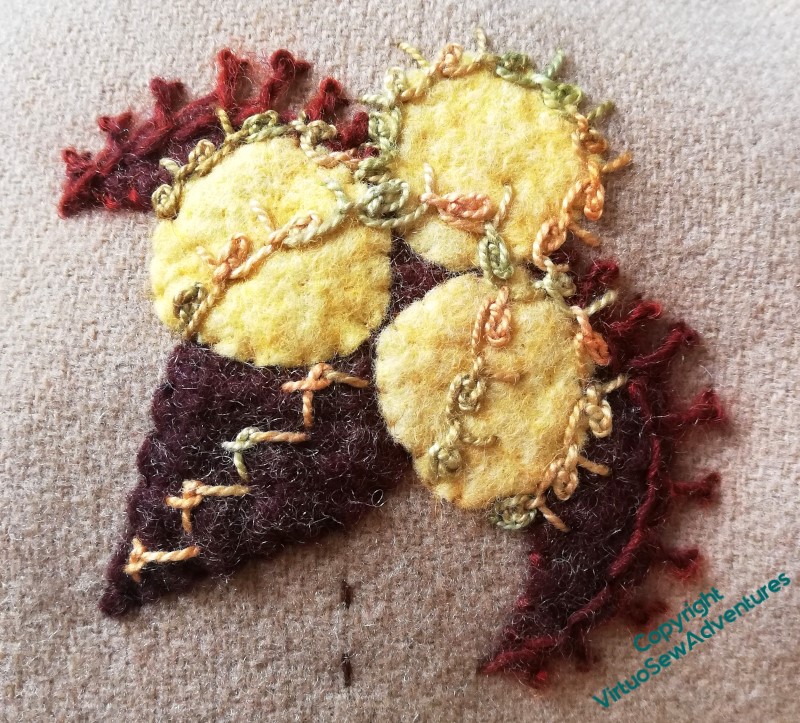
All the stitches came from Edith John, I think. Crested chain edging on the brown petals, and an odd combination of rosette chain and blanket stitch in the yellow-green pearl cotton. The stitch running in a spine down the lower brown petal is called “Wing Stitch”, and looks to me like a cross between fly stitch and twisted chain stitch.
I liked the stitches, but not the effect, and one way and another, I couldn’t work out what to do with them all. So I unpicked it and stitched other things along the way, playing with textures and threads and hoping that inspiration would return…

I took out all the pale variegated pearl cotton, and decied that what I need to do was to simplify the shape, and make it less frilly. So I’ve left the crested chain in brown bordering the top petals, but pulled everything else in and calmed it down. Blanket stitch edging the pale circles, and a spiral of twisted chain stitch to pull them together.
It still doesn’t really look like any flower that grew, but I think it makes a better pattern, and a better contribution to the whole thing.
And that is what matters, after all!
Christmas Angel Finished
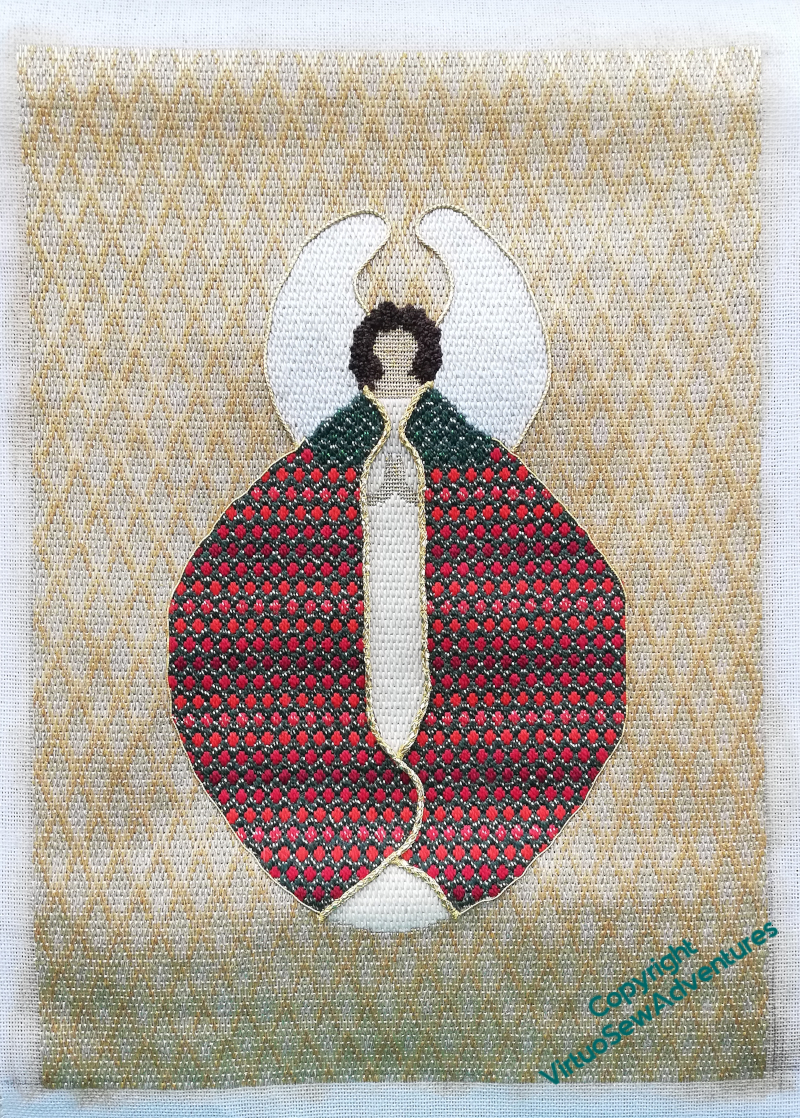
So here we are. All the gold canvaswork completed, the Angel outlined in different weights of thread, given tightly curled hair in French Knots, and now ready for however I work out how to mount her and turn her into something pleasing, and useful to decorate the house next Christmas.
I haven’t given the Angel a face, and I don’t think I will. It’s distressingly easy for “sweet” or “joyful” to become “disturbingly weird” with faces, especially when there is so little space, and relatively few stitches to manoevre with. If I experience an inspiration, I’ll reconsider, at least until I’ve mounted her. At the moment I’m looking for a sufficiently tall and wide cardboard tube that I can cut in half. Alternatively, I need to be very clever indeed about my card engineering…
It really only took as long as it did – it was begun in 2015 – largely because there was a lot of background, and it was remarkably tricky to find a rhythm to the pattern. Once I did so, it became much easier, and fairly romped away. Before that time, it spent a considerable period hidden away because – not having found the rhythm – it just made me grumpy to look at it!
Still more on the Little Jacket
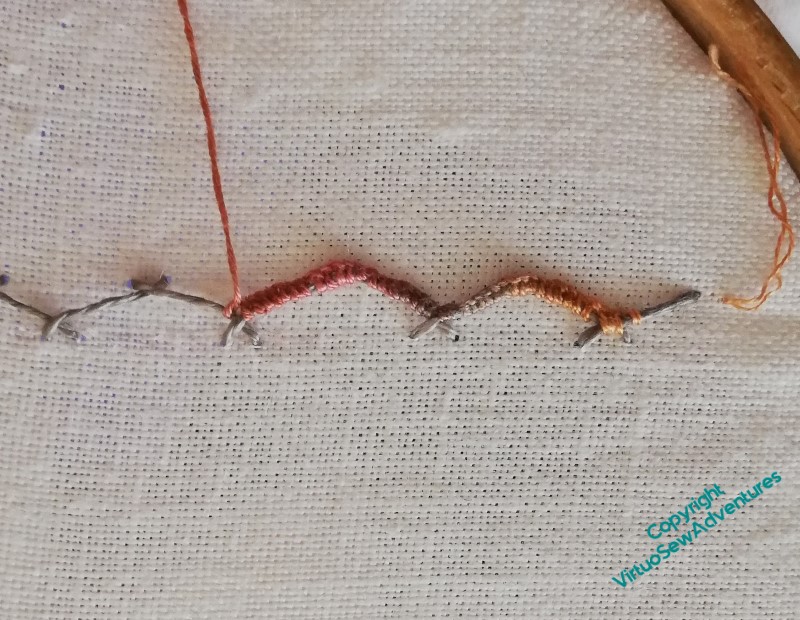
The two stitches here are both chain stitch variants – wavy chain (top) and shell chain (bottom). Wavy chain is a tricky one to use, because it is very difficult to curve, which rather limits the applications it might have. It does a good imitation of ric-rac or braid, but so far that is the best I’ve managed with it. Suggestions on a postcard, please!
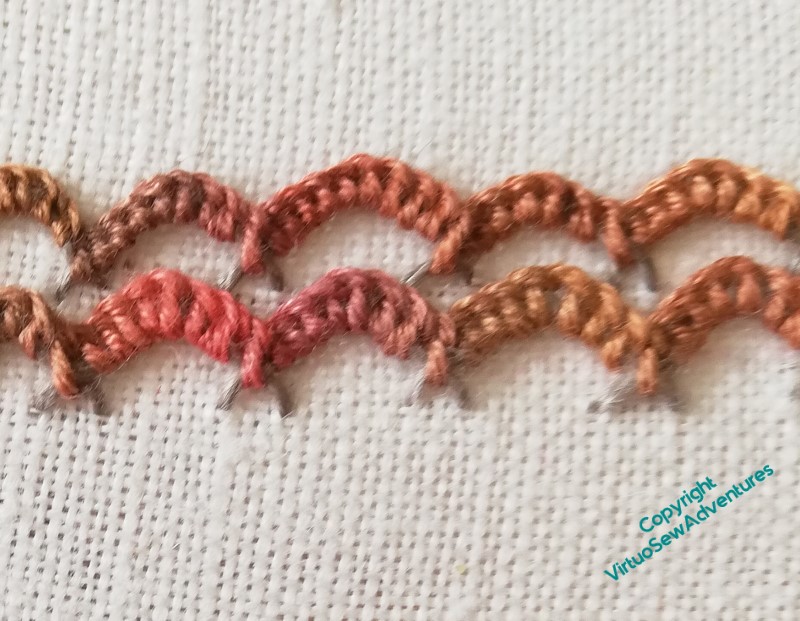
Shell chain does take curves nicely, and can be used in most places you might think of using closed feather stitch or heavy chain stitch.
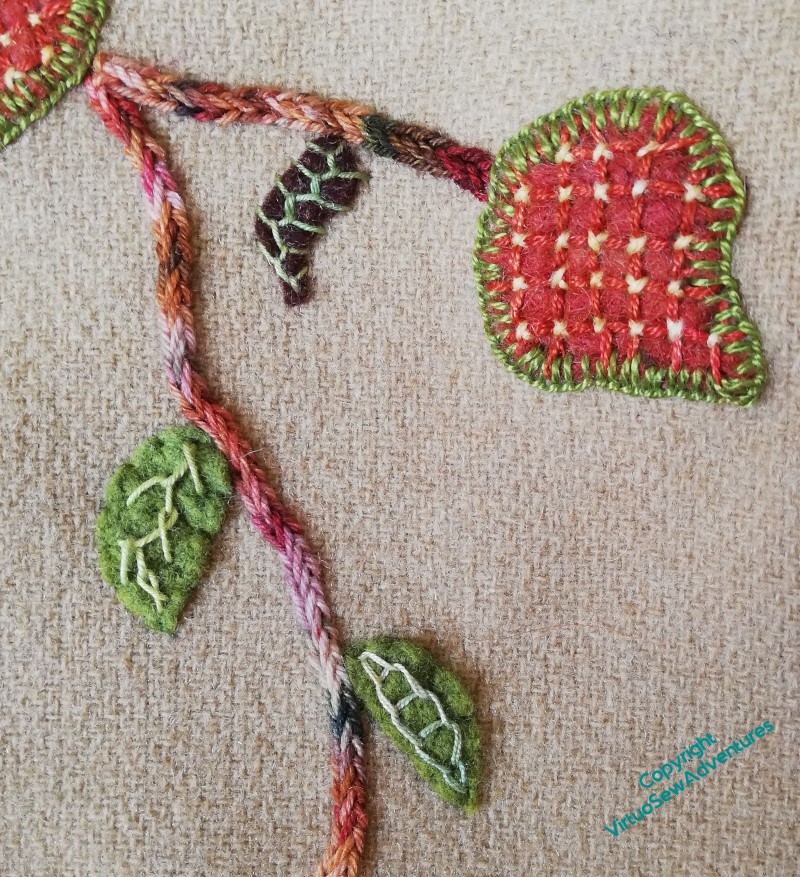
There are three of these buds, or berries, and they seemed a perfect place for trellis couching, which has been a favourite stitch ever since the first embroidered cushion cover I ever did. I’ve edged them, rather conventionally, I’m afraid, with ordinary blanket stitch, and the leaves use Cretan stitch, another of those odd variants, which alternates feather stitch with twisted chain stitch, and then open chain stitch, which one of my books describes as “an ugly stitch, fit only to be the basis for ornamentation”. Which seems a bit harsh.
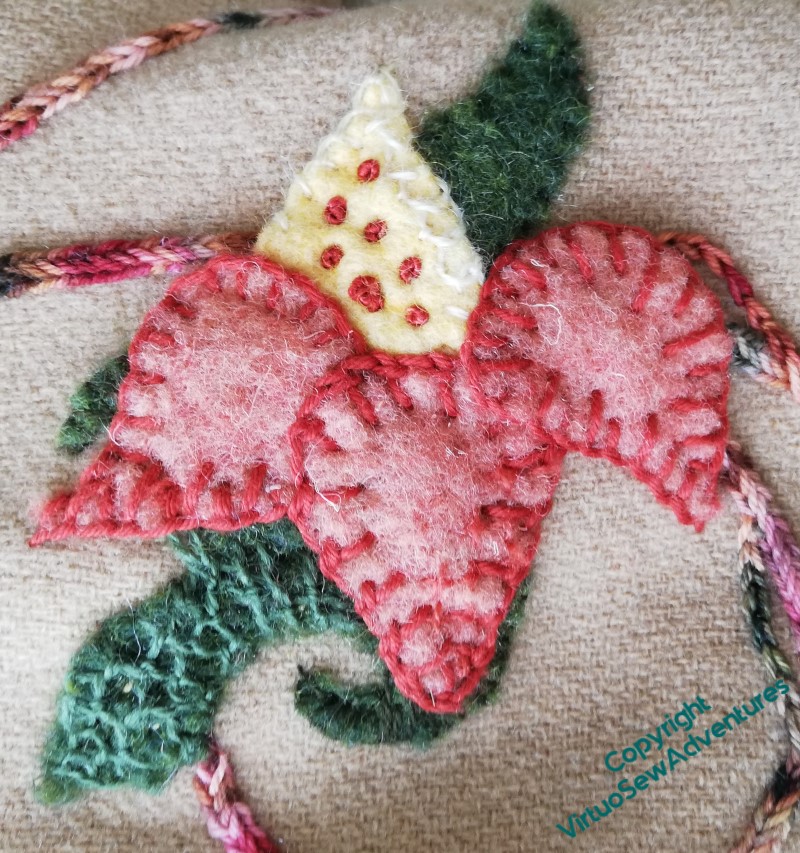
This final flower took a bit of jockeying with, because I didn’t quite place the original green elements as I might have done if I’d left them until later. Be warned by me, and when you start to get tired, STOP! Otherwise it takes ten times as long to sort out afterwards
However, I got there in the end, I think, with some chained blanket stitch, some French knots, and some needlelace stitches on the calyx.
Footstool finished and set up
There was something of a pause once I’d finished the cavaswork and we had removed the old cover from the little footstool. We reinstated all the padding (leaving my Grandad’s old pyjamas just where Grandmama had left them!) and stapled the cavaswork over the top.
However, that left a border of bare canvas, which was definitely not what I wanted on show, so there was some thought expended. There wasn’t enough of the assorted tapestry wools left over to make a border, and this was in progress during one of our lockdowns, so I couldn’t go frolicking off to a haberdashery to hunt for a braid. Very well, we would have to find a way of ensuring that our border matched, while trusting someone else to pick the material.
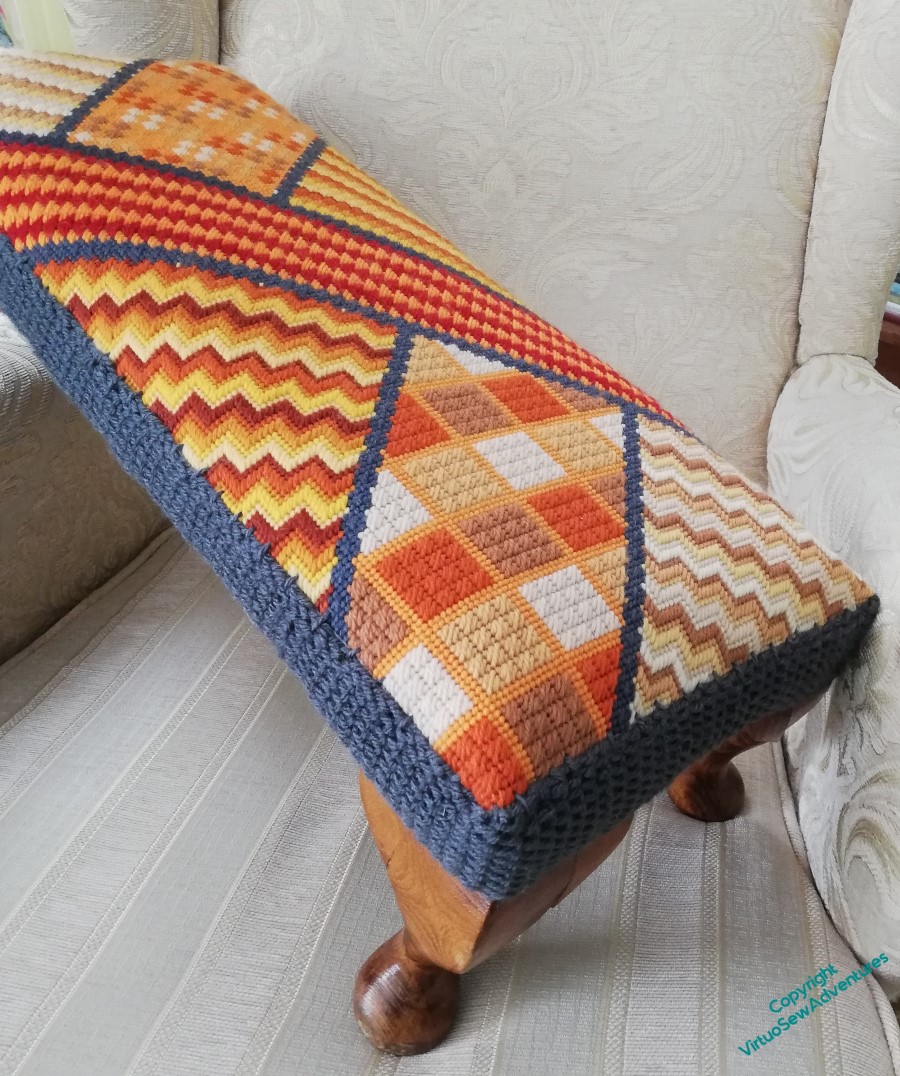
Fortunately, the threads I used were most of them current colours, and in particular the grey is a familiar Anchor colour. So it occurred to me that if I could find a shop that sold both embroidery supplies and knitting supplies, we could ask for a knitting wool to match the grey thread, and crochet a border.
That would have the advantage that we could be sure it would be wide enough to do the job, and in any case it could be slightly stretched to fit. I do like it when absolute millimetre precision isn’t necessary. This was a stash-busting, domestic area-improving project, not a major epic (although, you know, subject to my usual feature-creep!).
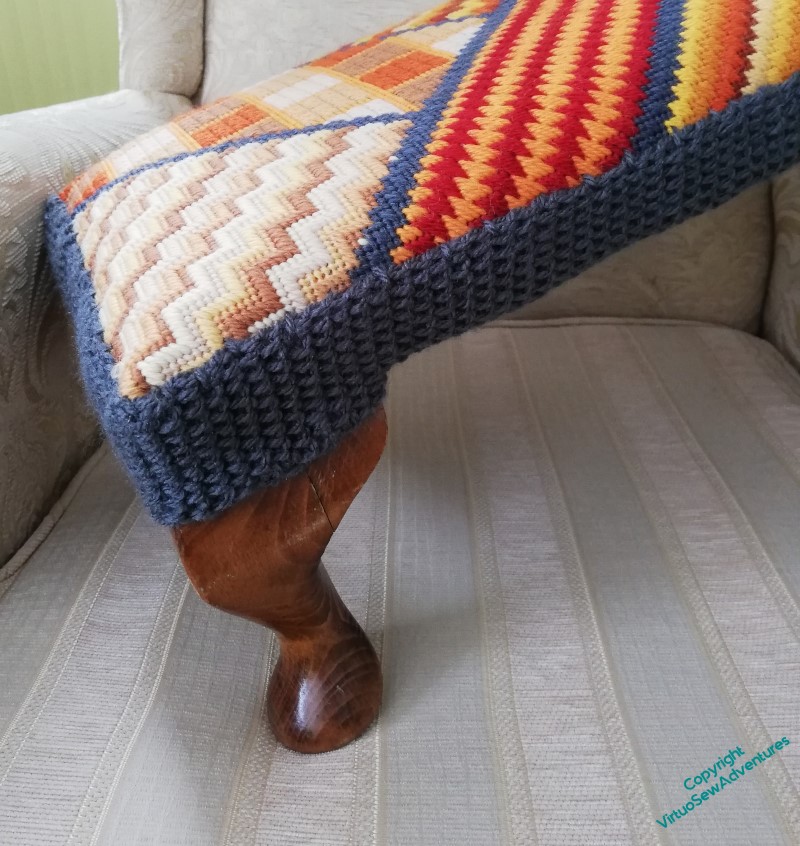
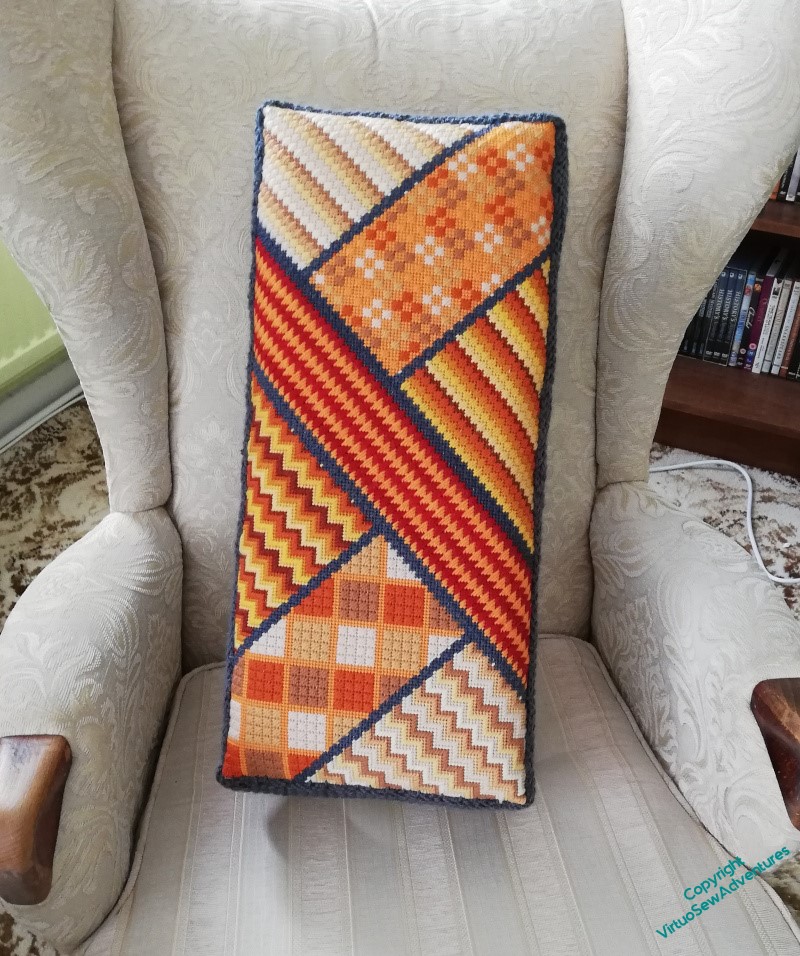
In the end, we picked a Tunisian Crochet stitch, and my Mam solemnly crocheted the necessary metre and a half of border, ten stitches wide, and then attached it.
No canvas showing now, and the knitting wool is such a perfect match you could be forgiven for thinking that we’d been intending this from the start!
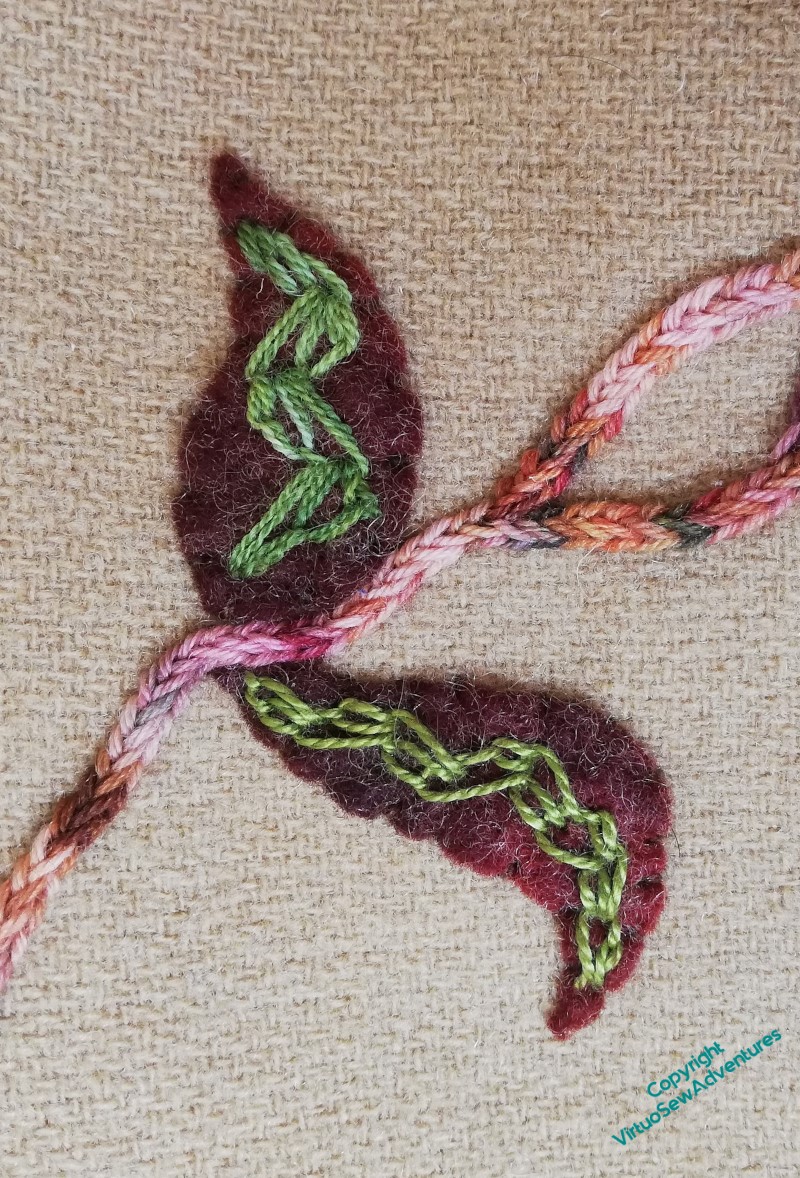
And still more on the Little Jacket
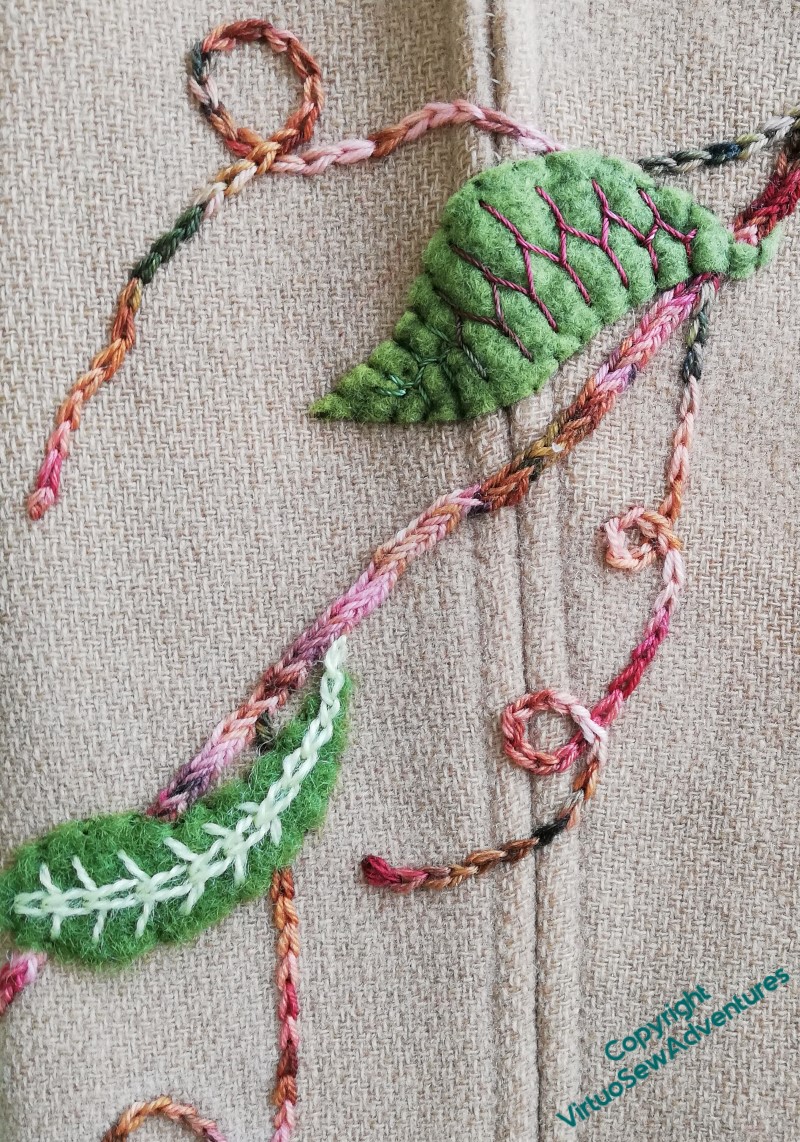
I spent quite some time solemnly Holly Braiding my way all around the jacket, over seams, over itself, even in a couple of cases over the felt. There will also be tendrils in the same yarn, which will pull out the colour variation and reduce the slightly spotty look – which is much less evident in real life, oddly.
The two different stranded silks I used on these leaves help, too, of course. Up and down buttonhole stitch on the top leaf, with the paired uprights worked in a V-shape, and in the lower leaf, closed feather stitch. I do wonder whether a bit more contrast may be needed, but I think that can wait until the whole thing is finished, and I can see what, if anything, wants more help.
The frilly flower (heaven knows what it was intended to be!) provided a good deal of scope, too. The green stitch over the yellow felt came from Edith John – she calls it Tied Cretan Stitch. The yellow stitching is another one of hers, a pattern of feather stitches, but it doesn’t respond well to the curve and looks so unlike the drawing I now can’t find which it is. The inner edge is tied down with coral stitch in an extremely lively rayon yarn that nearly drove me mad, and I’ve reused one of the variegated yarns from the leaf above to help pull things together.
I’m enjoying myself enormously, but I am not always coming up with something you could call a “textbook example”!
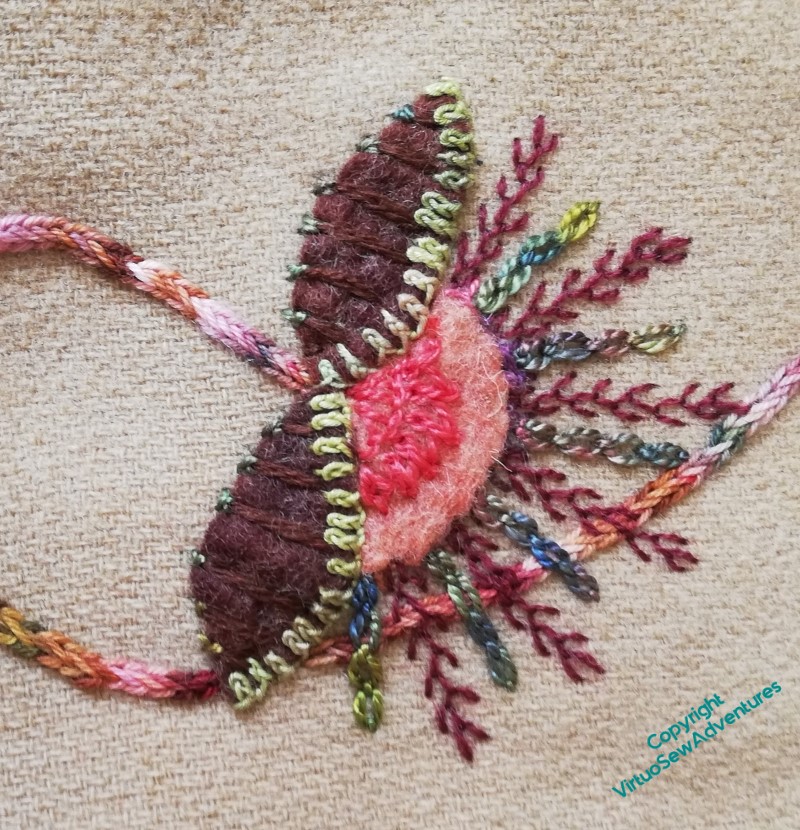
This one shows some of the stitching over stitching that’s been going on as well. I put the stem in first, and then worked the alternating feather stitch and cable chain stitch spikes over the top. I’ve also used rosette chain stitch again. It’s a usefully intricate and intriguing stitch which has some of the practical characteristics of blanket stitch.
Lorgnette Case Finished and Ready
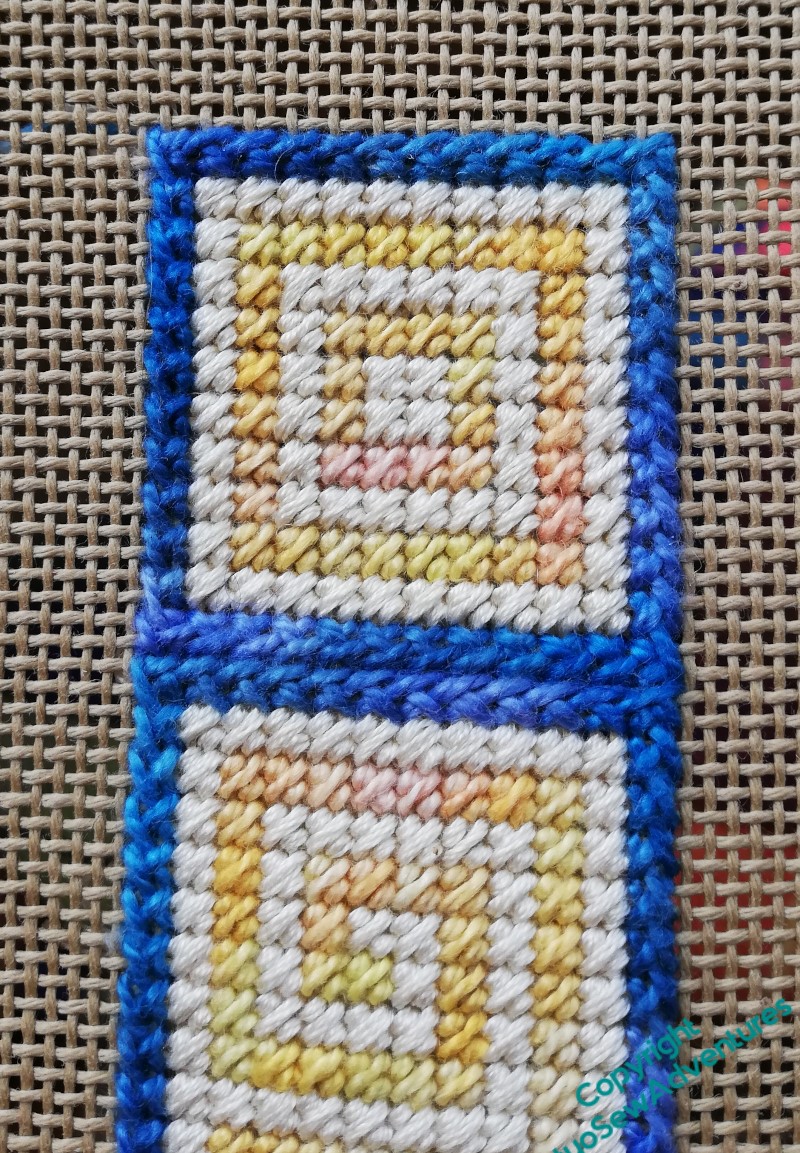
The lorgnette case would have been finished more quickly had I not been using a corner of the same canvas I was doing the Fishy Experiments on!
When I’d bordered the scroll pattern, using a long armed cross stitch, I thought that maybe it wasn’t quite long enough, and added a square section to the top to act as a closing flap.
The next task was to cut it out, turn in the canvas and catch it down, and then line the piece with felt so that the interior doesn’t scratch the lenses of the lorgnettes. This is always rather fiddly, but a very necessary stage. I certainly wouldn’t want to try to add the felt without catching down the canvas separately!
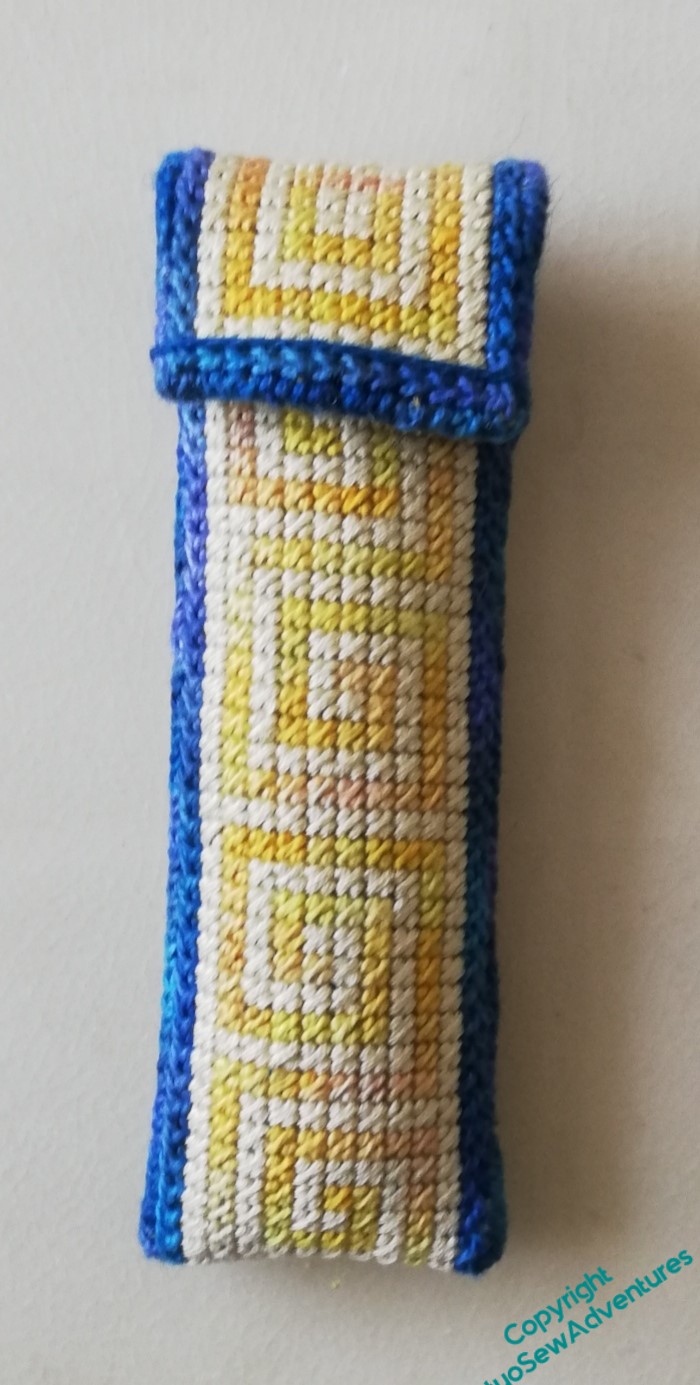
The next thing was to turn the lined strip into the case. I’ve used the same variegated pearl cotton as I used for the border, and in effect, the same stitch. It goes forward two and back one, so the finished stitching creates much better coverage than a straight overcast stitch. It has a slight fishbone pattern, and you can continue on from the joining seam to run around the edge of the flap without even breaking stride, as it were.
Since there’s already colour variation in the yellow and the blue, minimising the textural variation by edging the flap with the same stitch as the case is closed with makes the whole thing pull together nicely.

It only took an afternoon or so to finish the case and install the lorgnettes, so they are now ready for those Happier Times I mentioned, when Museums and Menus are a regular part of life once more.
I should add that while I was at university, I was the girl who wore white gloves with her summer frocks. None of my friends will be at all surprised to find me wielding a pair of lorgnettes – in fact, if at least one of them doesn’t ask me what took so long, I will be rather surprised!
And now, the final (for now) episode of Slow TV Stitchery, Episode 73, in which the slips are at last applied, and Tynemouth Priory is Finished.
More progress on the Little Jacket
I decided that I was going to work all the major stems in one of the Braid Stitches, so I spent quite a bit of time revisiting Plaited Braid Stitch, the ordinary Braid Stitch, and others. For a while that was a little painful.
First of all, I was reminded that these stitches don’t stay in your hands the way (say) Feather Stitch does, and then secondly I was reminded that they are very thread-hungry. It’s (almost) all on the front, where you get the benefit of it, but metres get swallowed up in short order. And I knew there would be metres of whatever-stitch-I-chose. My stash doesn’t run to that sort of length, but having performed a few experiments, I realised that sock yarn would be perfectly useable, given the fabric I’m working on.
I finally chose to work Holly Braid Stitch, which I experimented with in 2014 when I was working on the Glittering Nightcap. I’d found it in Jacqui Carey’s book “Elizabethan Stitches”, and after some struggles it had worked pretty well. This time I tied myself in so many knots with it that I asked for help in the Historic Hand Embroidery group on fb, only to find that very few people had attempted it. However, those who did were very helpful, and several very intrigued people asked me could I video it if I got it to work…
So I have. What you see here is probably not enough to learn the stitch from without also following Jacqui’s diagrams and instructions, but I think it helps with the “workflow” of the stitch, which is not well represented in those diagrams, I suspect purely because, as a braidmaker, she thinks differently about the way a stitch works.
Once I had the stitch down pat, I bought a rather gorgeous sock yarn (Woodland Fire from The Yarn Gallery), and whenever I wasn’t sure about the details I wanted to add to a flower or leaf, I just kept on with the stems..
And on. And on!
And now, Episode 72 of Slow TV Stitchery is now live, in which we encounter difficulties in working a pattern backwards, experiment with French Knots, and recall “Leaving the Tyne”.
Watermill Stitchery – Stones of Verrucola
I’m continuing to explore ideas for the course at The Watermill in Posara, and this one is inspired by the first outing of the painting course I went on. Verrucola is a medieval village and fortress not far from Fivizzano, with a deep stream valley, some very impressive buildings – and a delightful trattoria just inside the walls.
I want to explore the different ways an embroiderer might choose to explore the textures of stone that a site like this afford – the living rock of the hillside, cut stone used for building, and the shaped and smoothed stone used for architectural features.
You can see in the first picture that I have just “drawn in” the street beyond the gate with back stitch and used darning stitch to suggest the shadow beneath the arch.
I’m using padded satin stitch for the cut and smoothed stone of the arch, but since I find that an exasperating stitch, I’ve alternated working on the arch with the tiles which cap the wall which is pierced by the arch.
I found buttonholed herringbone stitch in one of Sharon Boggan’s books, but as you can see, my first attempt didn’t really produce the effect of the curved roof tiles that are so much part of the scenery in Tuscany. The linen herringbone stitch is too stretched out, and the two strands of stranded cotton just look straggly.
I am going to have to emphasise experimentation in the course, aren’t I!
This version is much better – the shorter, higher herringbone stitch, just peering through at the base of the arches, three or even four strands of stranded cotton for the buttonhole stitch, and the stacked stitches create a good recollection of the tiled roofs I saw. I’m pleased with the way the variegation suggests the weathering on the tiles.
You will see that I have added a Page to the site which will make it easier to find and download details of the course if you are interested.
And also, Episode 71 of SlowTV Stitchery is now live, in which I experiment with the shore, and talk of plans for overland travel for Times To Come..