
Category: General Embroidery
A Source of Inspiration (1)
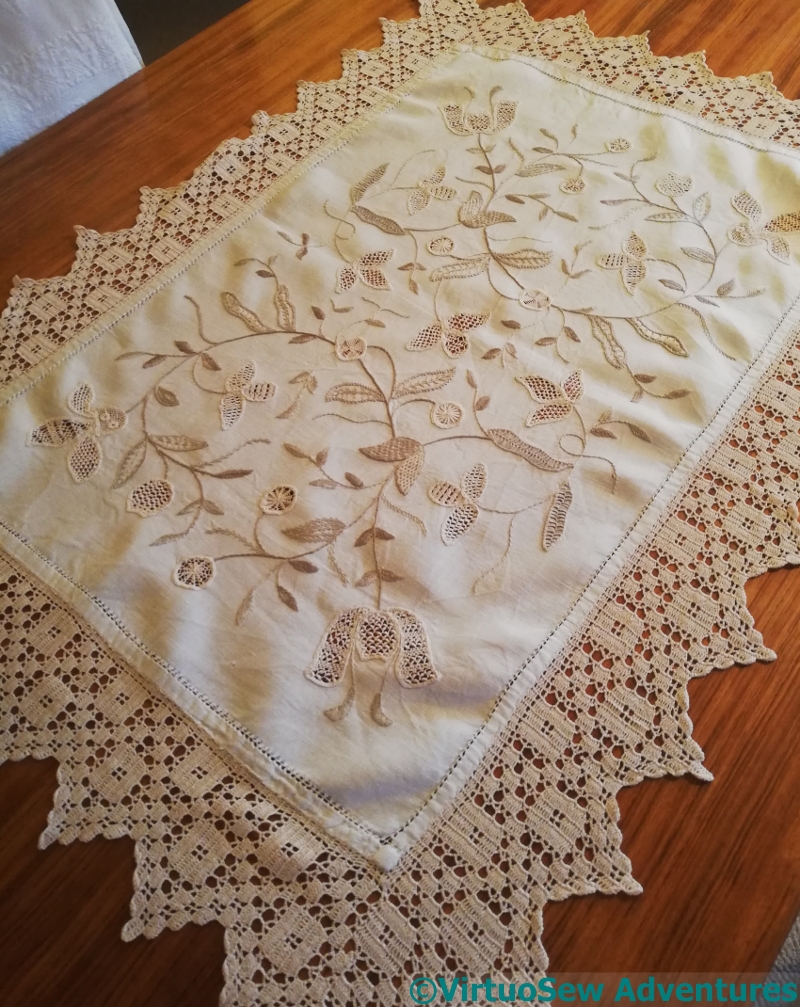
You might recognise some of the motifs on this teacloth..
Grandmama worked it, we think during the War, and it involves some motifs I used for the Coat of Many Colours.
In fact, even if I don’t use the exact motif, this teacloth, and a tablecloth (a sort of extended Director’s Cut!) are frequently the first places I look for inspiration when I am trying to put together a design for something stylised but floral. I suspect Grandmama would be laughing like a drain, as the family puts it, at the mere idea of being an inspiration all these years later!
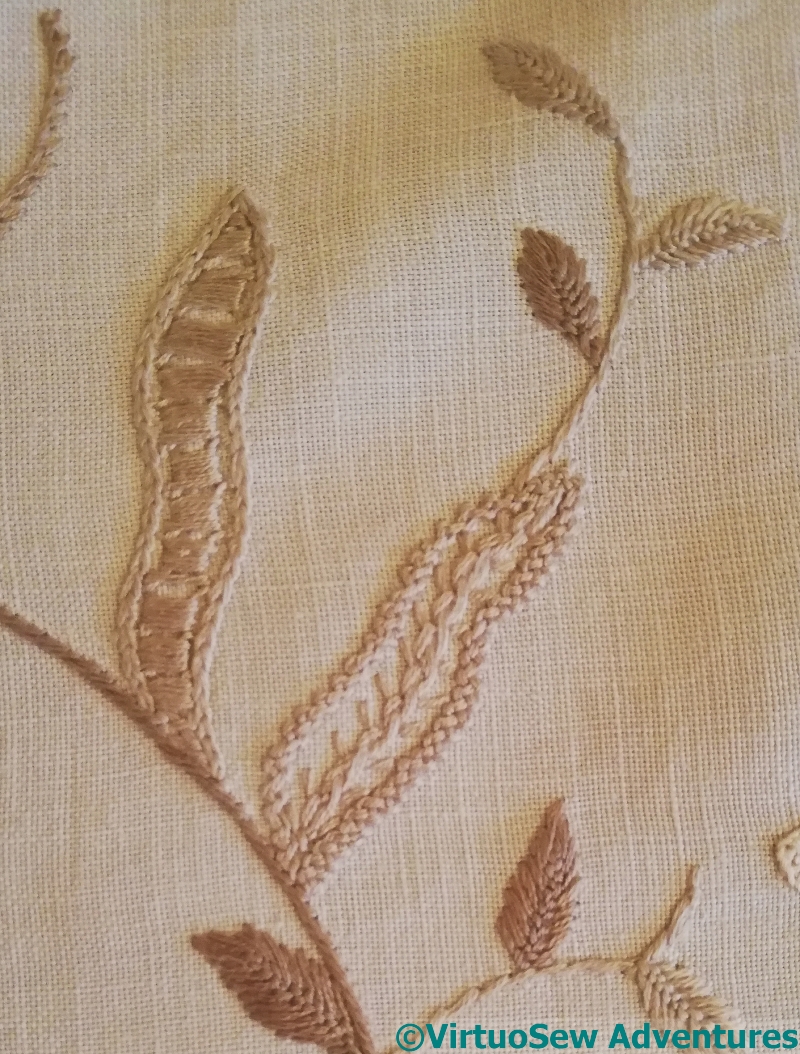
I’ve also learned an even greater respect for textile and embroidery historians, examining and cataloguing design and stitch use over the years. It’s all too easy to assume, complacently, that one’s first assessment of a stitch was correct, and I learnt when I looked at this photo that I was definitely wrong about the second of these two leaves. It might be Wheatear, but I suspect I will have to look at the back to be sure.
And I’m far from convinced that Grandmama didn’t simply make up the other one as she went along. It’s a whipped or wrapped Something, but it looks like a more complex composite stitch to me…
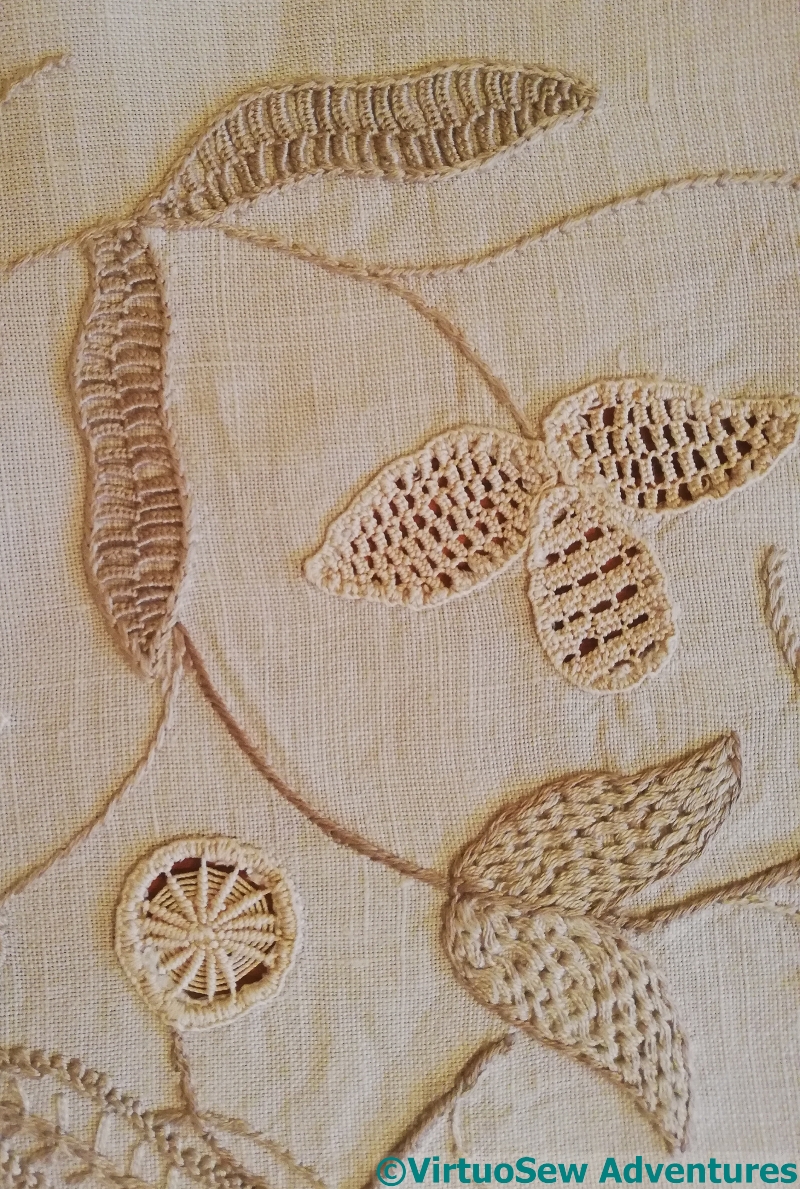
Whipped Spiders Web Wheel as a needlelace stitch, a sort of floral motif of needlelace, and a pair of leaves in the top left that I thought for a moment should have been cut away. However, looking more closely (aren’t smartphone cameras really useful on occasion!), I see that the edging isn’t buttonhole, but chain, so, no.
And that pair of leaves in the bottom left? They’ve been puzzling me for a while. The stitch looks a little as though it’s a whipped or wrapped stitch. Maybe stem stitch worked over foundation stitches?
More on the Robin’s Backing
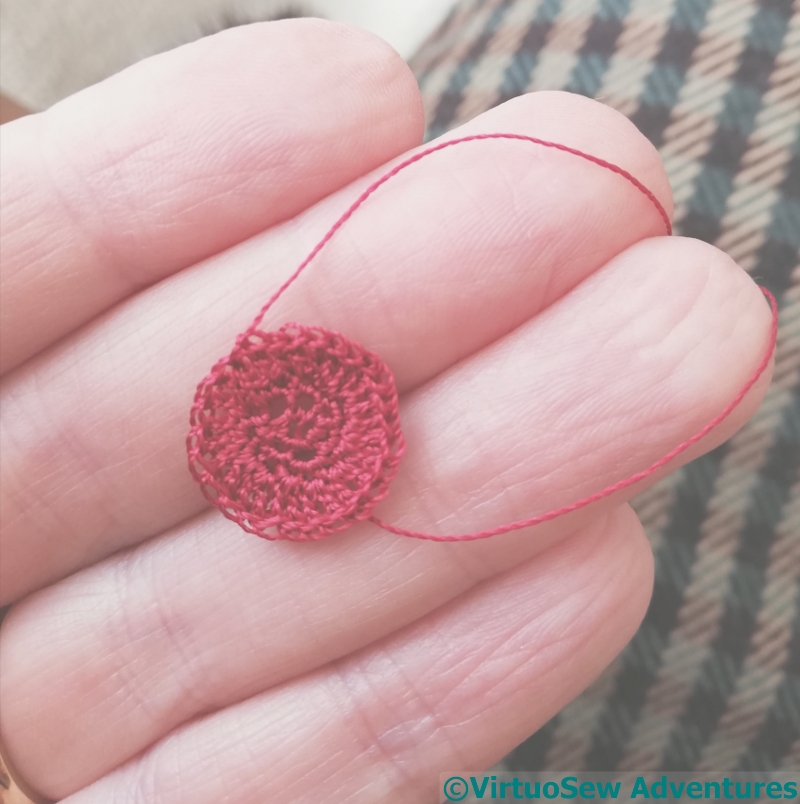
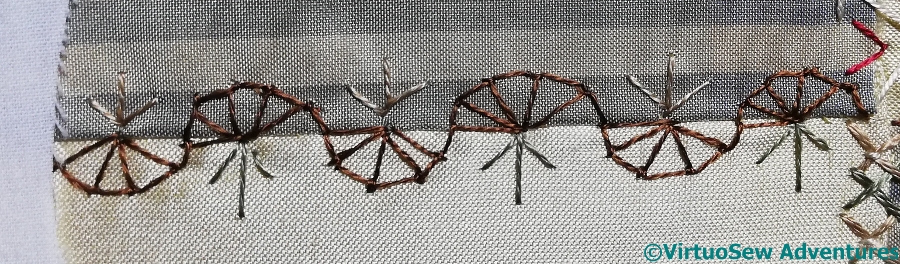
The point at which the four seam treatments joined looked a little untidy, so I decided to cover it with Something.
After some thought, and given that I don’t have a box of ready-to-go trims and buttons for the purpose, that Something turned out to be a disc crocheted using Soie Gobelins, a fine steel hook, and my magnifier.
I felt a little cross-eyed when I’d finished, in spite of the magnifier, but satisfied with it, all the same!
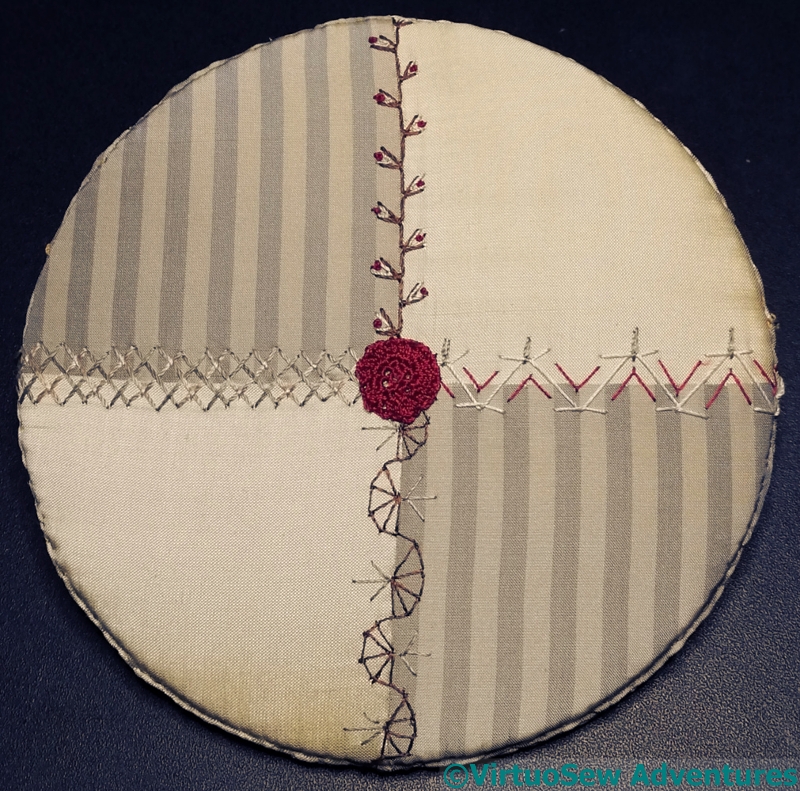
Then I only had to attach my little disc over the centre point to camouflage the meeting point of the seam treatments.
Once the Tame Crazy Patchwork was completed, I gathered it over the padded disc of card that matches the one the Robin was stretched over, and ladderstitched the two discs firmly together.
Using silk sewing thread. My, how my attitudes have changed since I’ve done all those Historical Embroidery projects!
I need to provide a hanging loop and cover the edge with cord, and then the Robin will be properly finished at last!
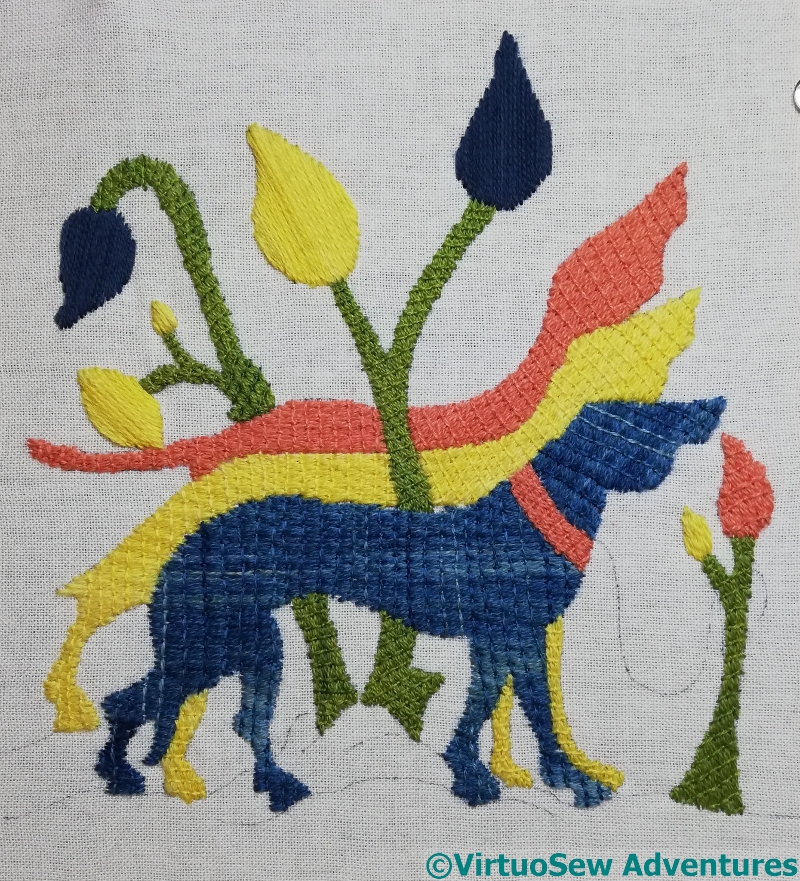
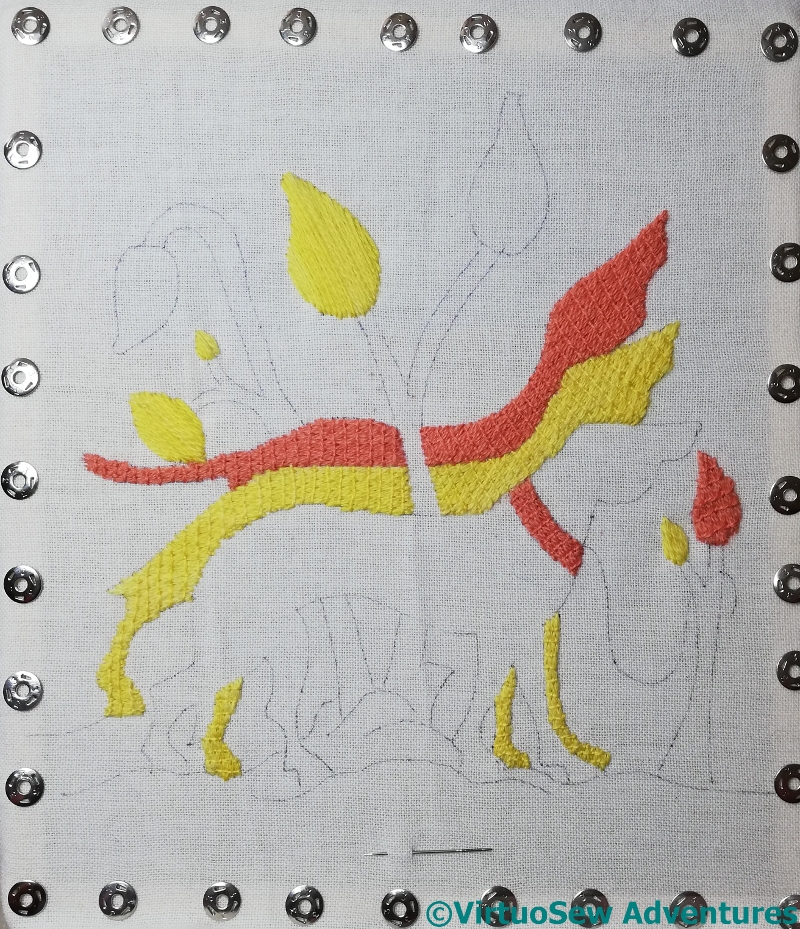
Finishing the Hounds
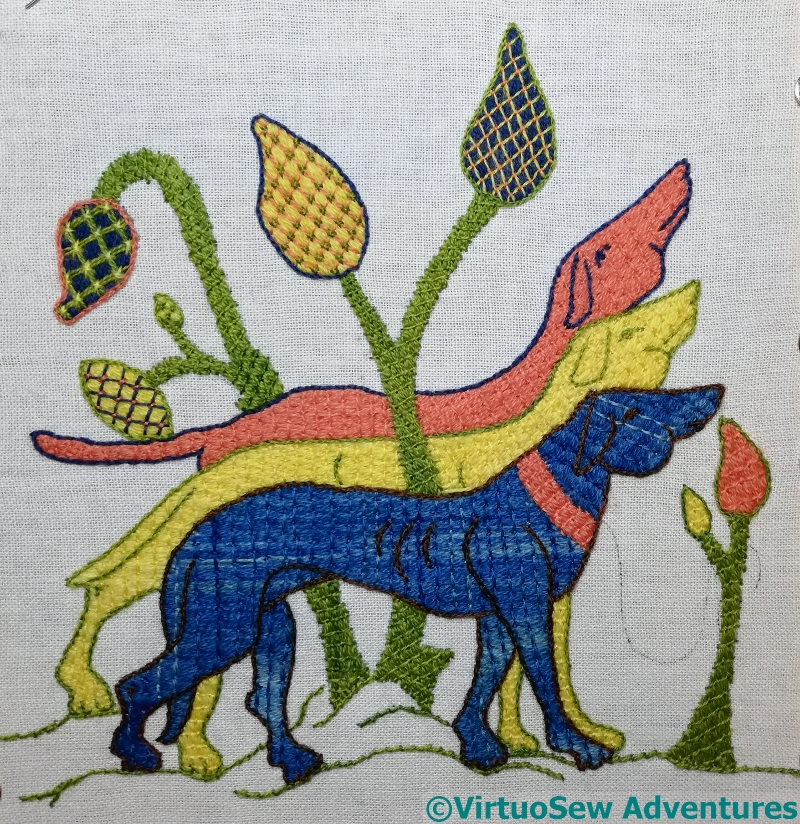
The next task was to work the outlines and the ground.
Each hound is outlined in a contrasting colour, as is each leaf shape.
The outline colour is also used for the little details – mouth, eyes, ears, and at the point at which I took this photo, I’d stitched all the ground (in twisted chain, which I don’t think is at all historically accurate, but it was fun!) but not yet outlined the tree trunks.
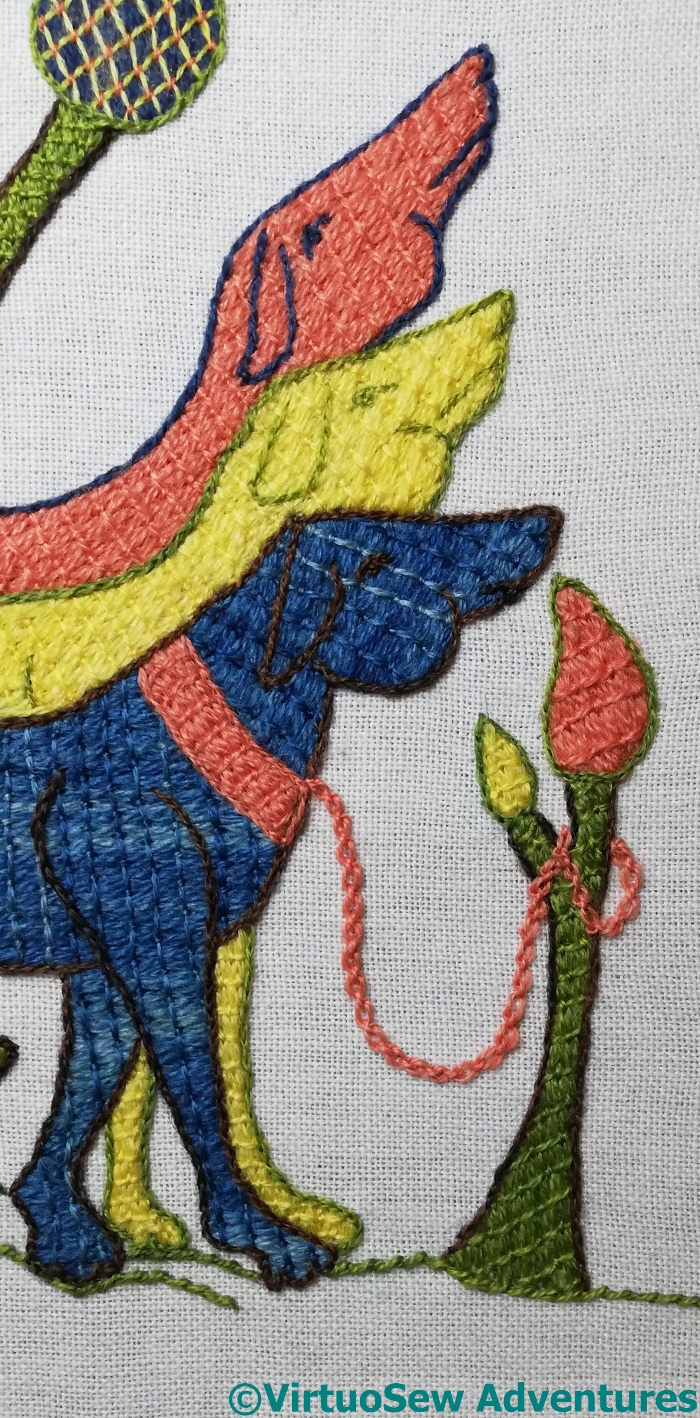
This photo gives a sense of the effect of the chocolate brown outlines around the green trunks, and affords you a nice close up of the leash on the front hound, worked in cable chain stitch, very small and neat. This is another one where I doubt the historical accuracy, but I was so pleased to find myself thinking up ideas like that I was in no mood to spoil the fun.
I don’t usually go in for such overheated ideas as New Year Resolutions, working on the principle that if I want to change something, I don’t hang around waiting for the new year to do so. However, stitching the hounds has given me something a bit like one – I need to go back to my first love, to the effects of stitch and thread, and the use of them to denote the textures or the ideas I want to convey. Let’s see how that pans out!
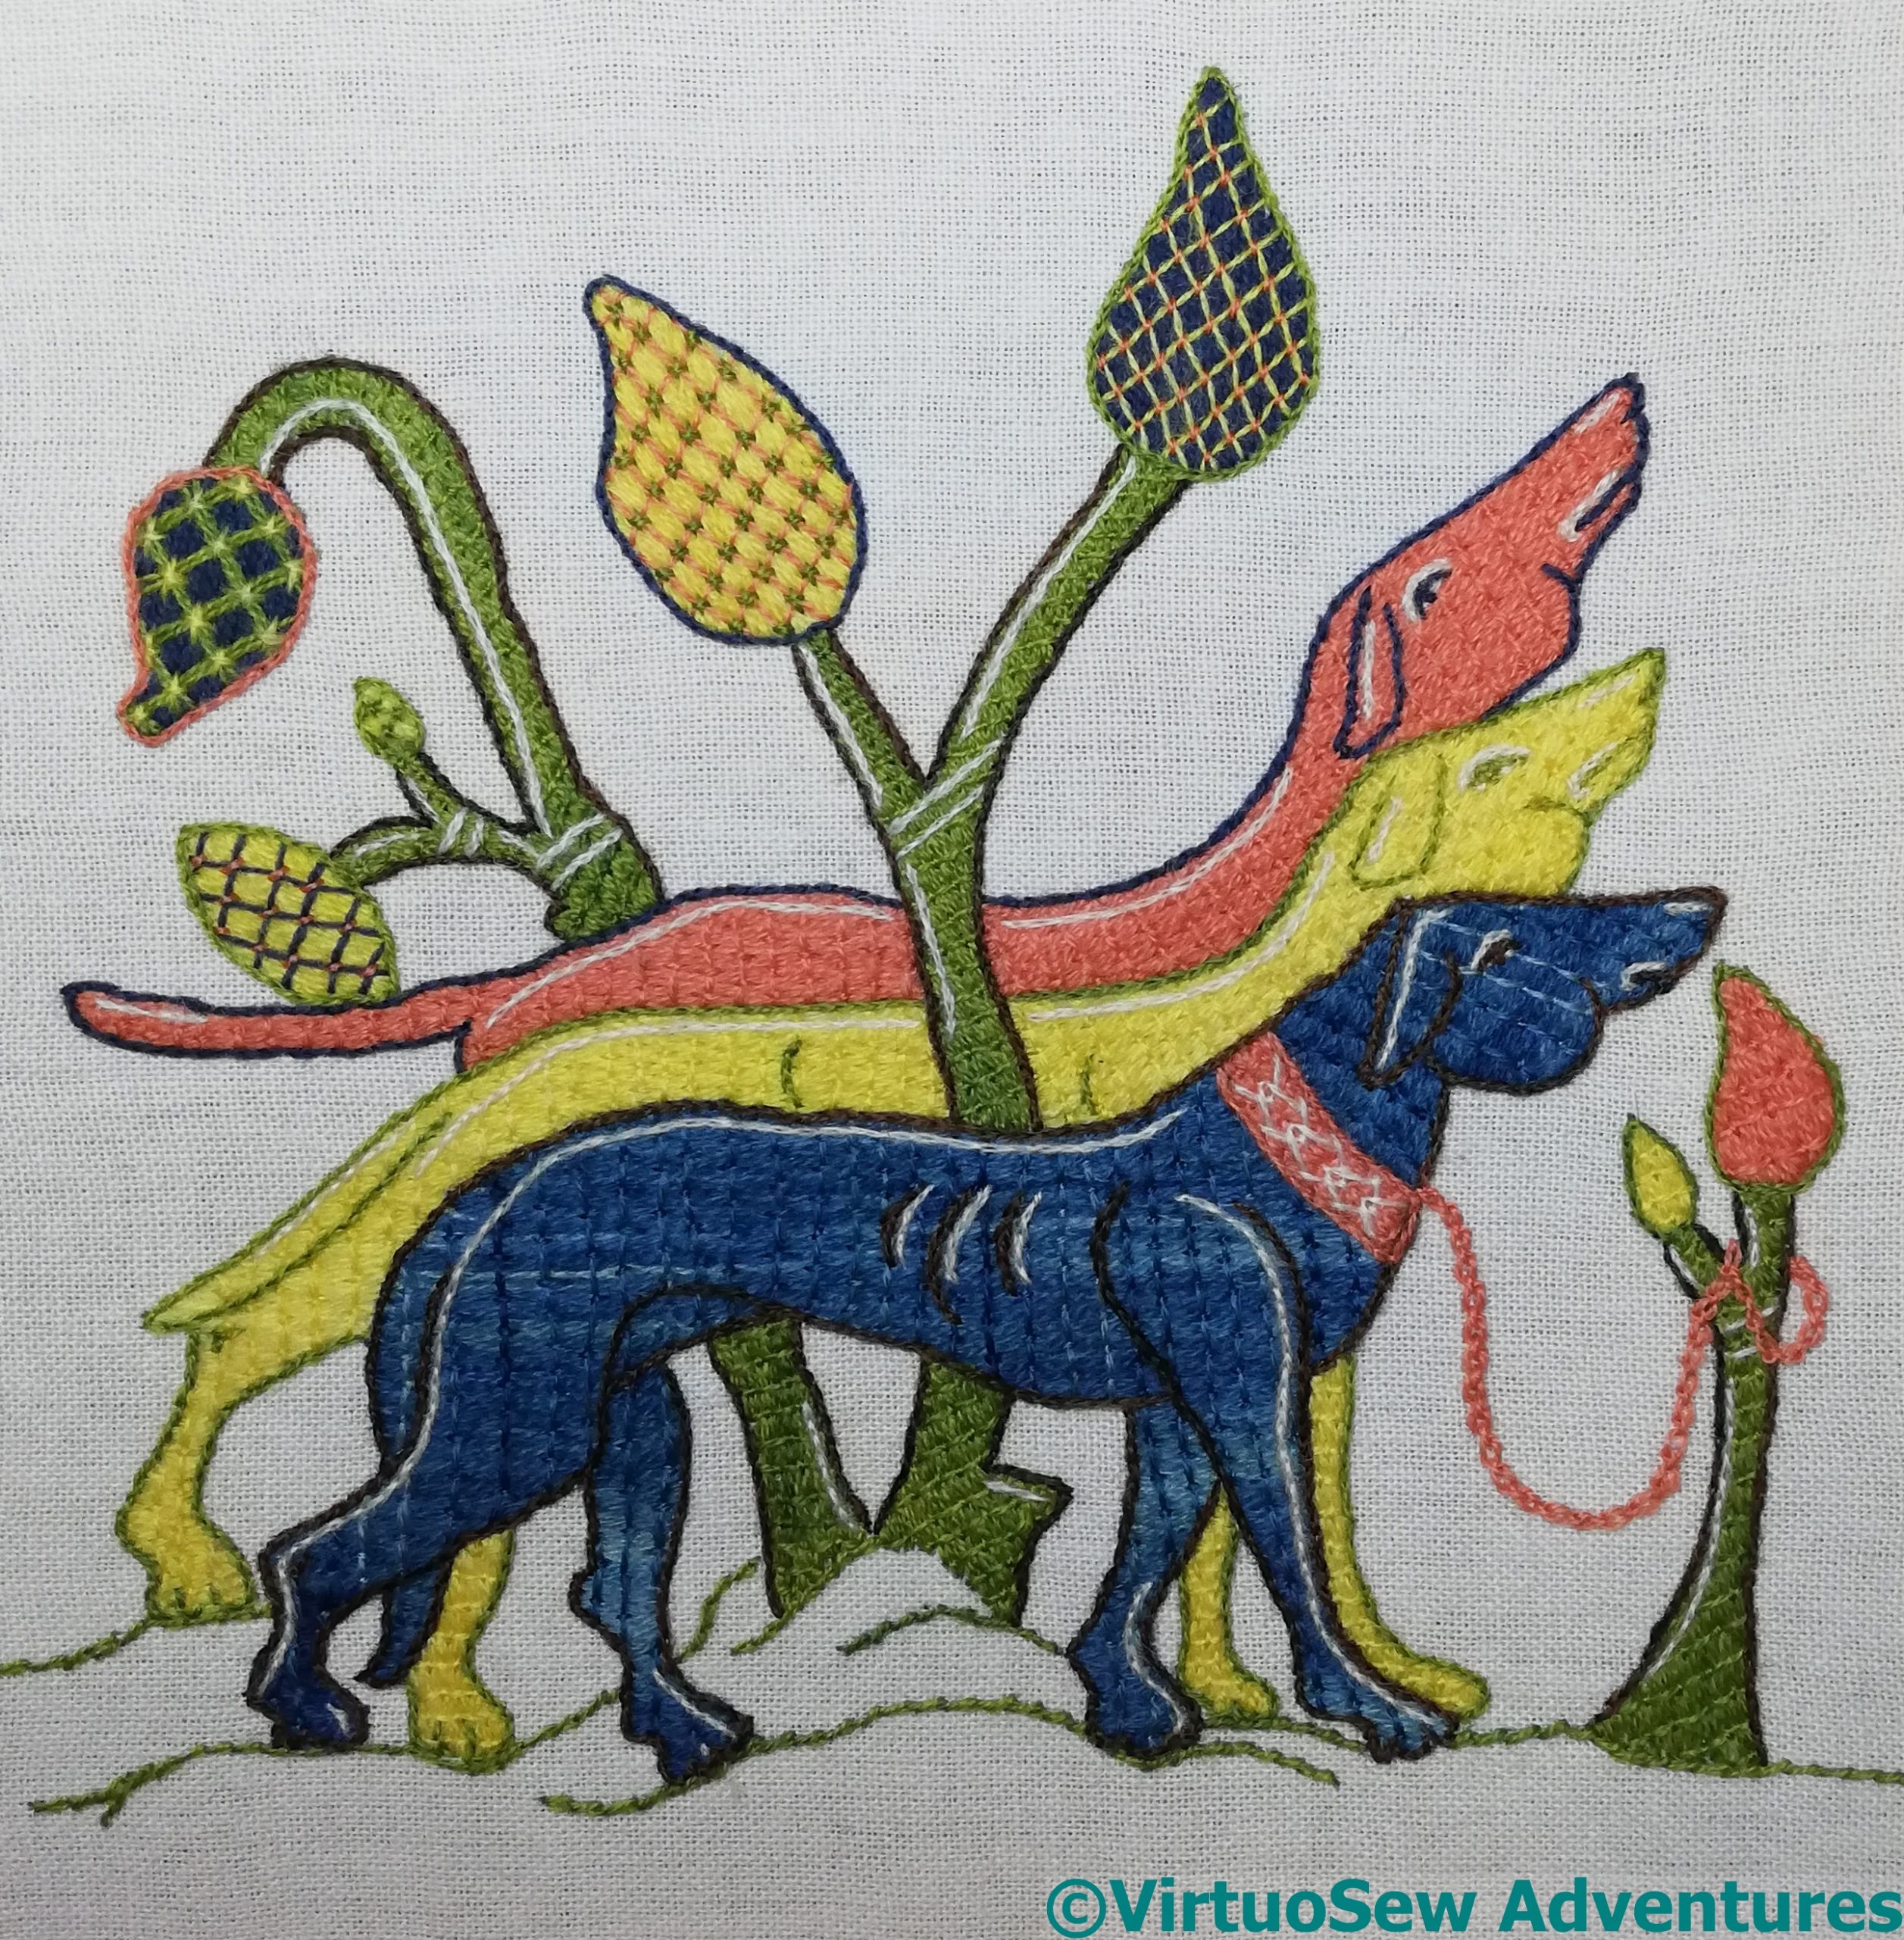
I give you The Three Wise Hounds, design by Tanya Bentham, stitched by me. I didn’t quite finished them by Twelfth Night, but since Epiphanytide lasts until Candlemas, on the second of February, I think I can get away with it!
Stitching The Hounds
One of the delights of Laid and Couched work is the slight sense of a return to childhood, but with added skills, as it were. The first layer consists of the threads laid and couched (hence the name), and is rather like “colouring in”: it produces a layer of flat colour, which will be tweaked and detailed later.
Or in this case, not quite flat colour. The thread Tanya includes is wool that she has dyed herself using natural dyes, and there are unevennesses in the colour that only adds to the charm. As you can see from the two large blue leaf-shapes. I was a bit over-determined to pack in the stitches on the frontmost hound and didn’t have thread leftover for the leaves. This being a holiday project, I went rootling in my stash for an indigo wool, and they only one I have is both much darker, and a different structure. But that will matter less when the details are added, so onwards!
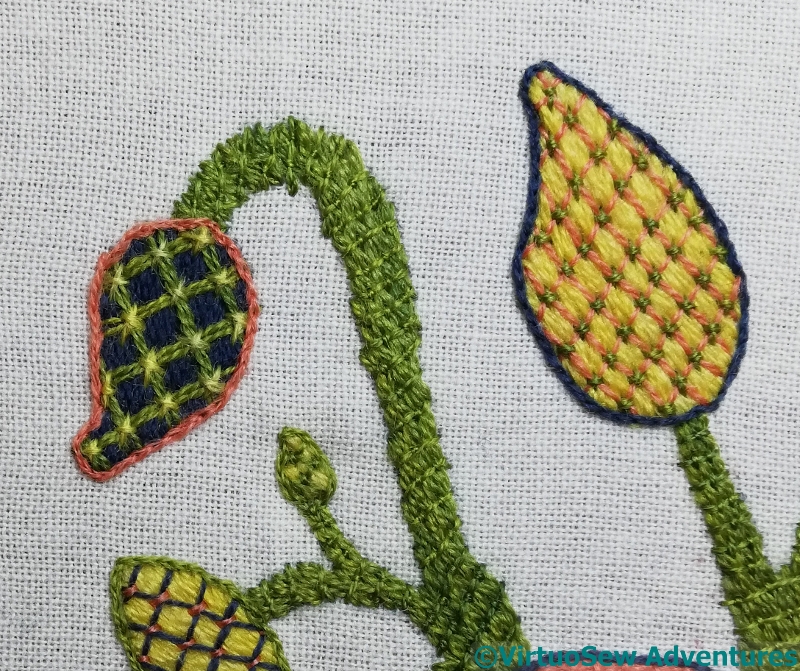
Each leaf-shape used the other colours in a different way – as grid, as outline, as couching stitch. The outlines are in split stitch, and each of the grids is couched slightly differently, with a horizontal stitch, a vertical stitch, and upright cross or a diagonal cross.
In addition, I experimented with grid spacing for the blue one shown here. I like this variation, even if it does produce a rather loud plaid effect!
I was quite glad to find the variations slipping in. They might be a sign that I’m recovering from Akhenaten!
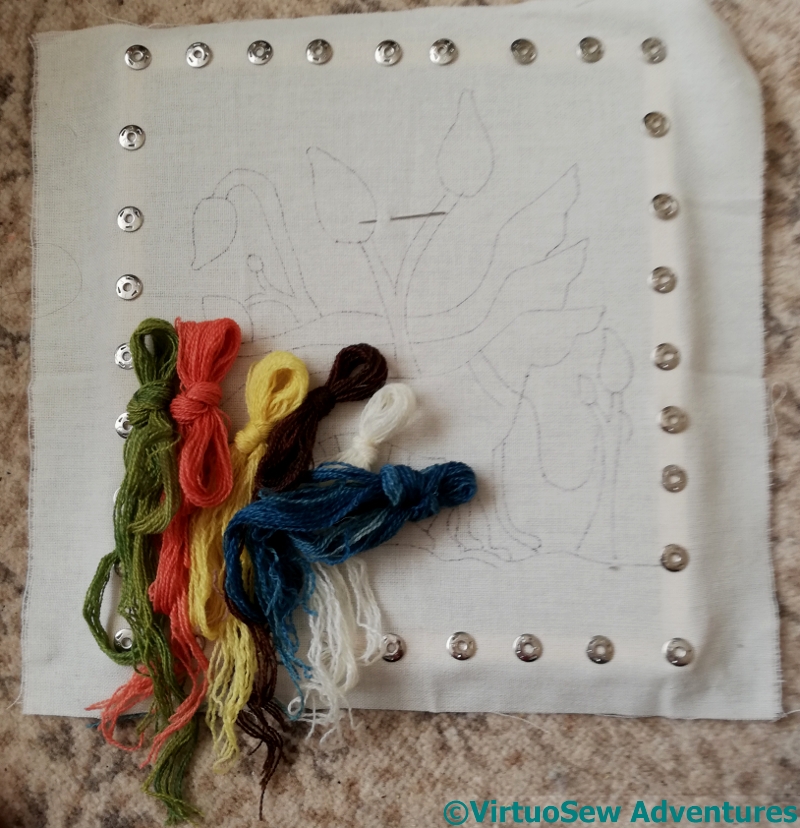
Starting The Hounds
Finishing Akhenaten this year has left me rather wiped out. It’s not helped by the fact that he needs to be got off the frame and mounted somehow and that is proving Not Entirely Trivial, as The Australian would say, so I’ve been getting a 1000-watt glare every time I enter the room.
So I thought I would tackle something smaller and friendlier over the holidays, something that would help me gather my thoughts, and give me a change of scale and emphasis. Tanya’s gorgeous laid and couched work hounds seemed just the thing. I lost my heart to them months ago, when Tanya first showed them, but Akhenaten was such a dog-in-the-manger that I didn’t buy a kit.
However, by the time I went to Harrogate, he was finished, so I decided he didn’t have a vote any more, and indulged myself. After metal threads and silk, wool is a lovely change, and the medieval habit of using the direction for the lower layer that makes for the longest stitch on the surface means that each section is slightly different, and stops me worrying about what I’m trying to represent. Which is also a lovely change.
I’ve decided that they are called Caspar, Melchior, and Balthazar, in honour of the season in which I am stitching them.
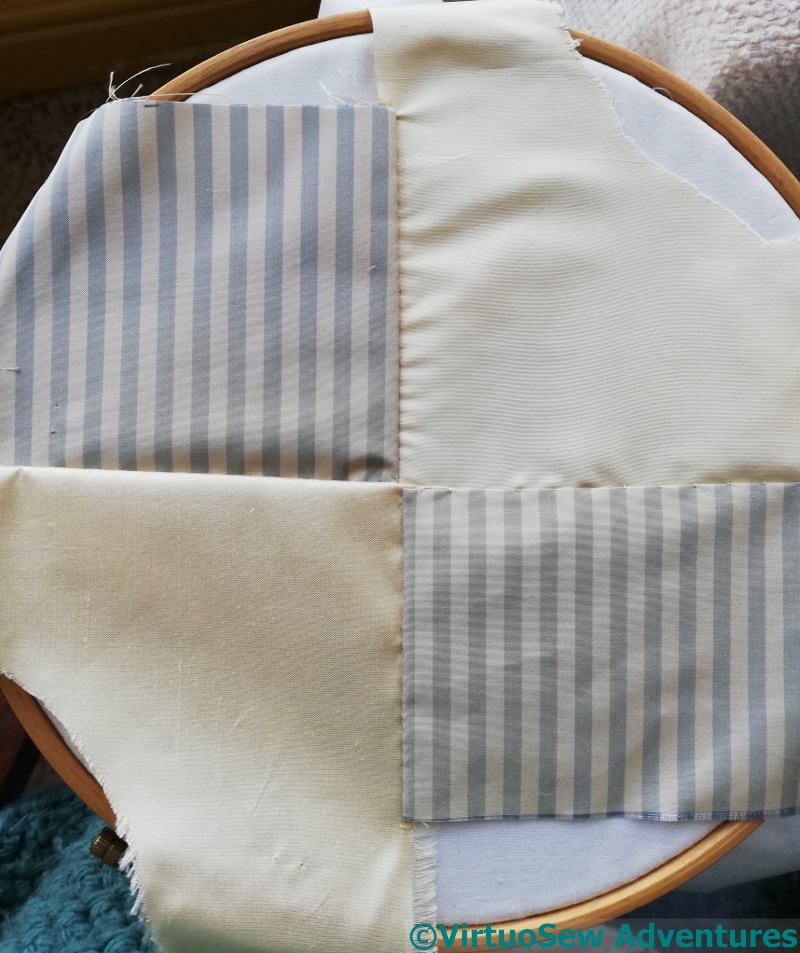
A backing for the Robin (in progress!)
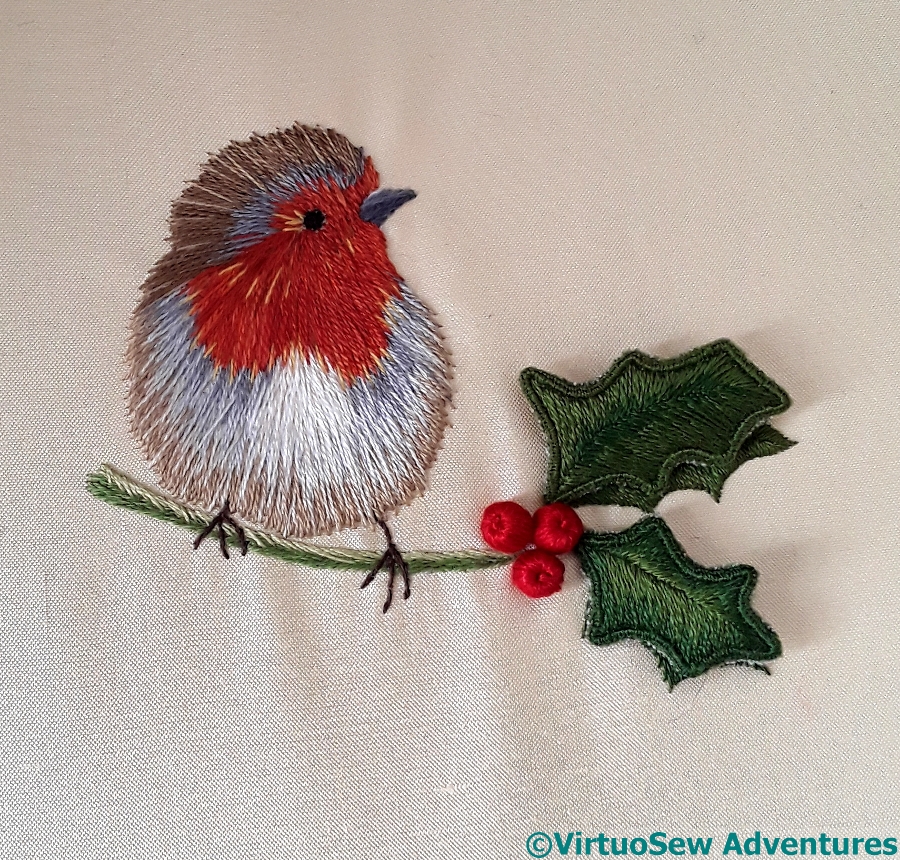
You may vaguely recall the little robin with stumpwork holly that I worked a couple of years ago. I mounted him on a circle of card and then didn’t make any more progress..
But I have now!
I’m using leftover fragments of silk from various Thistle Threads courses to do a rather tame crazy patchwork circle to cover the padding for the back, and then he can hang or be propped in a corner somewhere, looking cheery. I’ve settled on a simple quadrant arrangement, so I have four seams to deal with.
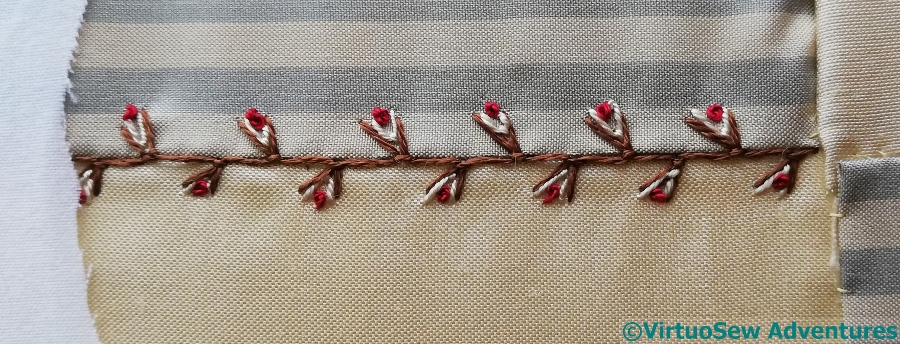
I said, when I found “Floral Feather Stitch” that I’d be using it again, and here it is, tweaked and embellished with a Fly stitch and a French Knot to emphasize the “floral” element. I really like this stitch – a simple, but extremely effective variation. Or maybe a stitcher’s “mash-up”!
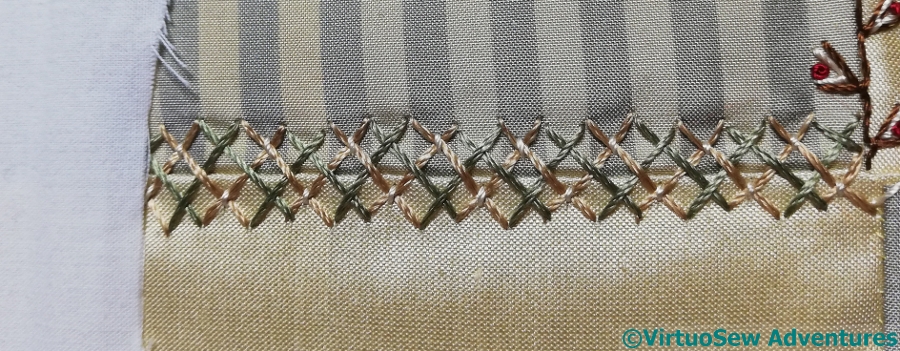
The second uses Interlaced Herringbone Stitch, with the second pass interwoven with the first and then tied down with short straight stitches. This one is maybe a little monolithic, but the first one is so simple, I didn’t want to unbalance the appearance with anything broader.
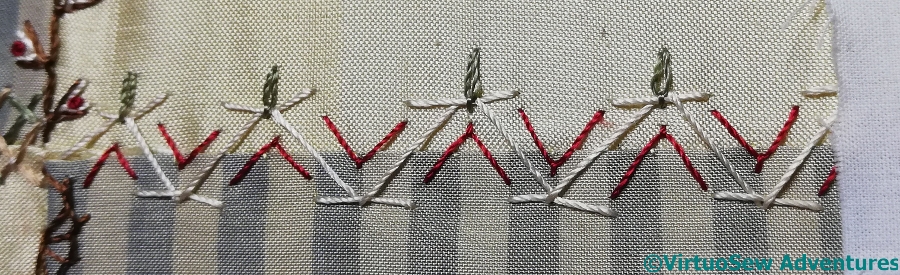
The third is Chevron Stitch, embellished with alternating Fly Stitches and Detached Chain Stitches on the “top” edge. This one went a little ragged, but I still think it works.
The final one has alternating Half Buttonhole Wheels with Straight Stitches filling the gaps. Again, this could have been expanded and extended, but I thought there was quite enough for the purpose!
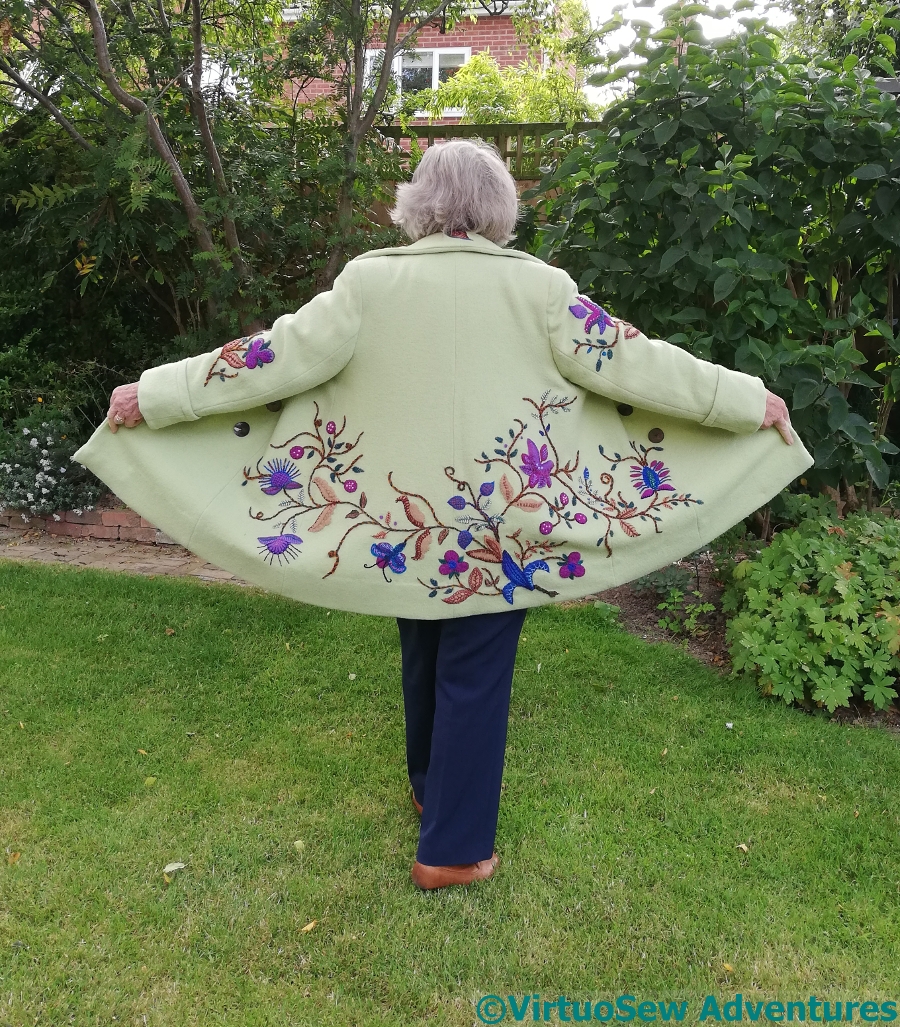
Finished, made up and being worn!
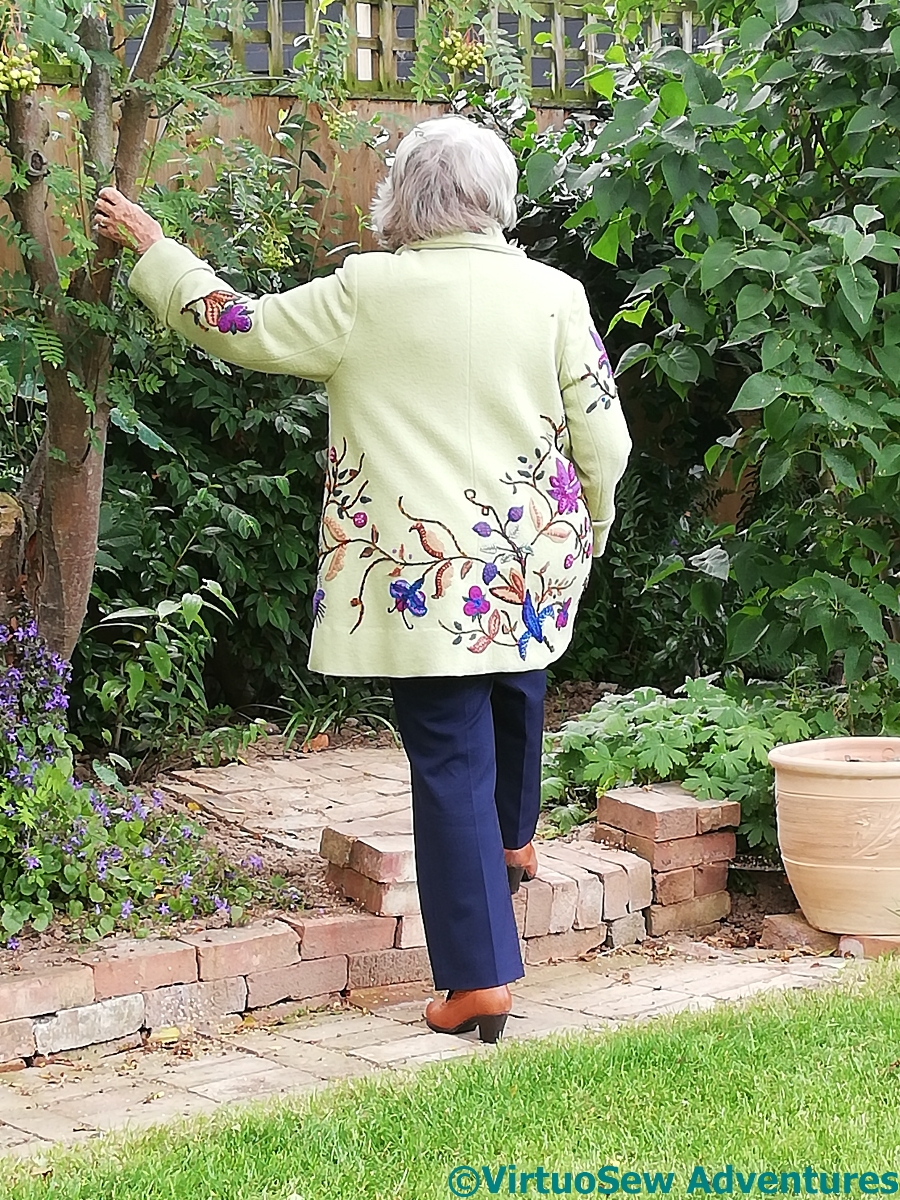
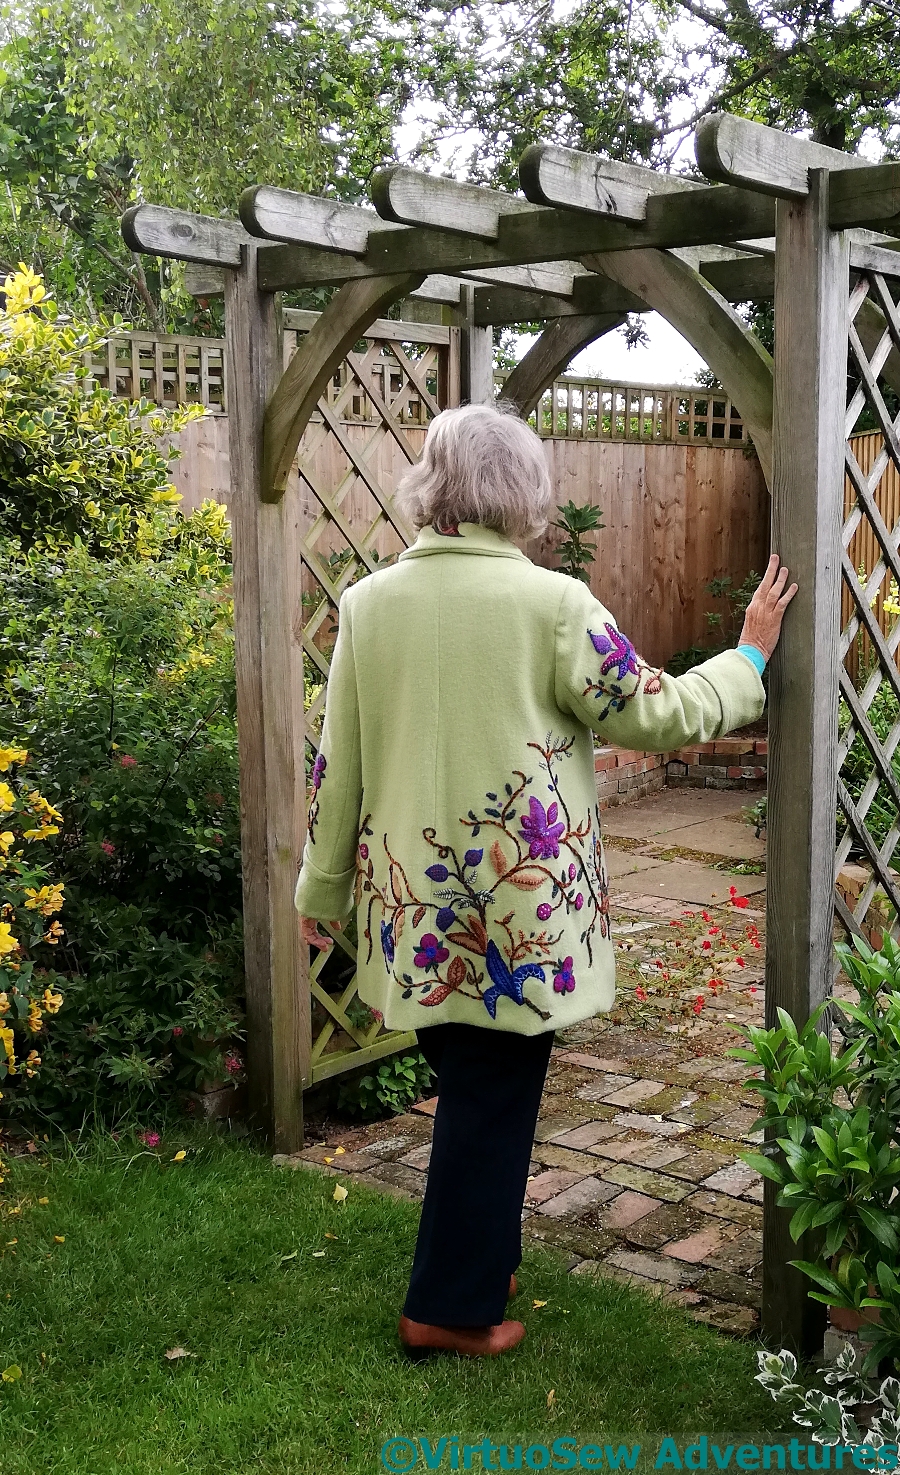
There’s not much to say here, except that the Jacobean Coat has been re-christened The Coat of Many Flowers (thanks to Sue at Tortoise Loft for the inspiration!), and is a great success.
It’s double-breasted, slightly shorter than three-quarter length, and lined with a nice figured satin to slide over woolly jumpers if necessary.
And if it doesn’t stop the traffic when Mam next strolls into town, I shall be vastly surprised!
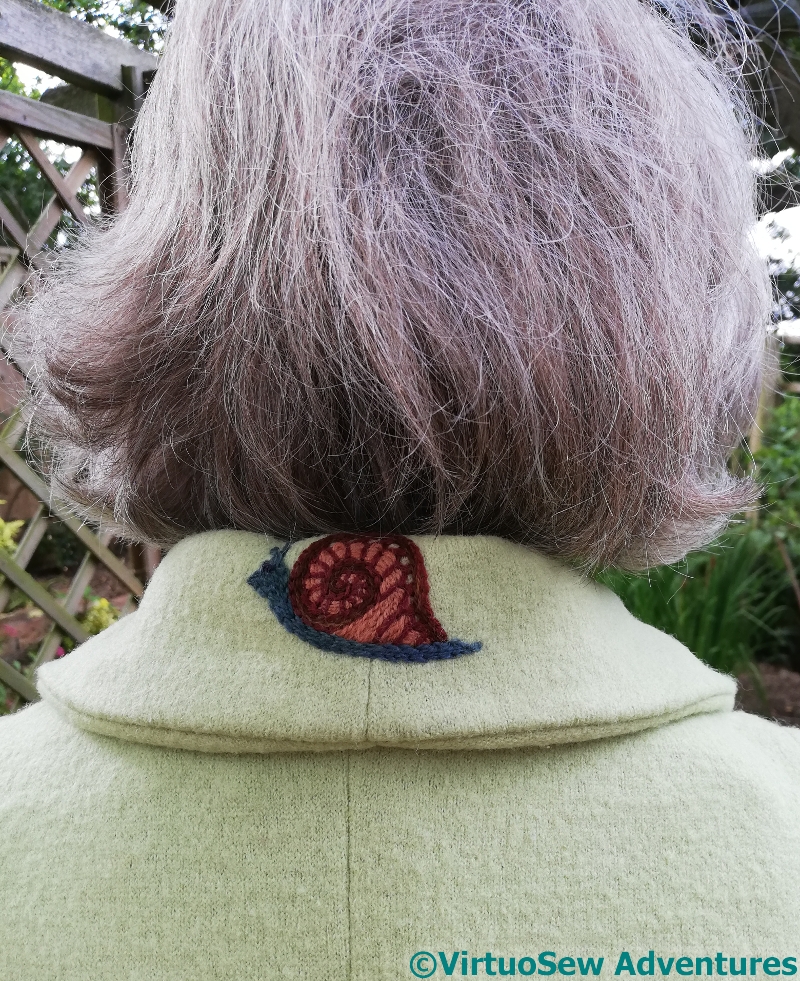
The Jacobean Coat – Collar design

Just when I thought I had no more to do, suddenly my mother asked, would I add a something-or-other to the back of the coat collar.
We thought about it, and decided that since I’m going to do a Morse Code signature that looks like a caterpillar, and there’s already a butterfly, I could maybe add a snail…
The tacks top and bottom show where the seam allowances and turn of the collar leave space for Something. I drew a snail on a bit of tracing paper (loosely based on the one on the Jacobean Firescreen), and tacked on the outline.
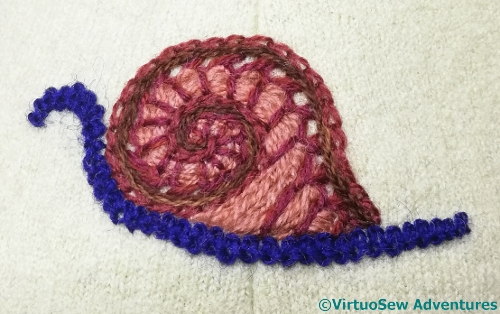
The shell itself came together easily, two rows of reverse chain stitch, then a row of half-cretan stitch which was then threaded with wool to create a slightly raised effect.
Inspiration briefly halted when I came to the critter himself. I tried several shades from among the ones on the coat, and two or three different stitches, and was underwhelmed by all of them.
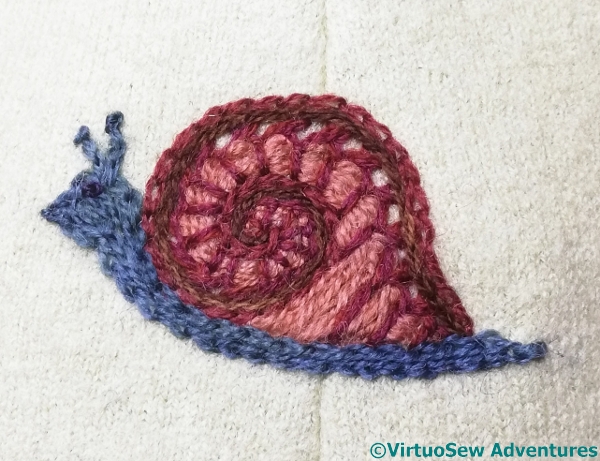
Finally, I picked the right colour (a middling shade of teal) and the right stitch (chain), and he came together beautifully.
Two tiny antennae, a French knot for an eye, and hey presto, one cute little snail to add the final embellishment to the coat.
Now it’s over to my Mam to sew the whole thing together…
Jacobean Coat – central section
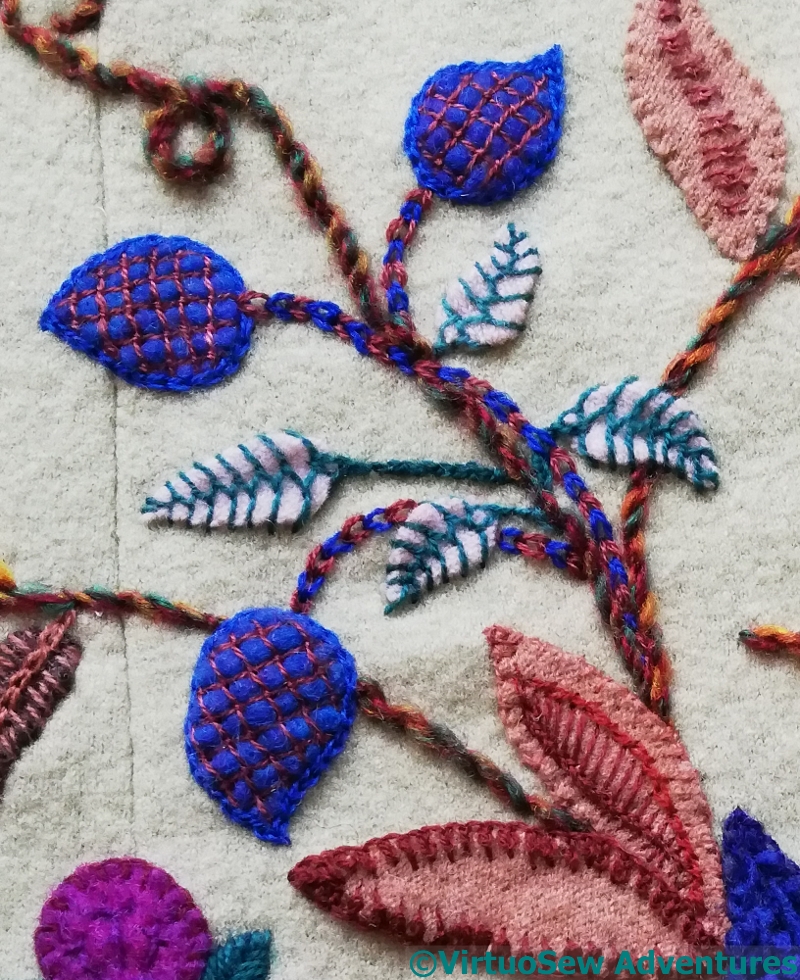
This central spray is just above the blue leaves.
The blue buds are outlined in Chain Stitch and decorated with Trellis Couching, and then, in a final bit of frivolity, the stems uses Magic Chain Stitch. I’ve often wanted to use it, and never really had the space before. Achievement, unlocked!
The cream leaves (from some felted gloves!) are couched with Open Cretan Stitch, and the stem – where there is one – is in Portuguese Knotted Stem Stitch.
You can also see the final version of the two leaves at the bottom, which are just above the blue ones. I’m not quite sure what stitches I used in the end, because I was beginning to create odd little mash-ups of my own!
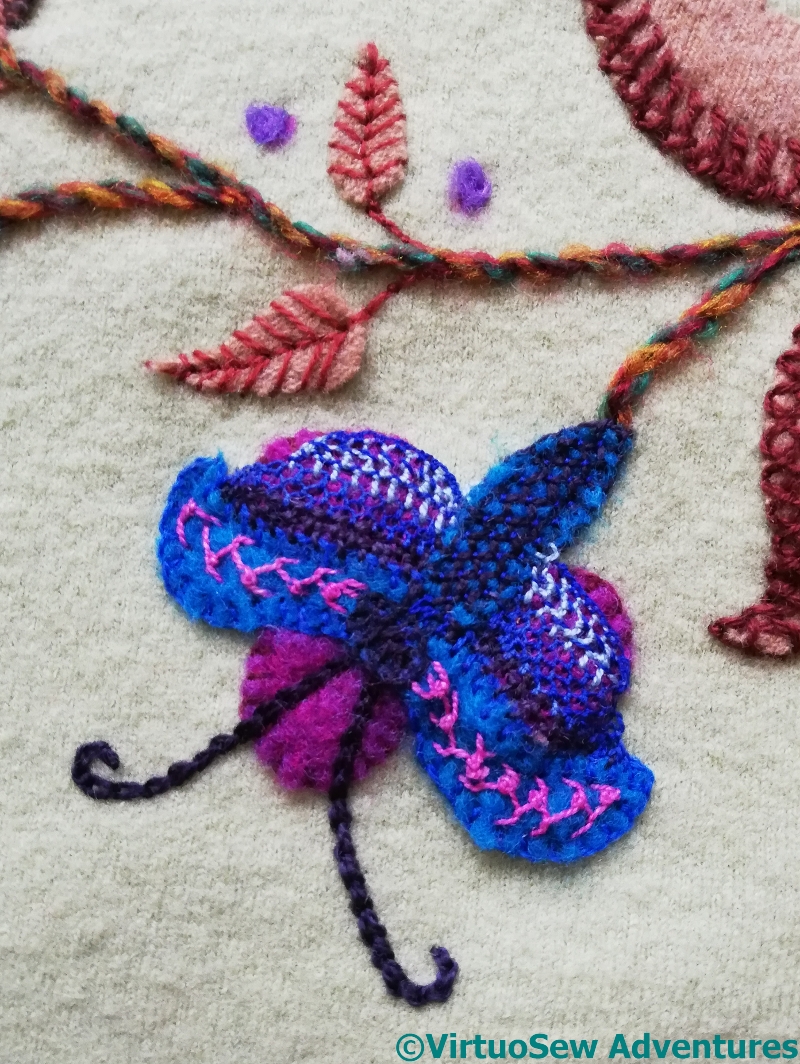
We’ve assumed that the odd element on Grandmama’s embroidery is a butterfly perching on a flower, so that’s what I’ve made it into here, tweaking and altering the pattern as I worked.
The upper wings, in felt, are ornamented with one of the knotted feather stitch variations – I think, Mountmellick Stitch – but then, I simply started to play with needlelace stitches to create more interesting and varied effects.
It’s all been rather fun…..
Mending a tablecloth, second stage

Having settled on a smaller circle, but still worried about the stability of the fabric, I paused for thought.
I’ve used tear-out fabric stabiliser underneath the fabric, and placed a circle of it over the previous overcast stitch ring so as to leave trimming out what isn’t wanted until the last moment. It’s now enclosed between two layers of stabiliser, so I shouldn’t catch my needle in it.
And this is definitely a case for using a hoop. Most of my Amarna pieces have been worked in slate frames or bar frames, and the Jacobean coat is being worked in the hand, but a table-sized piece of fabric of which a small element is the focus requires a more limited approach!
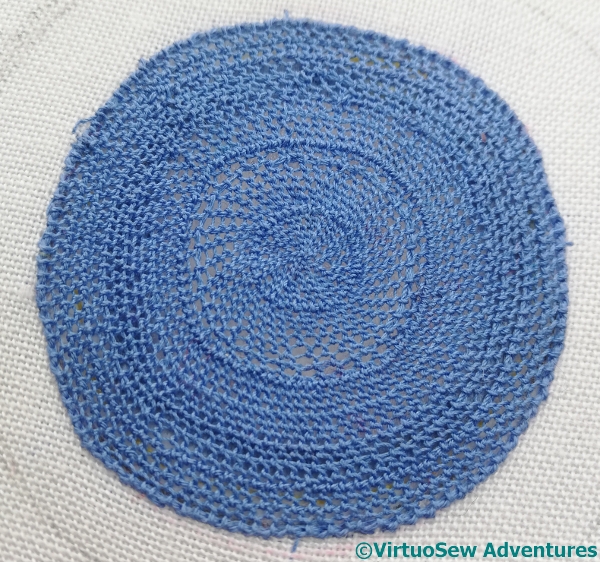
I decided in the end to use simple cloth stitch for the needle lace, but of course, choosing to work it in a circle rather complicated matters! I had to use several lengths of thread, so it became a matter of concern to make sure that firstly, there was no chance of it coming undone, and secondly, weaving in the ends made sense!
It was also important to bear in mind that while classical, straight cloth stitch has a free “return” stitch, I couldn’t expect to keep control of a “return loop” in my circular variant. So instead of that, I whipped the base of the stitches to create the heavier line.
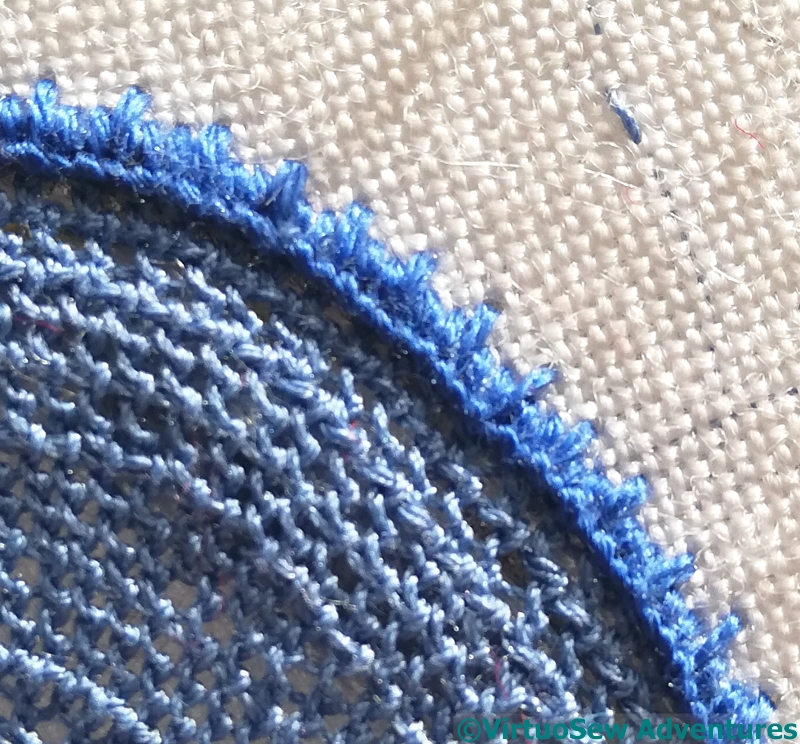
Once the needlelace was finished, I had to consider the edging. The whole aim of this exercise has been to cover the hole in the tablecloth in a manner that looks considered and deliberate – not just a mend, but a thoughtful mend. So the edging had to be thought about too.
In the end I chose to work a pattern in the buttonhole stitch – the uprights of the buttonhole stitch covering the split stitch and the edge of the needlelace alternate one long with two short. I also considered enlivening the needlelace with some daisies in white, reversing the blue on white of the main decoration, but decided that that was going a bit too far!