
Category: General Embroidery
Embellishing a summer top
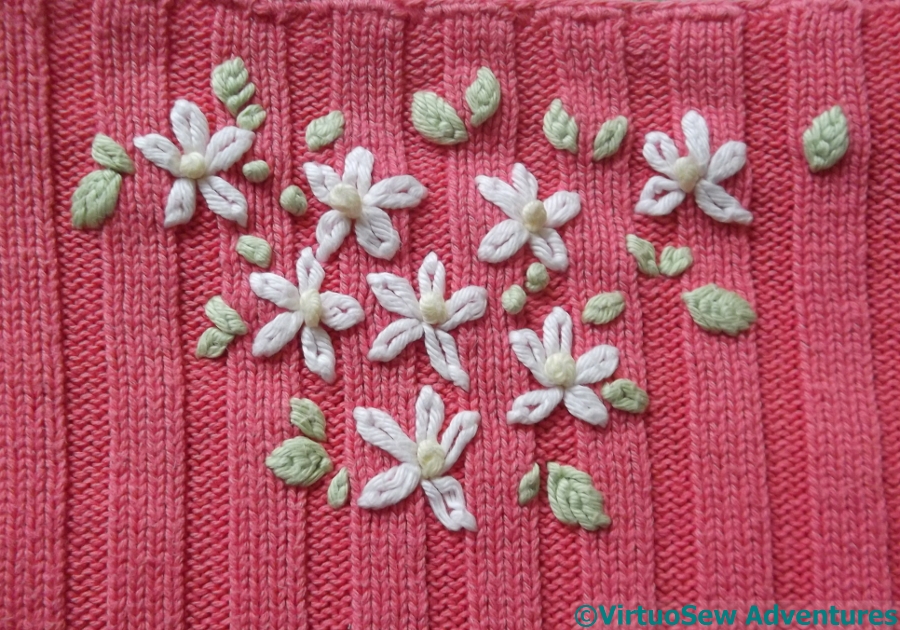
Back Of Top
Since summer is here (supposedly!) I’ve changed to summer clothes. Pink is not usually my colour, but I found this top in a charity shop and it goes beautifully with the crepe skirt I was wearing that day.
However, I got slightly twitchy fingers and improvised some embellishment for it. The top is knitted in quite a heavy cotton, so the embroidery is in soft embroidery cotton, and it’s very, very simple.
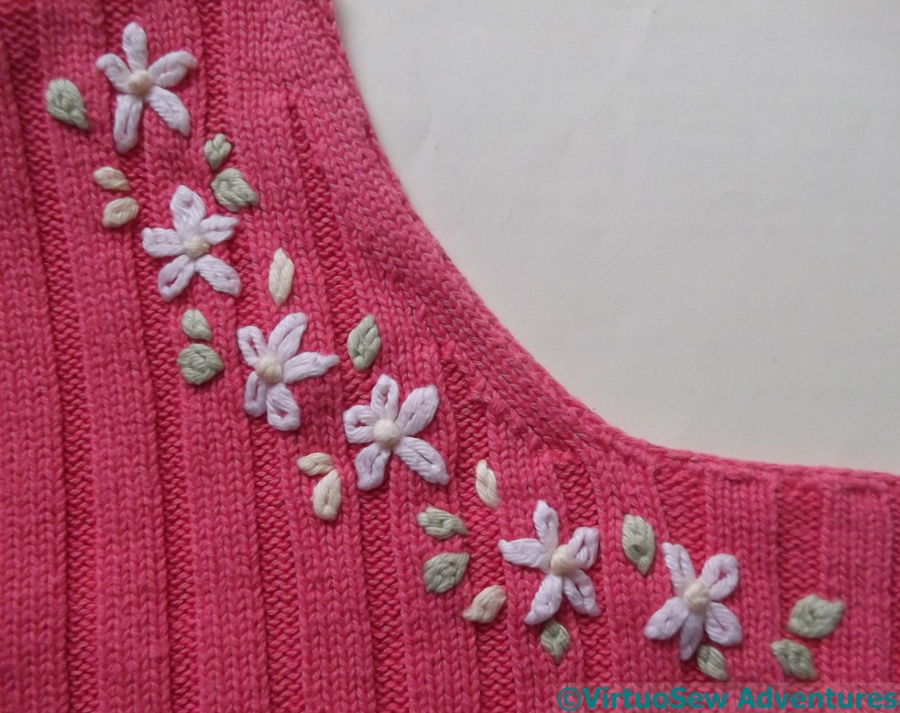
Side Front A
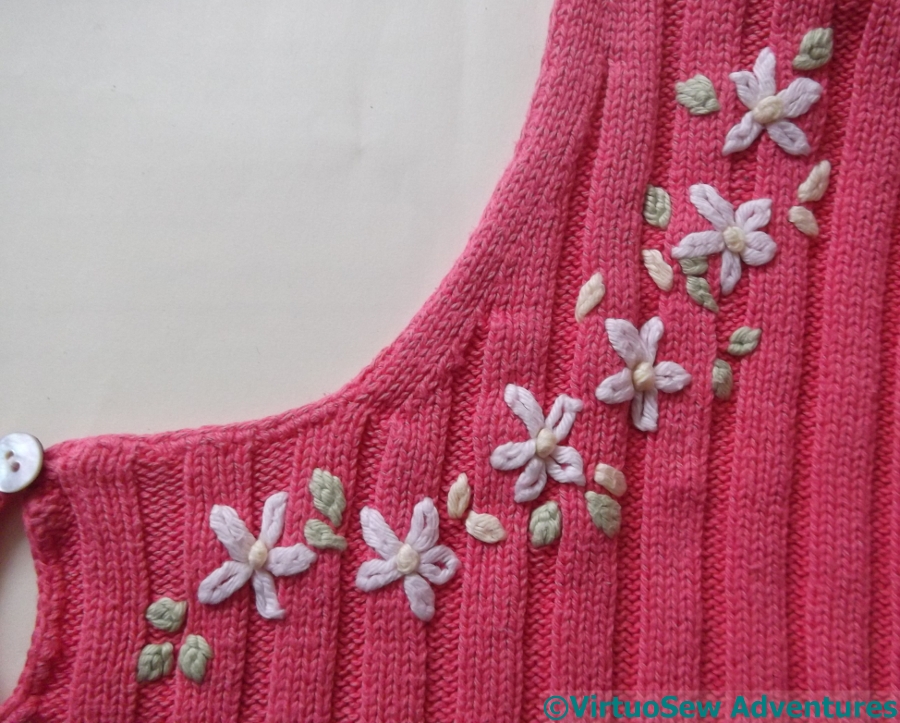
Side Front B
Only three colours – white, pale yellow and pale green. And only three stitches – Lazy daisy petals, French knot buds and flower centres, and leaves made of nested fly stitches. I didn’t attempt to make the sides at the front identical or symmetrical, only to make the front appear balanced, and when I’m wearing it, it does. The ribbed knit of the top made stitching tricky at times, since I was trying to avoid piercing the thread, but perfection is overrated, especially for a casual top.
The little spray of flowers at the back does get seen (by others!), because although I have long hair, I almost always wear it pinned up; but of course the frustrating thing about embroidering the back of a dress or top is that you never get to catch sight of it unexpectedly and get the chance to think “I did that!”.
Never mind, like the contrast lining or facing, I still know it’s there…
Finishing The Thistle
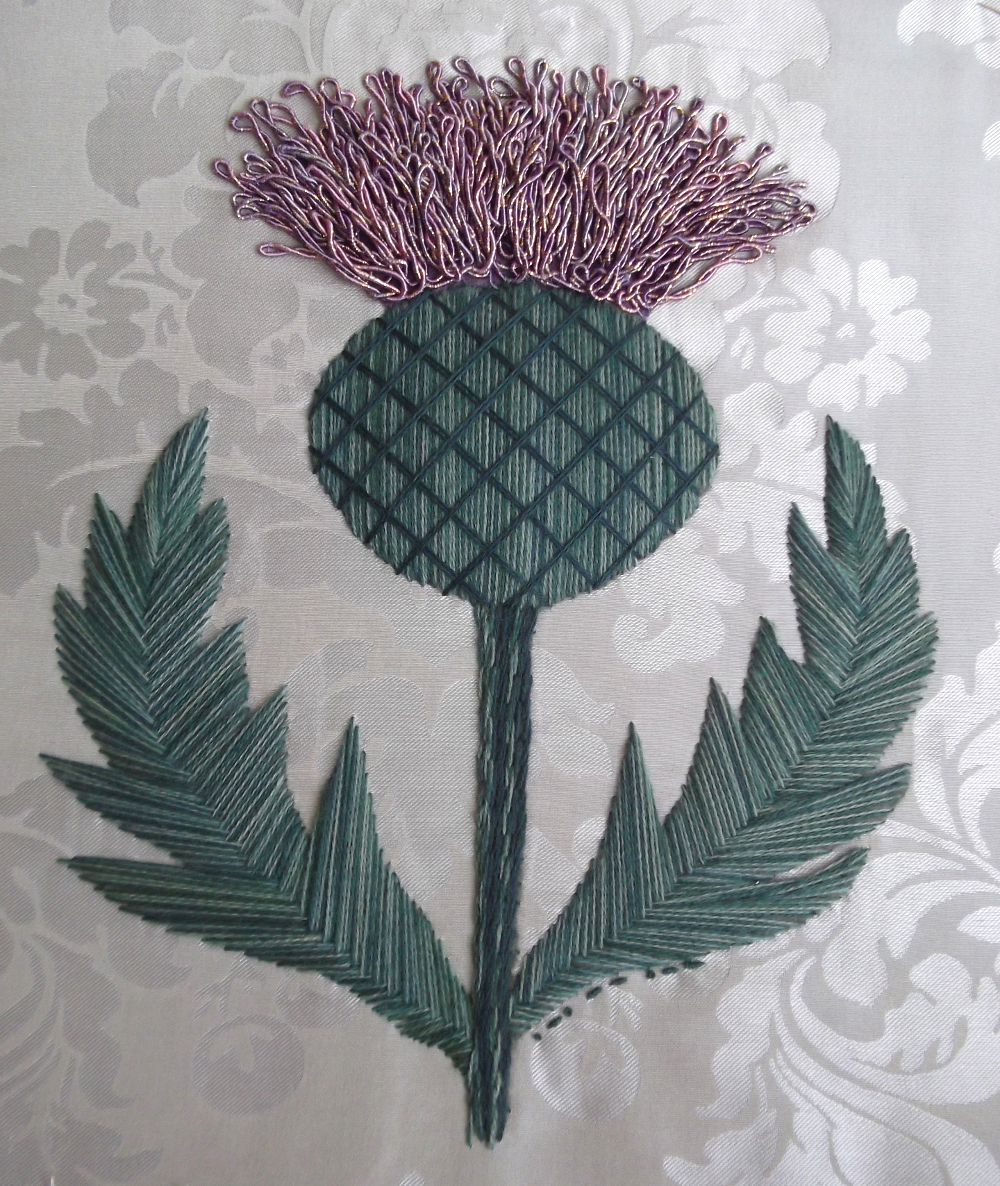
Thistle Finished
Well, I decided in the end to unpick the silk pearl purl. I was extremely disappointed about that, because the whole idea of this project was to provide an underlayer for the pearl purl.
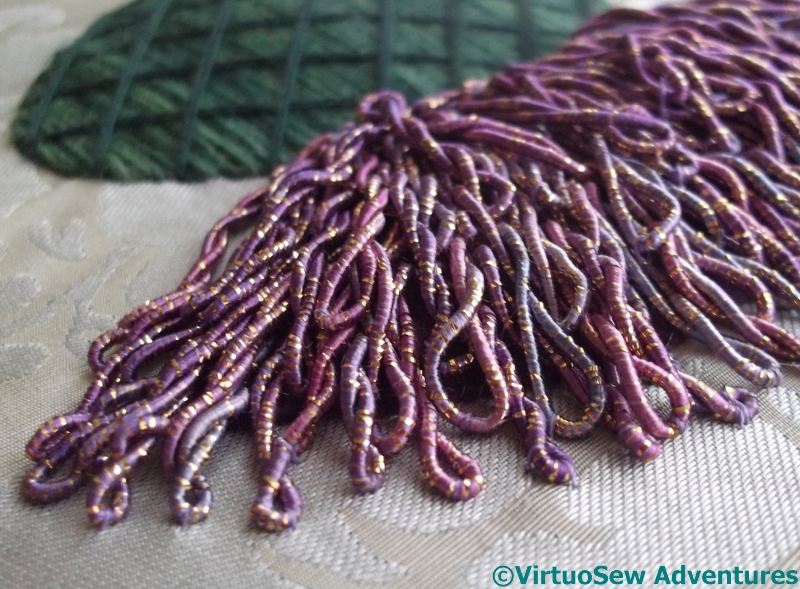
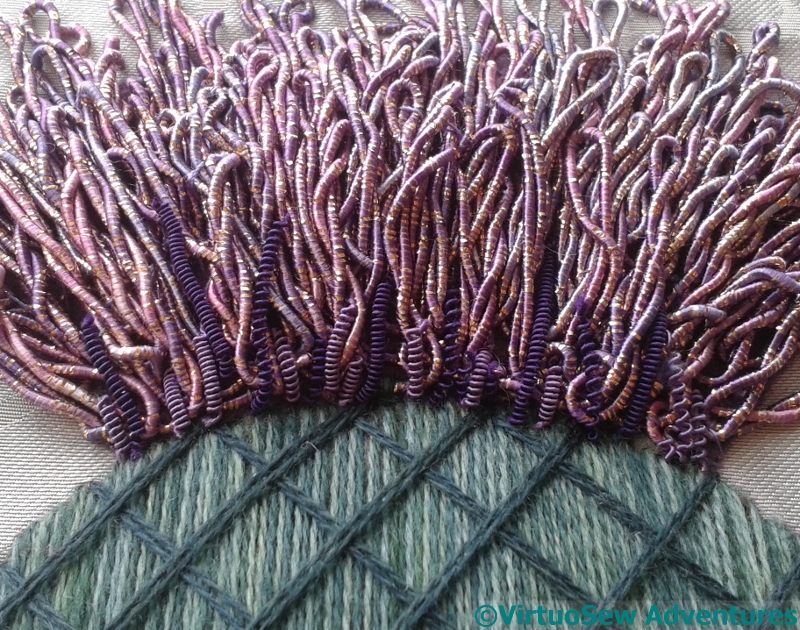
On the other hand, I do think it turned out rather well. The gold and viscose gimp makes a beautifully tangled, almost “fluffy” head – there’s something like 10 metres in that head, an entire skein of thread, uncut, and twisted back on itself in little one-inch fronds.
Even if I did feel as though I was using my pins more like a windlass!
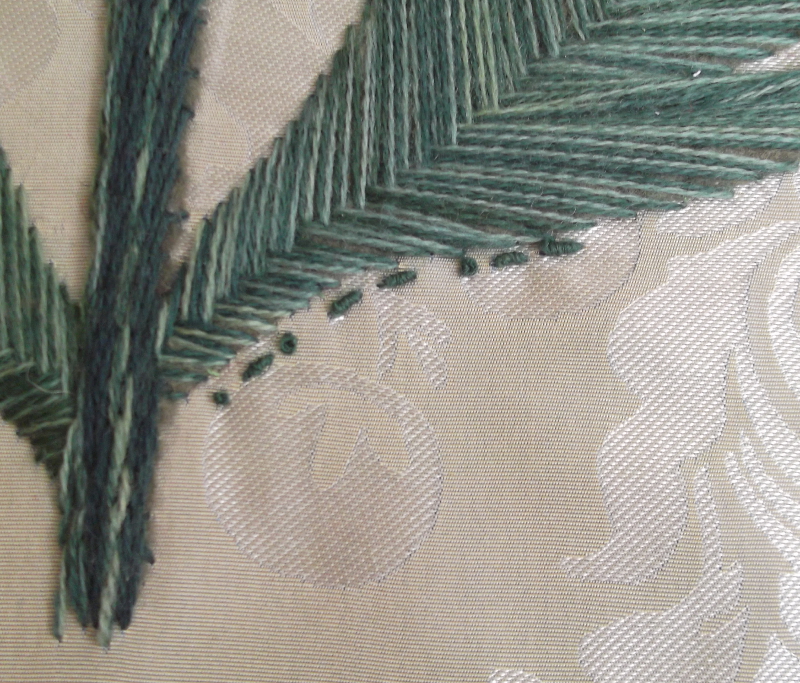
The three shades of green wool break up the otherwise rather monolithic leaves and I’m very pleased with my fishbone stitch variation. I took care to make sure the two strands I was using lay side-by-side rather than twisting up, but in truth that wasn’t much of a problem.
Thistle Signed
The stem I worked in raised stem stitch band, incorporating rather more of the dark thread, and trying to make sure that I didn’t catch any odd bits of the felt – harder than it looks!
Finally, having decided that my planned embellishments (the silk pearl purl) were blemishes rather than embellishments, I took them out (cautiously) and signed with my usual Morse Code initials…
I didn’t have any plan for this piece, but I’m so pleased (in spite of my disappointment!) that I’m quite seriously considering framing it up.
Sampler Tool Case – the stitches in the sampler
The whole idea of the sampler on the case is to have a few reminders of stitches I haven’t done before, or use only rarely…
First stitches
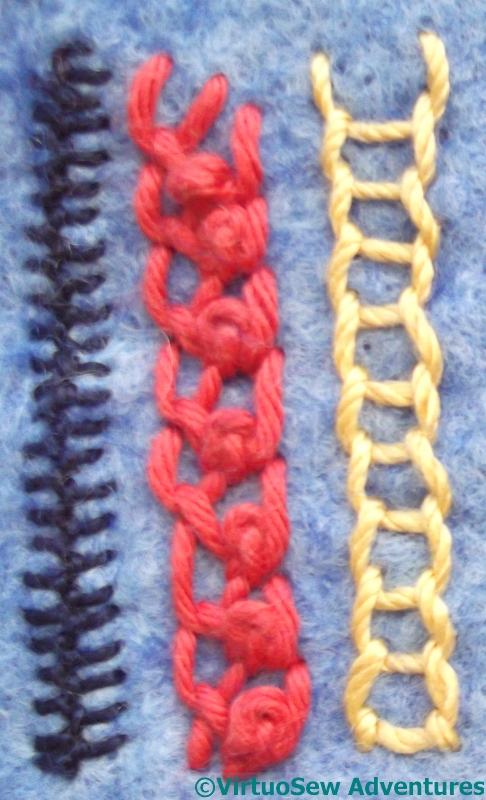
The first row was Fishbone Stitch in navy blue pearl cotton. I wanted something definite to create the edge of the panel. It was a little tricky to stitch on the soft pre-felt, but as I soon remembered – that would be true of all of them!
Next, Mountmellick Thorn Stitch in reddish-pink cotton. I’ve only used this once before, on the Jacobean Work Panel, largely because I have not found a suitable application. I enjoyed it, though, and now the stitch will be before my eyes more regularly, maybe I will find one…
Open Chain Stitch is an awkward stitch. In Barbara Snook’s “Embroidery Stitches”, she says it is best used as the basis for further ornamentation, such as single chain stitches across the bars. and I think you can see why. I used a pale yellow pearl cotton. I like the thread, but the stitch is one that needs more work!

Second Stitches
Next, Sorbello Stitch, worked in overdyed blue mercerised cotton. I’ve used this stitch before, to work the modern villages on the Map of Amarna, but at this larger scale the form and texture of the stitch is easier to see.
Hungarian Braided Chain Stitch has become one of my favourite stitches since I used it for the Silken Crane and the Antelope Frieze. This version uses an overdyed pink/red pearl cotton. It does show colour variations nicely!
Bonnet Stitch is a new one for me. I am absolutely sure that yellow rayon is not what the stitch was developed for, but it worked rather well, and I enjoyed it.
Third Stitches
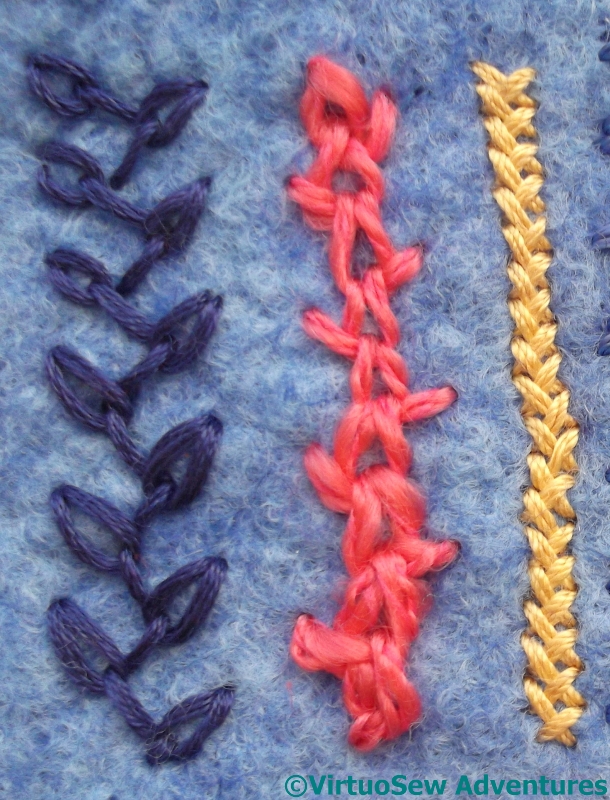
I chose Feathered Chain Stitch next because I wanted something fairly wide, and fairly open. The navy stranded cotton makes a strong central axis for the panel.
Petty Chain Stitch is a new one for me. I found it in one of the books by Edith John that I have. She named it after the student who created it by accident when she confused the instructions for two stitches – immortality of a sort, I suppose! I’ve used a pinkish wool slub, doubled to even out the thickness. I’ll try to remember to use this again, in a less textural thread. I think it could prove useful.
The Herringbone Stitch, I chose because I wanted something narrow. You will have noticed I’ve tried to create a rhythm of stitch widths, although it isn’t a repeating pattern as such. The golden pearl cotton has a lovely shine.

Fourth Stitches
Up and Down Buttonhole Stitch is another old friend. The challenge with this blue overdyed rayon floss was not in the stitching, but in wrangling the fifty or so metres that joyously tangled themselves as soon as I untied the skein!
I’ve never used Butterfly Stitch before, either. I’m not sure that the textured pinkish cotton does it the best service, but it creates an interesting effect.
Feather Stitch is harder to stitch well than you might think. The de-twisted gold rayon cord certainly didn’t make life easy, but it helps create an emphatic stop at the end of the panel.
A Sampler Tool Case
With Inspiration
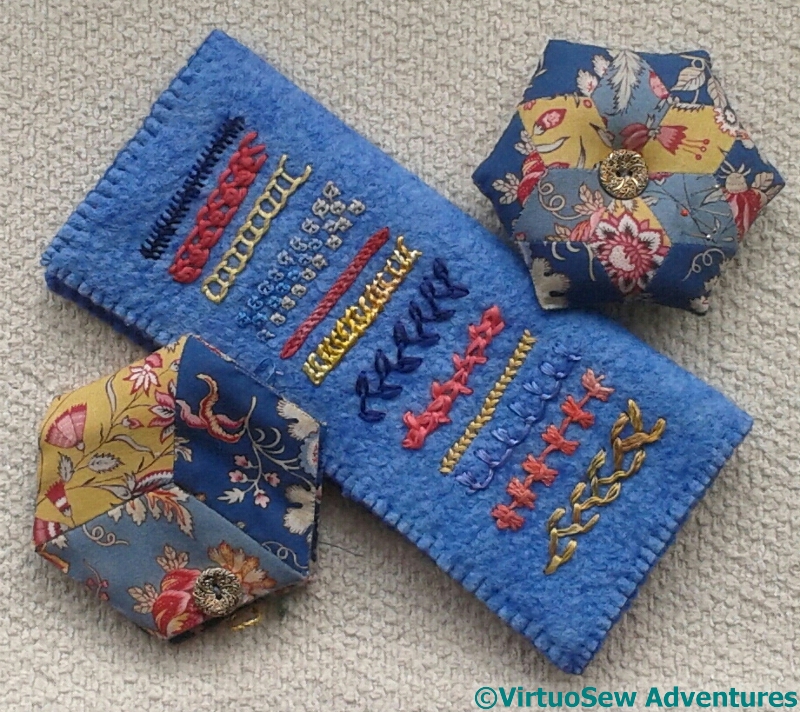
Here is something else I completed while I was recovering from Loading The Felucca, pictured with the two gifts from Alison that inspired my colour choices, a pincushion and a needlecase in English Paper Piecing. Considering that I selected my colours from stash, I think they have a surprisingly similar “feel”.
Some of you will recall that a couple of years ago I made a case to hold a wooden stiletto and mellor as a gift for my cousin. I’ve finally got around to making a case for three bone stilettos and a wooden mellor for myself!
I’ve included several stitches I haven’t done before, or use only rarely and I’ll write about those later.
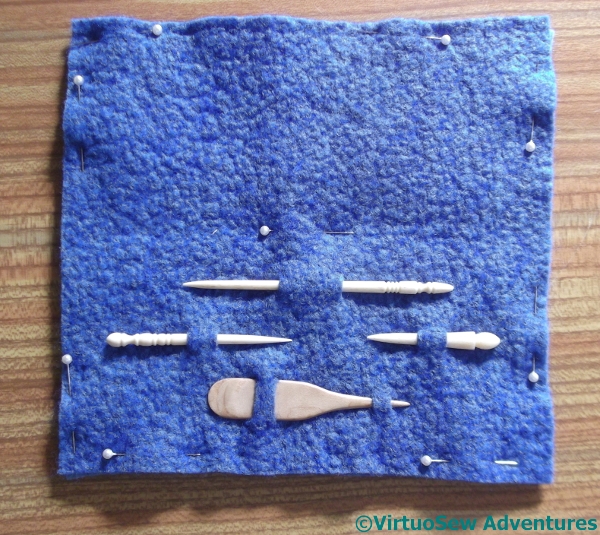
Tools In Place
It was a little tricky to find a suitable layout for the tools, but I finally decided I liked this one. I’ve blanket stitched the edges together, now, and I intend to needlefelt the layers together, just as I did with the other one.
When I find my needlefelting tool, which has gone Absent Without Leave!
Beginning on the panel of the Excavation
Draft Of Excavation Design
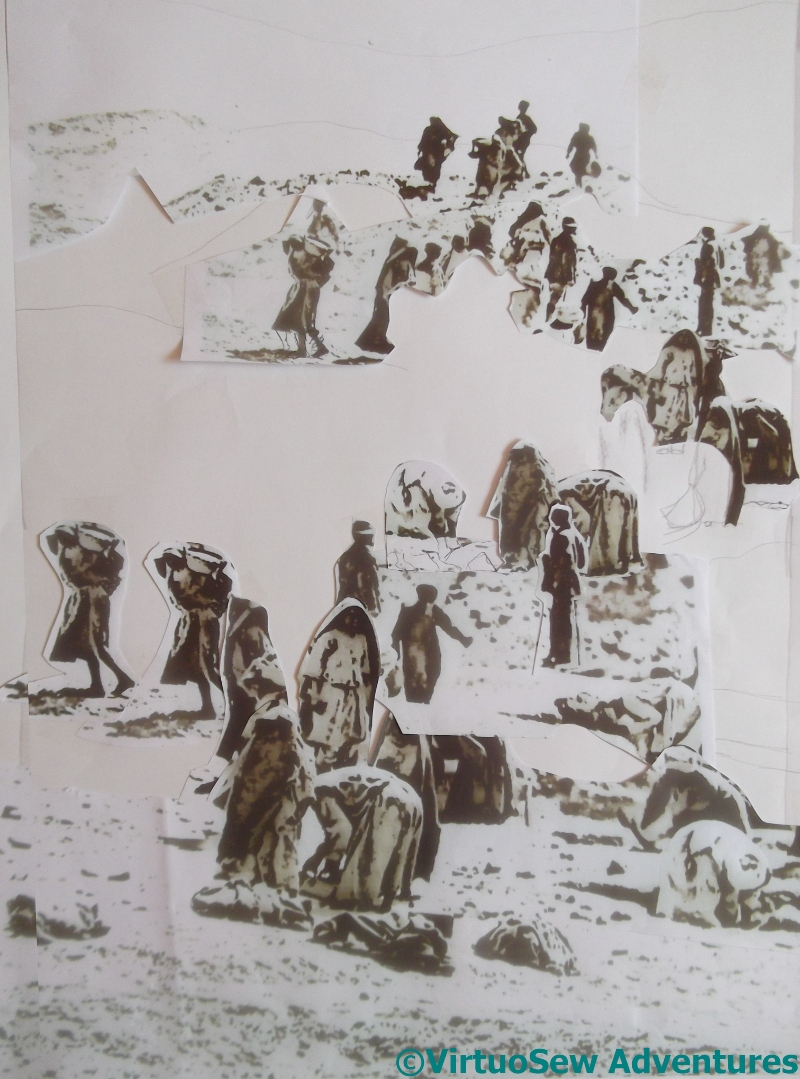
When you last saw the Excavation design, I had a rather blobby draft image, created with scissors, glue, and paper, and loosely based on one of the Egypt Exploration Society photographs. The pattern of shapes creates a pleasing effect, but there was more to do..
There followed the process of turning the design idea, layout, call-it-what-you-will, into an embroidery design. I outlined it onto tracing paper, took the tracing away from the paper, stood back and wailed.
None of the lines – taken from this image, I remind you – made sense.
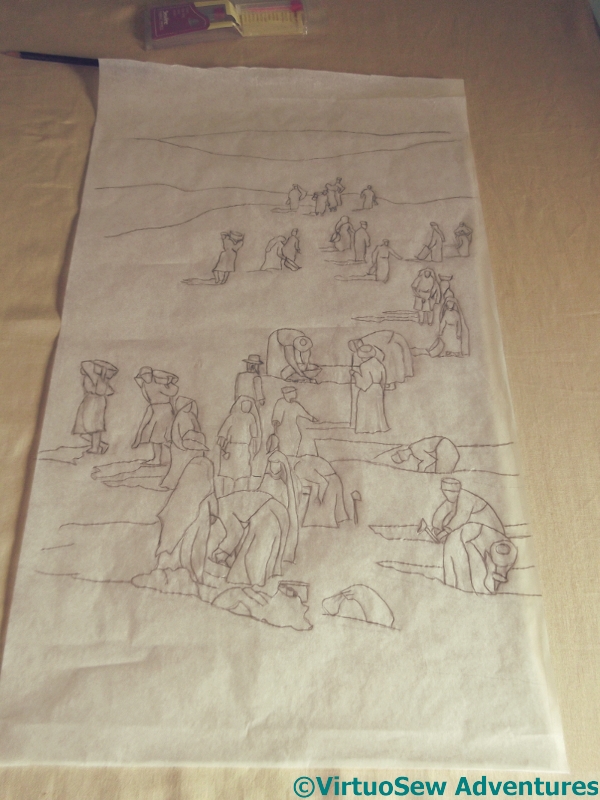
Transferring The Excavation
Fortunately my mother (an artist, remember, with a much better understanding of figure drawing than I!) came to my rescue, emphasising some lines and removing others, tweaking and balancing the figures, and then finally I got the design transferred onto a piece of the sandy coloured linen.
Now I have to invent my stitched version, based on the lines transferred, but quite possibly inventing others as I go.
At the moment I haven’t the vaguest clue where to start, so this may be another case of “set it up and stare at it”.
I seem to do a lot of that!
Progress on the Thistle
Oblique View
I rather like the texture of the layers and layers of viscose gimp, in this photo. Every now and then an oblique view is exactly the right one, and it’s a gorgeously over-the-top effect, isn’t it!
I did find myself beginning to feel rather tied in knots by all the twisting and turning, and progress slowed noticeably as the number of layers increased and the difficulty of holding the strands just firmly enough also increased.
Worth it, though, I think!
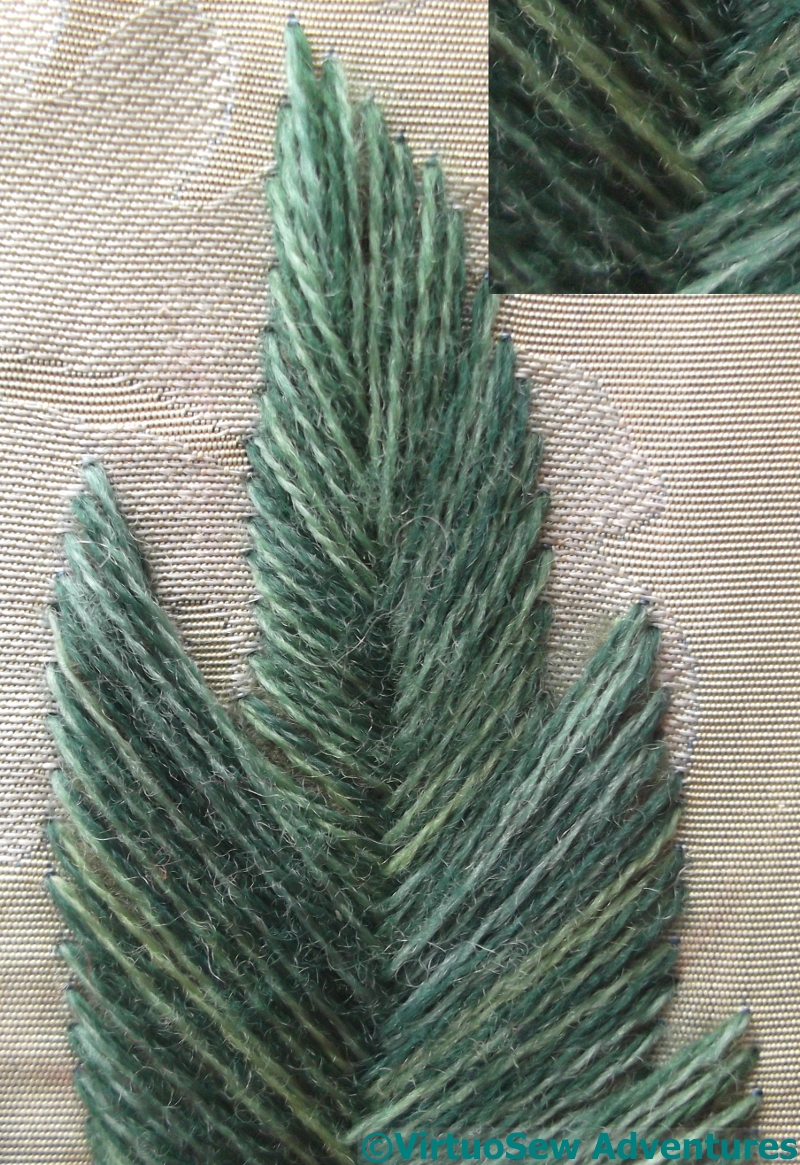
Leaf Detail
The leaves required some slightly careful management. I wanted to use fishbone stitch, because I wanted a simple leaf so as not to detract too much from the flower. However, fishbone stitch does use rather a lot of thread, and I was just a little nervous about whether I would have enough of my lovely wool to do the job.
So I thought, first of all, that I would use the light and medium shades together. They aren’t flat, solid colour; they shade a little either side of the main colour, and this brings a little variation to what might otherwise have been a somewhat monolithic element.
Then, secondly, instead of taking the thread across the back from side to side, I devised a variation which changed slightly the pattern of the crossing in the centre. You can see in the detail in the top right hand corner, that there are two sets of threads in each section. There are only small back stitches running down the outside edges, and down the vein in the middle, so the amount of thread on the back has been minimised.
Not At All Happy
I originally hoped to use the layers and layers of viscose gimp as the base for another layer, of silk wrapped pearl purl, and of coloured wire purl.
Unfortunately, when I’d done it, I decided that I really didn’t like it at all.
It adds nothing to the design, and in fact, it even detracts from it. Out, out, out!
So having taken it out, rather grumpily, I sat back to consider whether or not I have finished the piece at all….
An Experimental Thistle

Preparatory Felt
After I’d (mostly) finished Loading The Felucca, I found myself temporarily lacking inspiration for the Dreams of Amarna, so I thought I’d have a go at an idea that has been burbling around in the back of my mind for a while. I’m hoping a change of scene, as it were, will “reboot” my imagination.
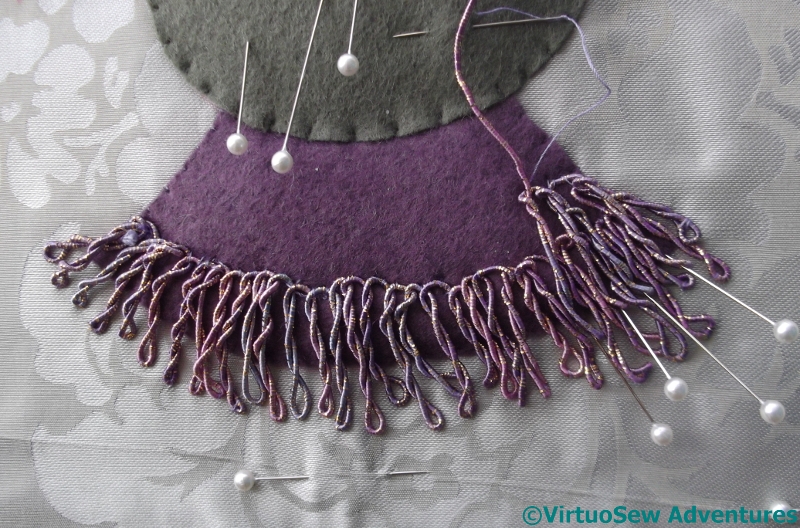
The background fabric is a silk brocade, and I’ve padded the thistle itself with wool felt, in several layers (three under the topmost green circle, in fact).
I drew the whole thing freehand, and I think I will remove and replace the lefthand leaf with a reversed version of the righthand leaf. It will look more balanced and altogether happier if I do.
Working with Gimp
I’m intending to use silk purl and coloured wire purl for the thistle flower, but I wanted something for those to be embedded in. I’ve chosen to use a gold and viscose gimp, and I’m couching it down in a series of fringes zigzagging across the flower.
Each fringe is twisted back on itself – I used a pin as a sort of handle – and held down with small stitches at each end. As each additional layer went on, the “free” ends were held down a little less firmly. It’s a delicate balance between controlling the thread sufficiently (and remember gimps are very stiff and have a mind of their own!) and leaving it looking free and springy!
More Unfinished Objects
Tent Stitch Flowers
I keep on finding things that I’ve not quite finished, don’t I – and in some cases I had completely forgotten about them.
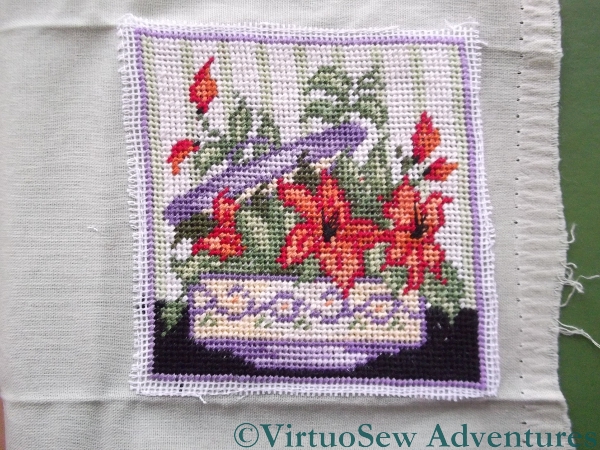
Like this one. I know it was a kit – stranded cotton worked in half-cross stitch on canvas, – but I don’t know why I bought it.
And I clearly had something in mind for it, because I have attached it to a cotton furnishing fabric. Equally clearly, it wasn’t going to be a cushion centre, or I would have centred it on the fabric. It is only about three inches square, so I suspect I had in mind making it into a needlecase.
But before I do anything else with it, I have to find some way of covering those raw edges of canvas with something that looks deliberate!
Any suggestions?
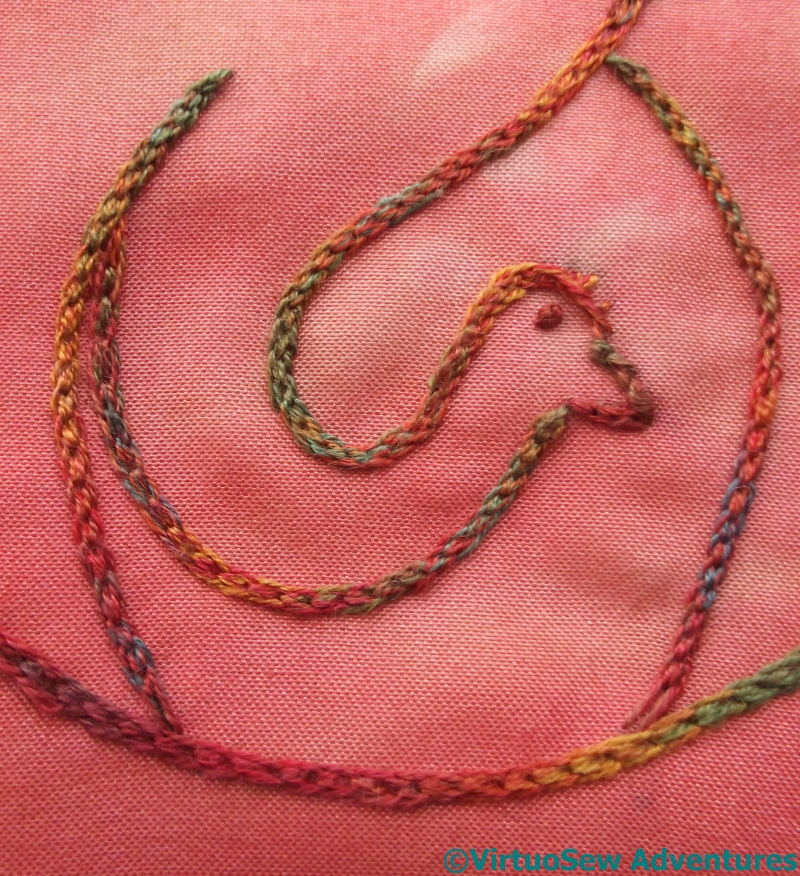
Coloured Crane
In other news, though – I’ve finished the second Crane!
Actually, you may recall that it was the first, but I decided it looked too overheated in the pot it was destined for, and set it aside for another version.
I found in when I was looking for something else, and finished it. At least, the embroidery…
I will probably mount it on a circle of card, and put in that famed Winter Decoration corner.
At least I know what I’m going to do with this one!
Dressing the Second Labourer
Using The Mini-Iron
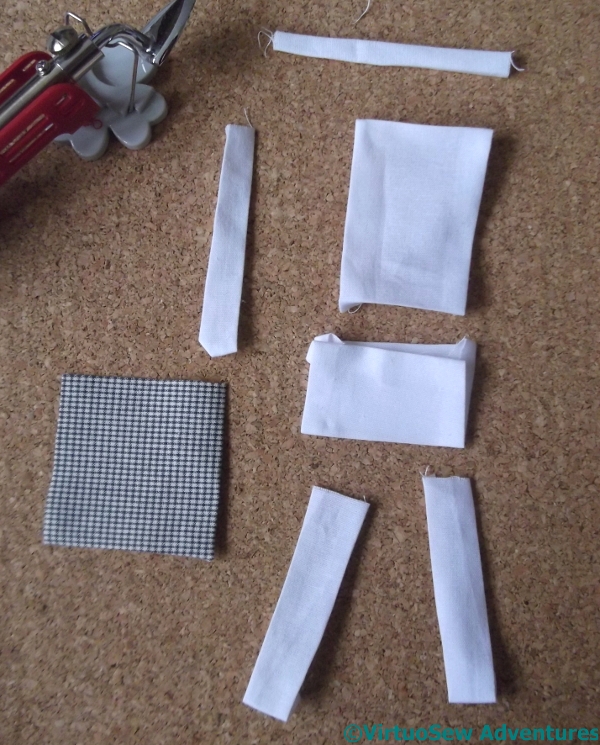
Since I decided after dressing the first labourer that using rectangles of fabric was the way to go, when I started on the second I began by cutting out every bit that I expected to need.
That meant:
two pieces for the legs, a piece for the body of the top, a piece for the section of the top below the waist, a piece for the turban, a piece for the sleeve, and a piece for the cloth thrown over the shoulder.
I bought myself a mini-iron to make the job of folding in the edges easier, lighter, and less perilous. Fortunately there are two more labourers to dress, so I will have plenty of time to improve my skill!
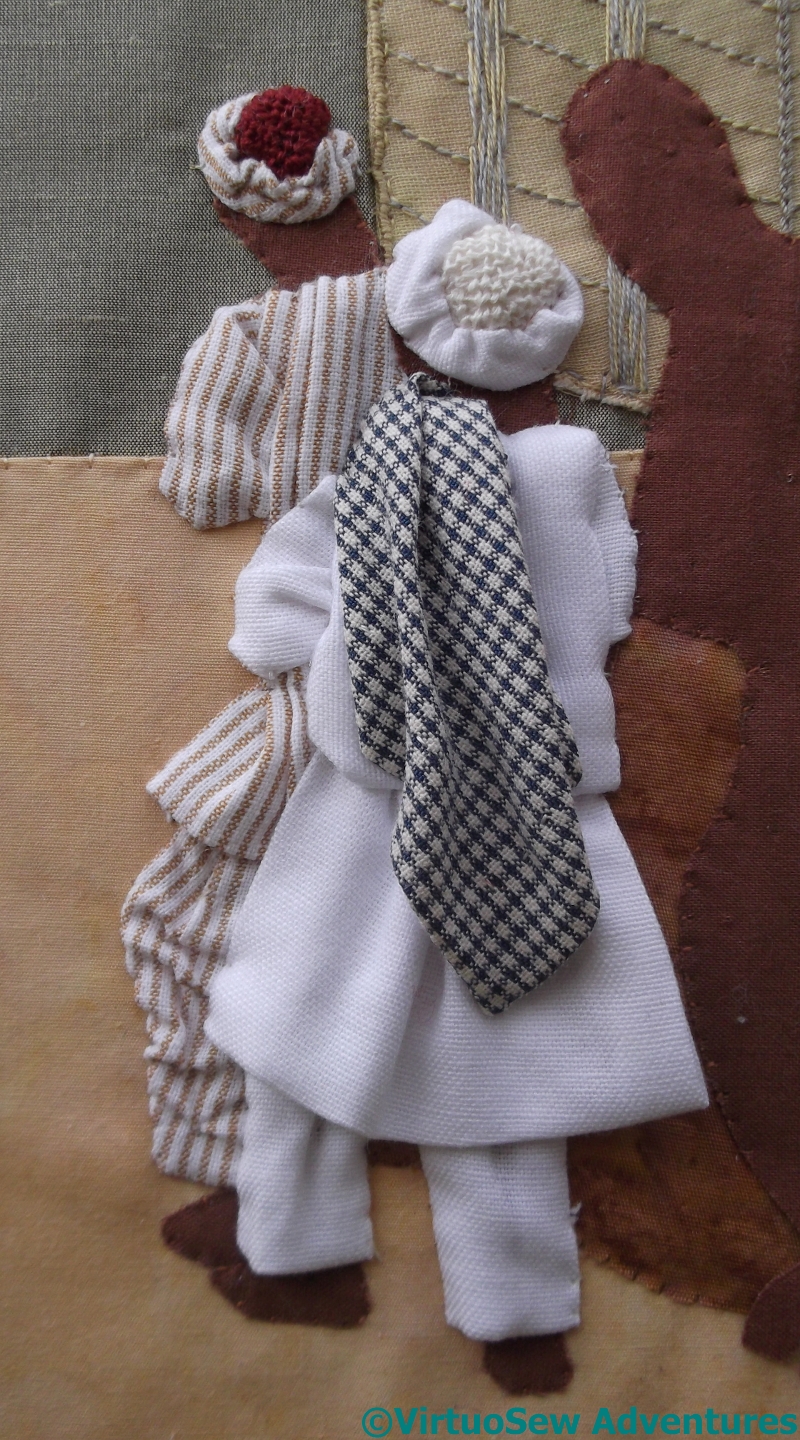
Two Labourers Clad
The trick to a successful applique is the order in which the elements are layered.
So in this case, the first pieces are the trousers. They are stitched down each side, and tweaked in the middle to create some impression of a body underneath. The bottom edges aren’t held down, so in storage this piece may be a bit delicate.
The turban is done in just the same way as the first one, but this time I used a cream linen thread for the central disc.
The sleeve was next, and then the “skirt” of the top, which is gathered to give it a sense of bulk. It is tethered by the underlayer, but not attached at the bottom edge. The right-hand edge isn’t tethered, either, because in due course the Third Labourer’s clothing needs to fit underneath..
Finally, there was the body of the top, and the fabric thrown over the shoulder. I don’t understand why he didn’t use it to pad his shoulder against the packing case, but the photo says he didn’t!
Crazy Canvaswork Cushion – Part 10
Section Sixteen
The last section, Section Sixteen, gave me a lot of trouble. I suppose that is partly because the end was in sight, and I wasn’t quite as focused as I could have been!
I was originally looking for a crossing stitch, but every single one I tried either looked wrong, or simply failed to cover the canvas. I sent several tweets enumerating my trials, with one or two strands being too fine, and three strands too heavy, and in the end I abandoned the crossing stitches entirely.
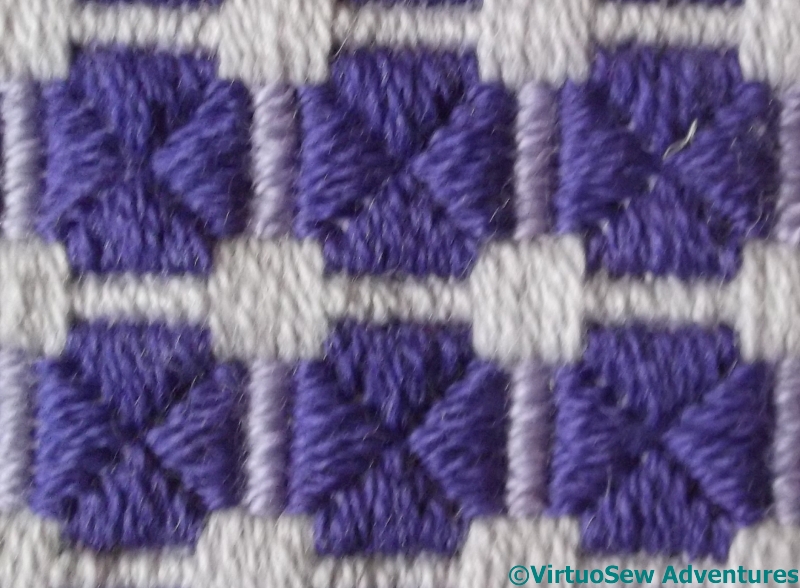
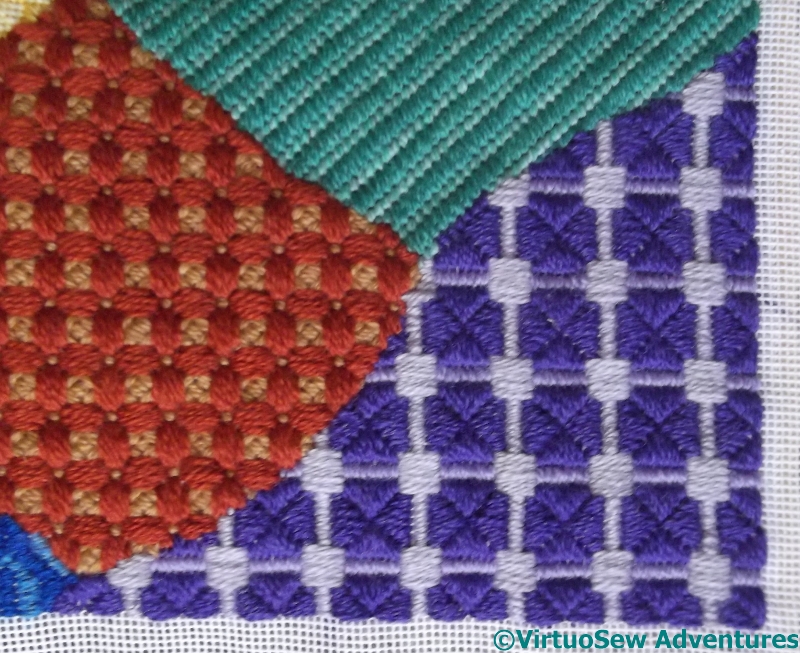
Framed Triangle Stitch
In fact I devised my own variation on Triangle Stitch, which I’ve called Framed Triangle Stitch. I rather like the way it has turned out. It is a bit of a trial to stitch economically, but since I am attempting to reduce my stash, that is scarcely a problem!
Although I like the pattern it creates, I’ve been somewhat concerned about the scale of the pattern, which is perhaps a little too similar to the blue pattern of Section Thirteen.
However, I now have the challenge of unrolling the whole piece, blocking it, and working out how to finish the cushion.
As they say – watch this space!