
Category: General Embroidery
Spots The Eeyoropard
Got My Eye On You…!
Under Rusty’s very bright and beady eye, I got started on the companion that Tanya provided for him in the Stitchalong on her blog, Opus Anglicanum.
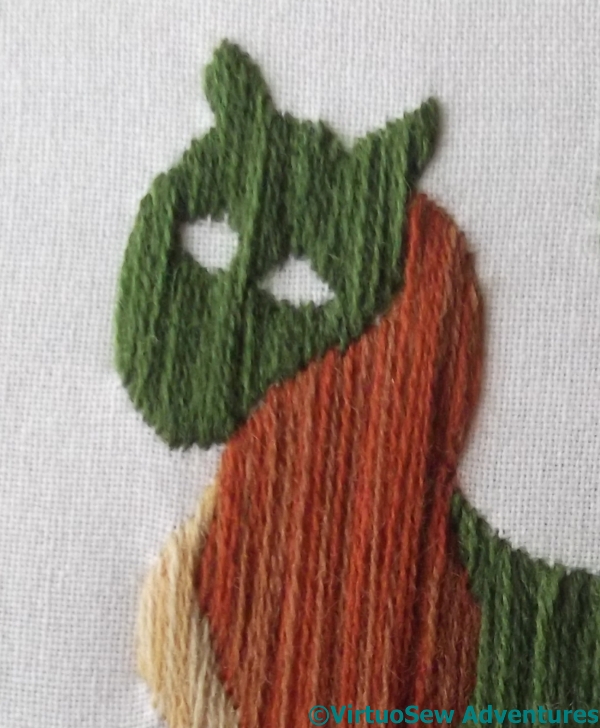
Detail Of Underlayer
Which turned out to be a Leopard!
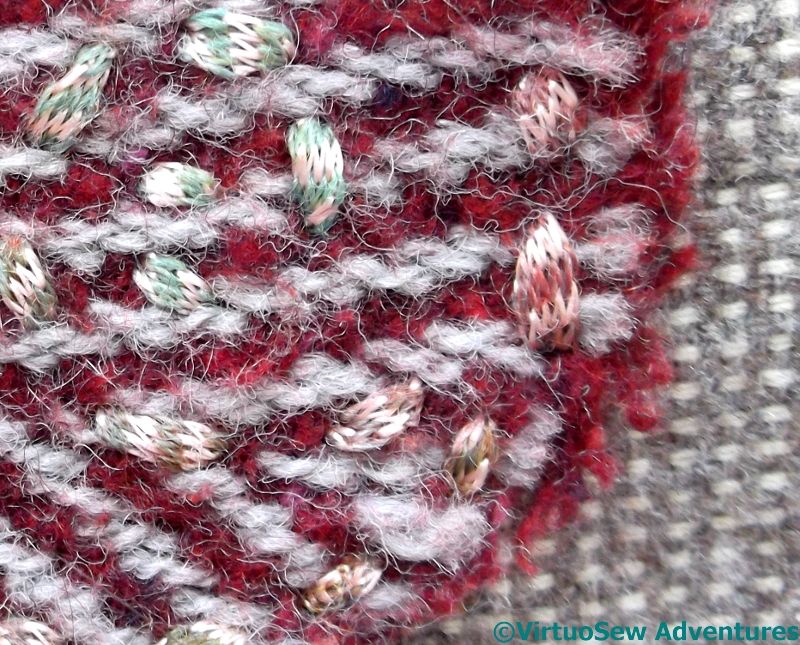
This closeup of his head and neck gives you a chance to see the two different shades used side by side in the underlayer of the laid and couched work.
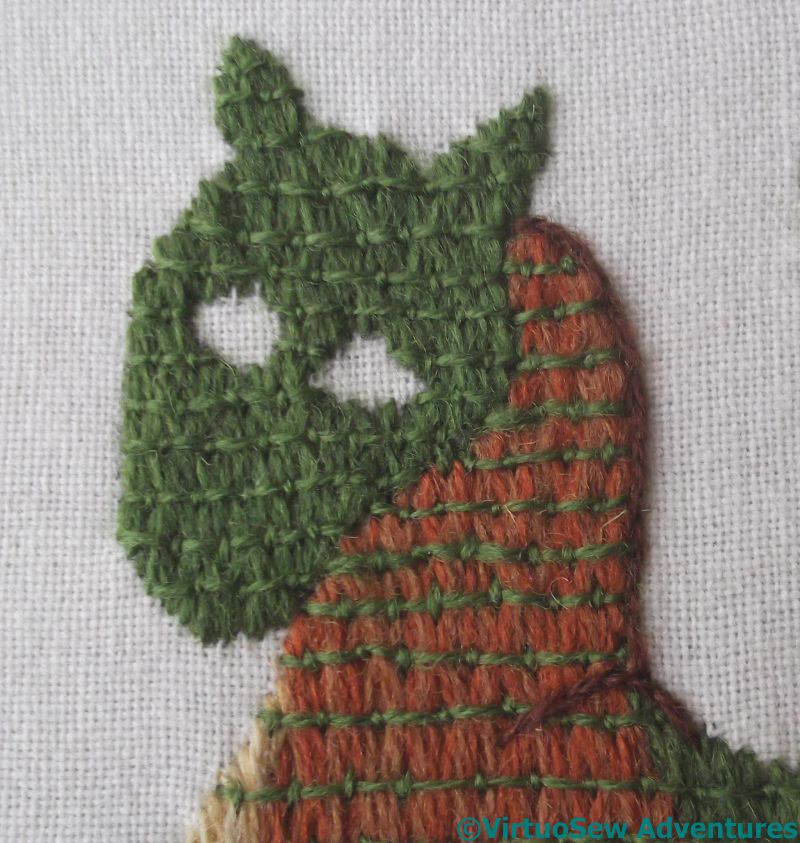
False Start
Once I’d finished the couching – in a modern twist, Tanya suggested working all the couching in a single colour, so that the Dragon and the Leopard will offer two versions of the same stitch – I had a slight false start with the outlining. When I tried the dark chestnut red, I wasn’t entirely happy with it. I’m not sure quite why, but perhaps it simply wasn’t distinctive enough against the orangey-red.
Spots The Eeyoropard
I went back to the dark green I used on Rusty, and used the same creamy yellow for the highlights. I don’t think I put in quite the same highlight twiddles as Tanya put on hers, but I like him just the way he is.
Apparently the Leopard of the medieval bestiary is a gentle creature – in spite of the fearsome claws, and according to Tanya, they all look “terminally grumpy”. I was talking about this with my friend @Matheknitician a week or so back when she accosted me at the MathsJam weekend, saying she was desperate to know what I was going to do with Rusty, and a day later she sent me a message suggesting that we should call Spots an Eeyoropard.
So, ladies and gentlemen, – Spots the Eeyoropard! Please be nice to him – he’s rather shy..
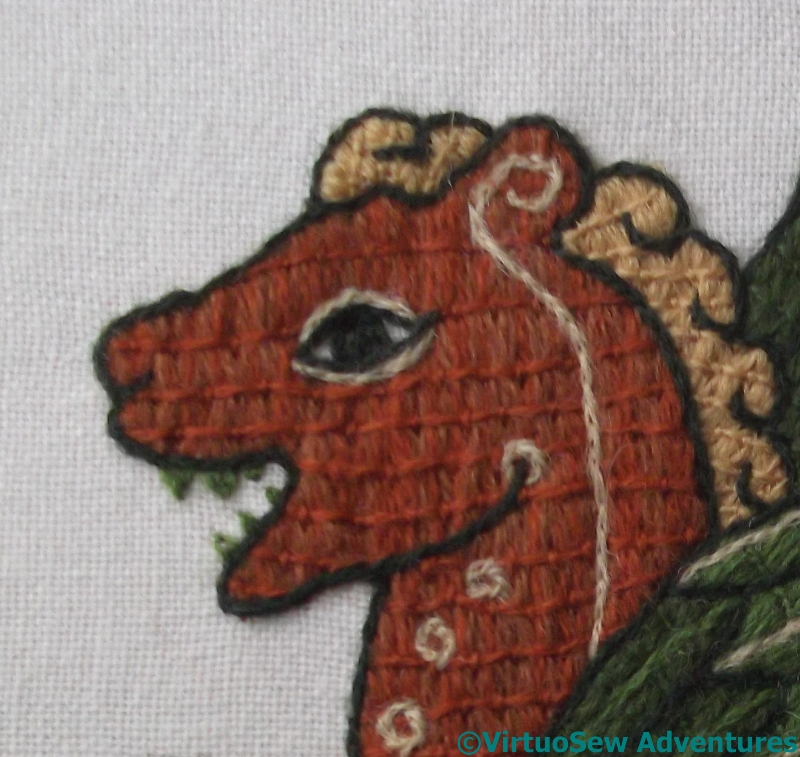
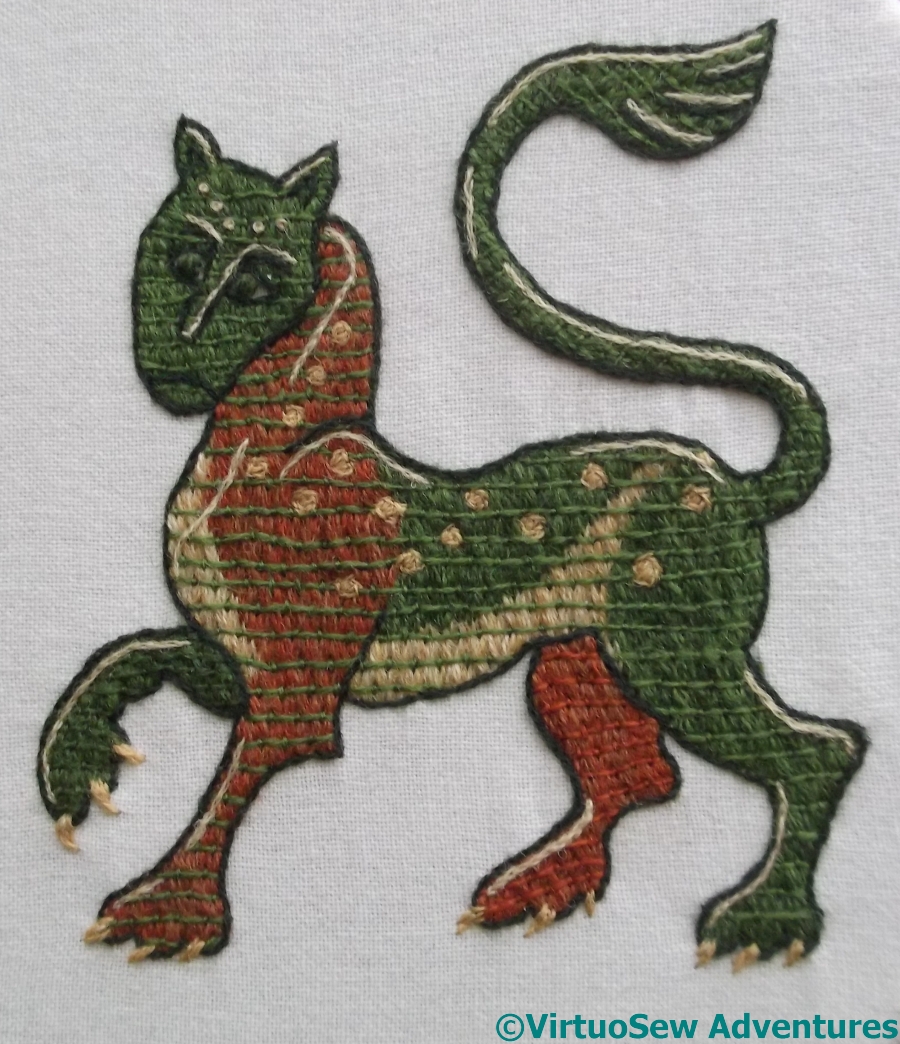
Rusty The Dragon
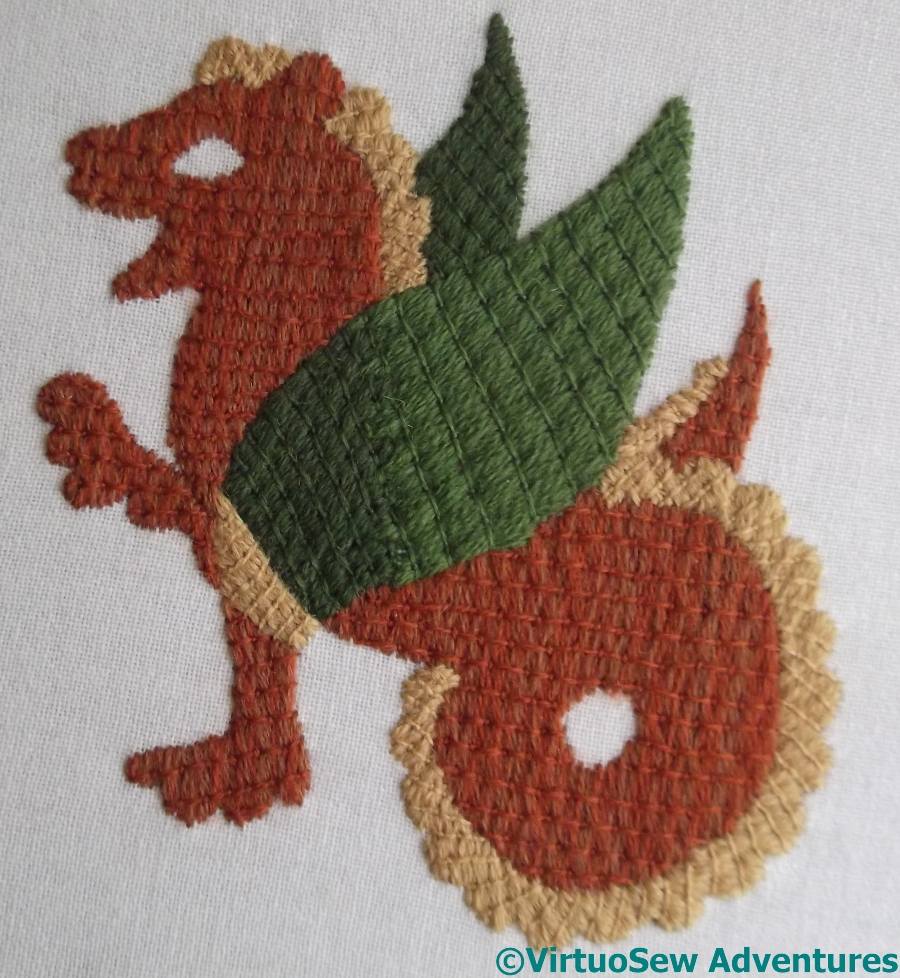
First Layer Completed
I did comment that the laid and couched work romps along, and once I got going, it really didn’t take long at all to finish the first layer.
In the interests of being sure of having enough thread to complete the Dragon, I used two shades of rust-coloured wool for his body. The underlayer of surface satin stitch is worked using two strands – making it possible to blend the threads – while the couching stitches are worked using a single strand.
Looking once more at Tanya’s Dragon on the Flickr Group, I realise that I’ve not quite followed her stitching angle in all places. but I’m very happy with how the first layer turned out.
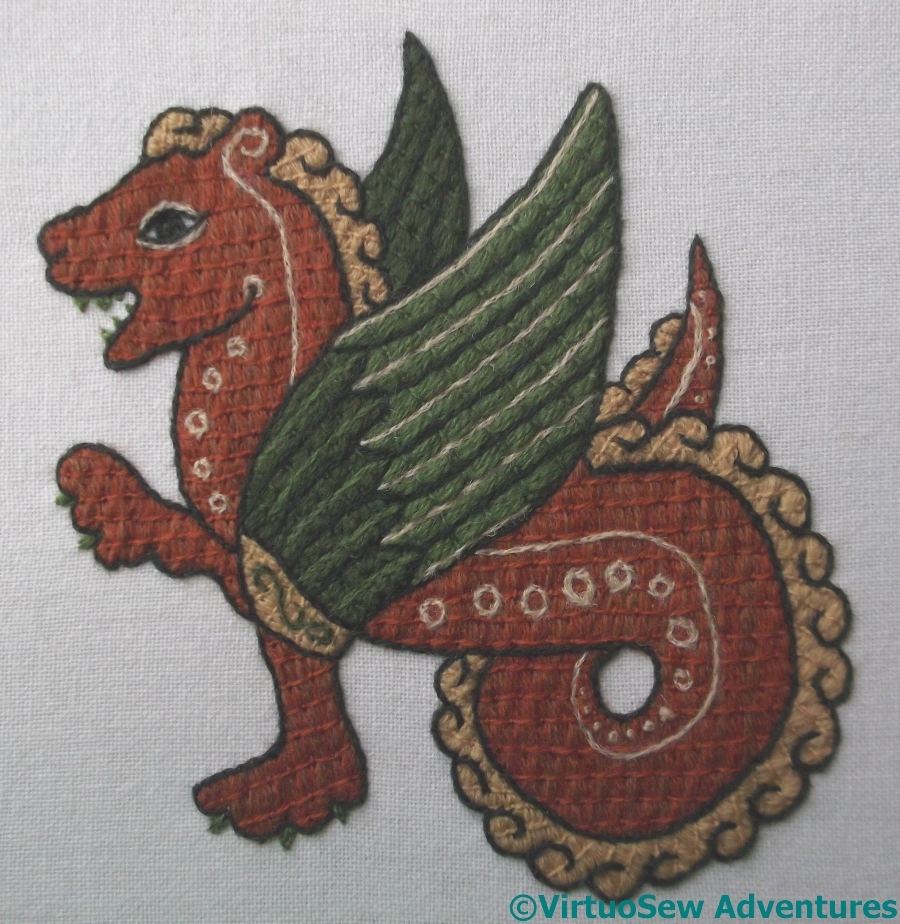
Detail Added
Once the first layer is done, there are details to be added.
And my goodness, what details!
There was a slight false start, because the creamy-white was too light, the wrong texture, and simply looked wrong.
Since the details are worked in split stitch, the necessary unpicking was a severe trial. However, the combination of a pair of tweezers and my brand new embroidery scissors from Ernest Wright and Sons Ltd (bought when I heard of them following a BBC article) made it as easy as it could be (still not very easy, though!).
I finally picked a creamy shade, lighter than pale yellow I used for his crest, but in the same family. It turned out really well, and even his green teeth don’t detract from his charm. He looks a very genial fellow, and I’ve named him Rusty.
Stitch A Long with Opus Anglicanum
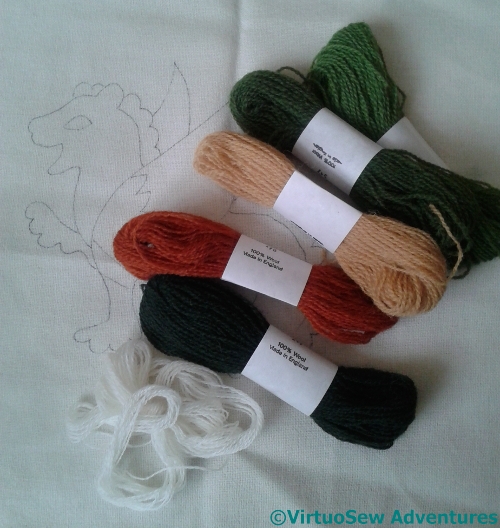
Thread For Dragon StitchALong
Do I really need another project to fit in, I wonder?
Well, yes, I think I do. Over on her blog, Opus Anglicanum, Tanya Bentham is running a medieval stitchalong, and quite simply, when she showed us a picture of the dragon she’d designed for us, I fell head over heels in love. He’s absolutely adorable, and I really didn’t care that I’m running short of time in any one week to do anything at all!
I decided not to buy a kit, since I have more wool thread than I know what to do with (remember my stash-busting canvaswork?), but I did buy some of the wool fabric Tanya suggested, and then rifled through my stash. Most of the wool is Appletons, but the creamy-white for highlights is a remnant of something rather smoother and silkier.
Maybe I’ll make some progress with the stash-busting, after all!
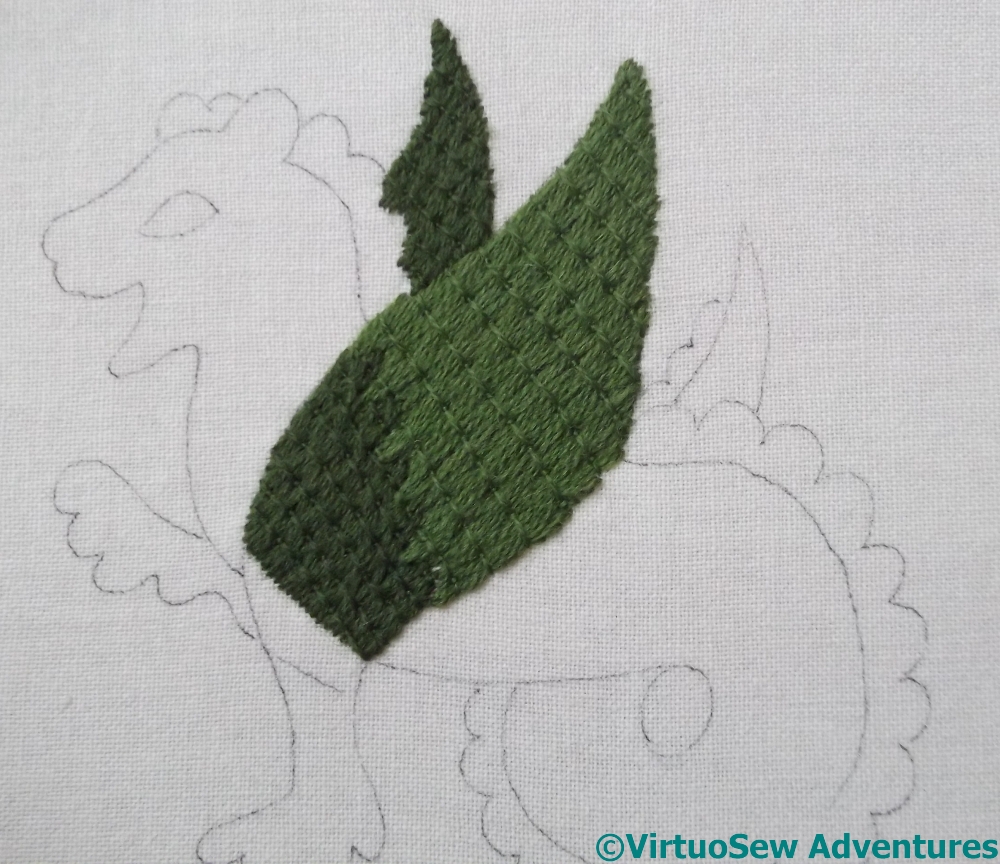
Wings In Laidwork
As it happens, I’m trailing slightly behind the stitchalong – and my blog is trailing behind my progress, because I’ve been enjoying stitching too much to stop and write about it.
The “colouring in” element of the design is worked in laid and couched work, which consists of three layers, in modern terms – surface satin stitch, with long couching stitches at right angles, which then in turn are tied down at intervals. Furthermore, it fairly romps along, which makes a lovely change after all that painstaking or nué earlier in the year!
There are several people taking part in the the stitchalong, not all of them bloggers, so Sue set up a Flickr group so that we could encourage one another..
The Aztec Blind
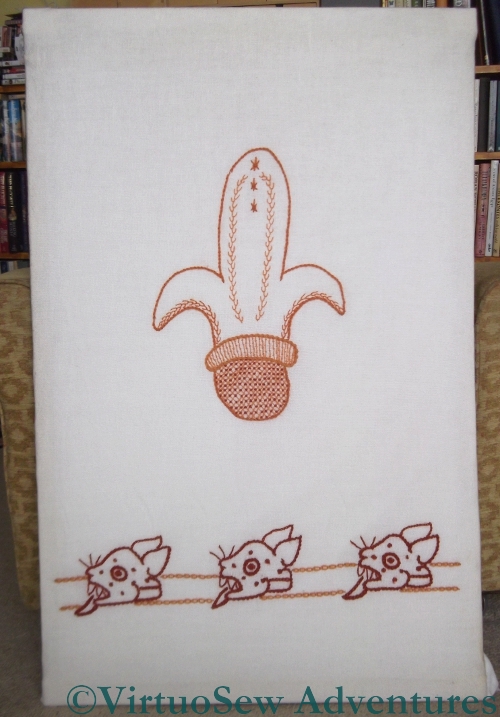
Aztec Hall Blind
Our predecessors in our current house had a somewhat flamboyant decorative style, and we still haven’t replaced the Aztec inspired wallpaper in the hall. If the combination of terracotta and ochre makes it dark, that same colour combination also makes it seem warm, which in a draughty, 100-year-old house is a consummation devoutly to be wished. Especially since my Geordie friends tell me I’m “nesh” (translation: excessively susceptible to cold)!
Since it’s also Grade II listed, we can’t simply double glaze, so the first winter after we moved in, my mother suggested reviving the idea of “blackout blinds”, padded to reduce the draught. With my usual knack for complicating a perfectly simple project, I embellished the hall blind with an Aztec inspired embroidery in rusty coloured wools on a coarse cream linen.
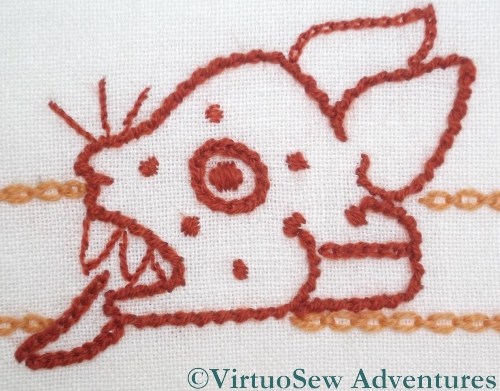
Jaguar Head
I started with the Jaguar’s Head frieze across the bottom. The main outlines are in twisted chain stitch, and the spots and the eye are in rough satin stitch. The background lines in the lighter shade are in my favourite Cable Chain Stitch.
I enjoyed working the jaguars. The simplicity of the stitching and the rather stark line drawing combined to create something that was very easy to do.
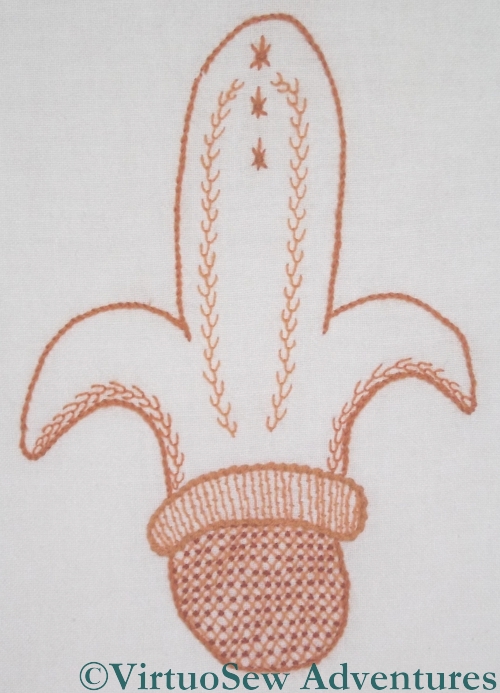
Central Motif
Unfortunately I then lost my nerve. The jaguars alone could easily have created all the effect I wanted, but the expanse of bare fabric unnerved me slightly and I filled it with another motif.
There’s more going on in this one – feather stitch and star stitches, jacobean trellis couching and burden stitch (running vertically instead of horizontally).
I may yet unpick all that section and wash the fabric again to pull the threads back into line..
Although, as it stands, it provides a salutory reminder, every time I go past, that more isn’t necessarily more !
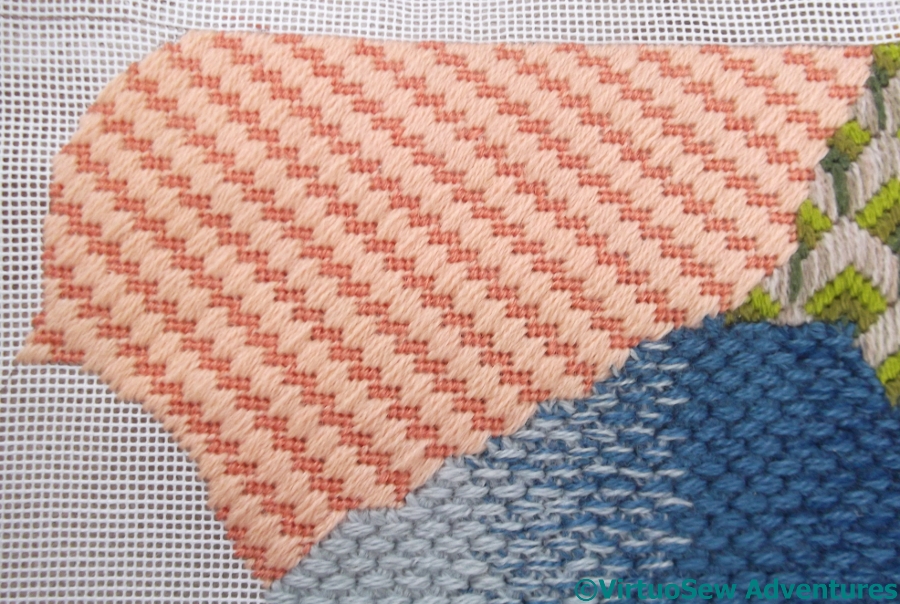
Crazy Canvaswork Cushion – Part 6
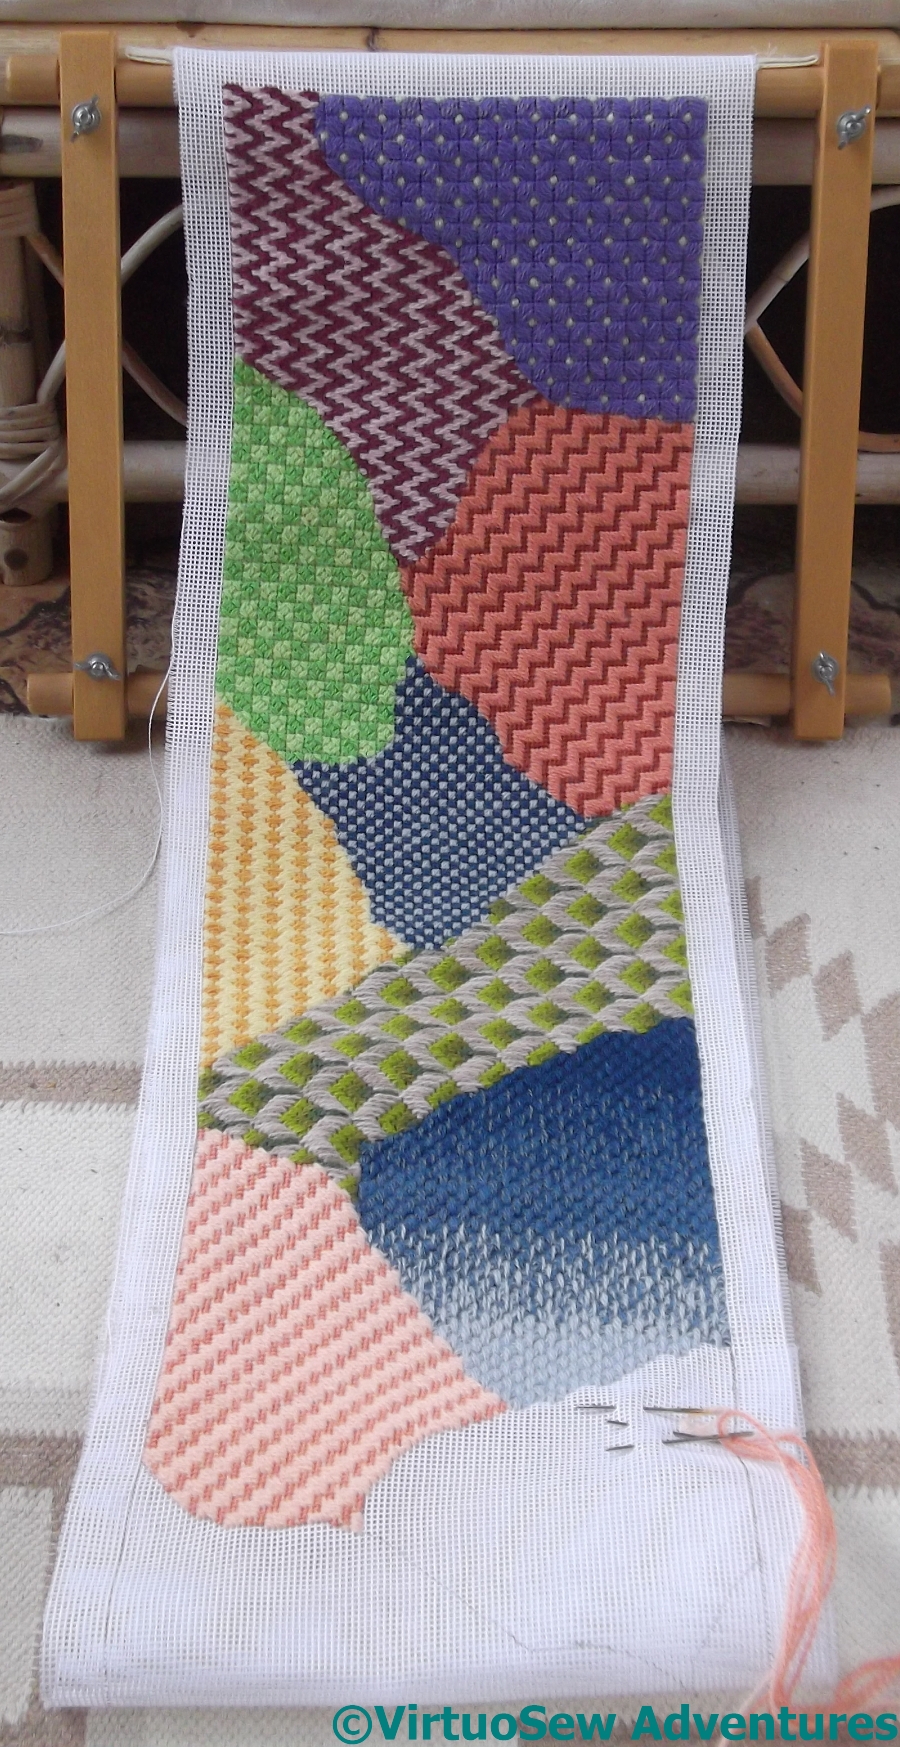
Two Thirds Done
We interrupt our normal programming…. to bring you your first sight of the whole Cushion.
Probably your only sight until I take it off the stretchers, too. As it turned out, getting the canvas rolled up neatly again, under sufficient tension, was really quite a task, involving two people and much changing of minds, as well as many rollings and unrollings. Furthermore, since the rollers are permanently set in their sockets, it won’t be possible to show the whole thing without taking it off the stretchers. I shan’t be doing that, because I really don’t enjoy the mounting process!
However, I can report that I am really very pleased with how it is going. I think I need another set of greens for the next section, since there seems to be a rhythm of sorts going on there. I certainly need something bright, with a bit of punch and impact. I like the last two sections — they work well together – but they are beginning to look a little too well behaved. It’s not quite as riotous as I was hoping…
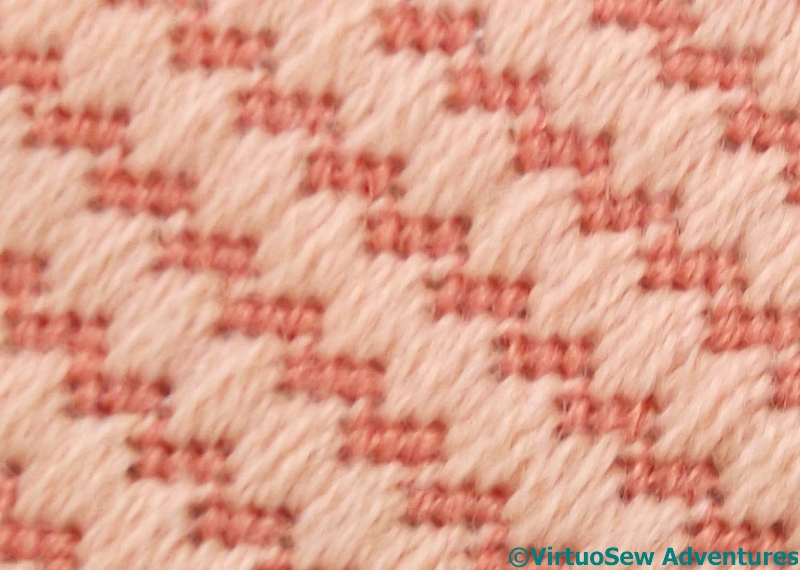
Moorish Stitch
Section Nine of the Crazy Canvaswork Cushion is worked in Moorish Stitch, a diagonal stitch to set against the crossed stitch of the previous patch.
There is one heathered thread in this pattern – the solitary tent stitch vertically separating the short dashes. That’s turned out a bit too subtle, but it does help to maintain the difference between Moorish Stitch and Jacquard Stitch, for example.
Section Nine
This patch took longer to do because as the weather warms up, wool becomes a less appealing material to work in. In addition, the main, peach wool proved to be rather harder to separate that I expected. It’s labelled Paterna, and should be exactly the same as all the other threads, but it was harder to strand, and has slightly less sheen.
Now I need to pick a stitch – I think it should be a straight stitch, with pattern that runs horizontally – and then pick the colours for Section Ten…
The Circle Skirt Finished – Maybe!

The Finished Circle Skirt – Perhaps!
This seems a good enough point at which to say the Circle Skirt is finished, although I may tweak and titivate further next winter.
Click on the picture to zoom in..
Some of the circles have been needlefelted, to greater and lesser extents, to help them to stay in place. Now I have my embellisher, I think that the next time I try this sort of thing, I will needlefelt very thoroughly, to try to help blend in the edges a little more. Once I have tried both ways I will feel that I am beginning to gain an understanding of how the embellisher affects the handle of the the fabric. I already know that it does, of course, but now I need to learn how to predict the effect and allow for it.
The skirt is now much more useful and wearable than it was. Unembellished, it was a strange light greyish colour that seemed just slightly “off” with everything I owned. Now, however, the burgundies, reds and greens tie in nicely with an assortment of tops, and the way the embellishment shrinks around the sides to the back helps to emphasize the kick-flare at the back.
In the right company, it’s a fabulous conversation starter, and it’s a wearable sampler as well. I’m rather looking forward to wearing it at the Knitting and Stitching Show in Harrogate in November!
Embellishing the Circles Skirt – Part Six
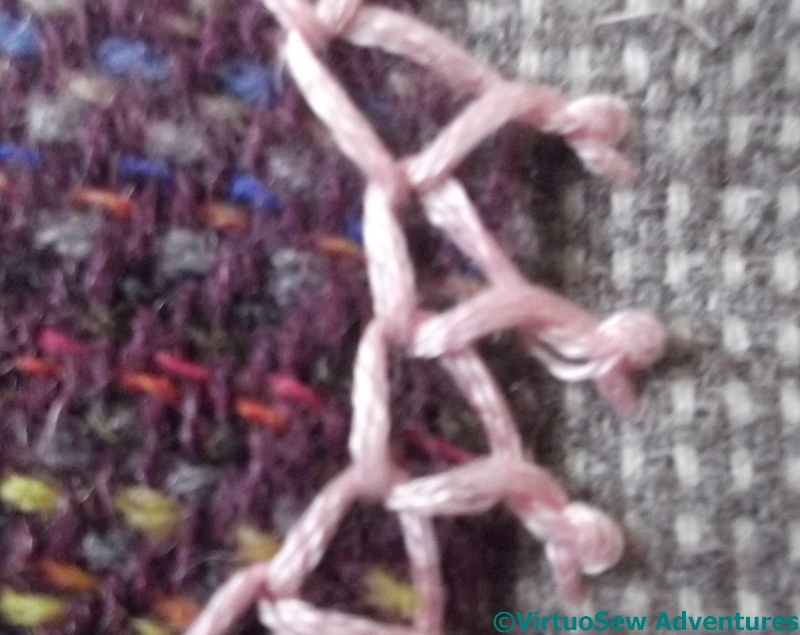
Crested Chain Stitch
I managed some really close close-ups here! This is the Crested Chain Stitch on one of the small circles on the back of the skirt, on the flaring panels.
The thread is a very ordinary stranded cotton, used straight off the skein – although as you can see, a couple of strands are making a bid for freedom, even so!
This picture also gives you a sight of the rainbow of colours involved in the tweed fabric I used for this particular circle – isn’t it lovely to see!
Trailing Spiral
The trailing spiral is high up on the front of the skirt, off to one side, and it was – in spite of the order of its appearance – one of the earliest elements which trailed off the circle and onto the fabric. I thought this would turn out to be quite important, to help link the various materials and create a cohesive whole. I had to work the spiral twice because the first time it barely showed at all. I’m all for the painter’s technique of “lost and found edges”, but there has to be something to find!
The purple chain stitch is there purely to make sure of the edges. If I had already bought the embellisher, I might have simply used that, very heavily, first.
Chainette Spiral
I love using rayon chainettes in this sort of experimental embellishment. As a one-time specialist in the industrial production of “novelty” yarns, I have a sentimental attachment to chainettes, chenilles, and eyelash yarns.
This particular chainette was striped, which echoed the twill weave of the tweed very nicely. It was also a real trial to stitch with – hence the simple running stitch. I simply didn’t have the energy for anything else..
Embellishing The Circles Skirt – Part Five

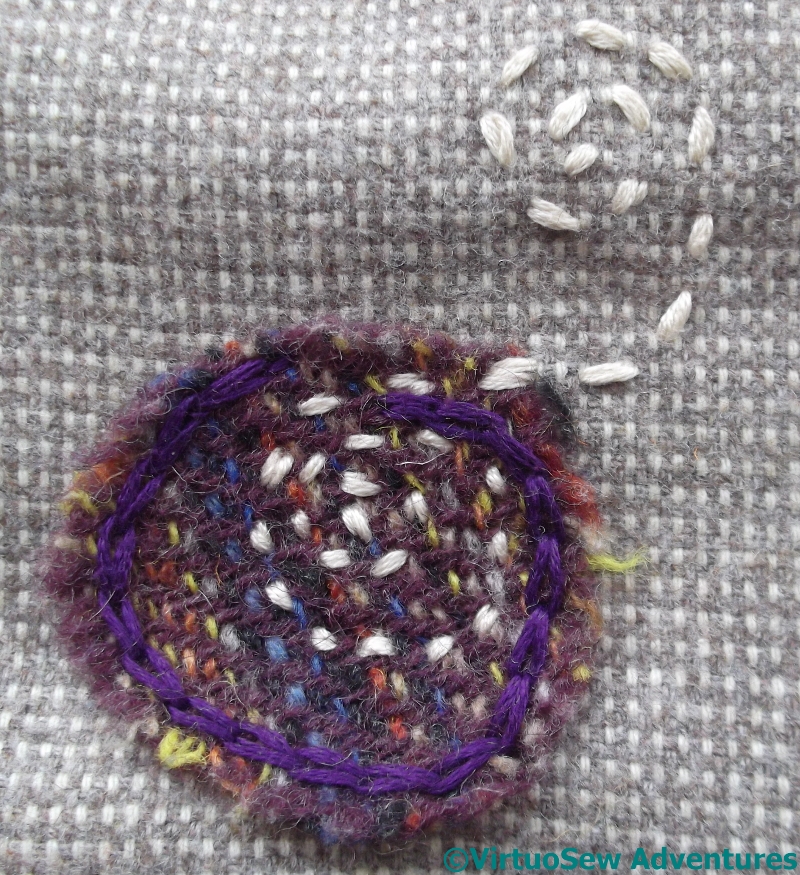
Blanket Stitch Wheel
I’ve recently bought myself an embellisher, and this is one of the circles I’ve used it on. The stitching is a simple blanket stitch wheel, which some small straight stitches between the spokes and French knots on the skirt fabric. The thread is wool, so I thought this one might be a good candidate. It has had the effect of making the stitches seem much more part of the tweed circle – almost drawn or painted on. In turn, that helps the French knots to seem a little more textural.

Change In Texture
Learning to use the embellisher – and in particular, how soon to stop! – is going to prove interesting. Here you can see that there is a less fuzzy texture at the centre of this tweed circle. That section has been more heavily treated with the embellisher. This was quite deliberate, because the very free ornamentation on this skirt allows me to experiment, and one thing I would like to know is – will this change in texture be permanent, or will this fabric become fuzzy again as the skirt is worn?

Couched Bouclé
In this case, I’m not sure I can even distinguish the effects of the embellisher! I couched a bouclé thread over the top of the tweed in this case, then ran the embellisher over the tweed and bouclé at random. There is extensive scope for investigation and experimentation here..
Incidentally, for those who’ve not heard of one before – an embellisher is something like a sewing machine, but it replaces the needle and thread with an assembly of barbed needle-felting needles. The barbs entangle the fibres of the fabric, creating new textures and joining the fabrics without stitching. So far I’ve only had a chance to experiment a little, but I think it might be a very useful tool when I start work on the Vision of Placidus!
The Crazy Canvaswork Cushion – Part 5
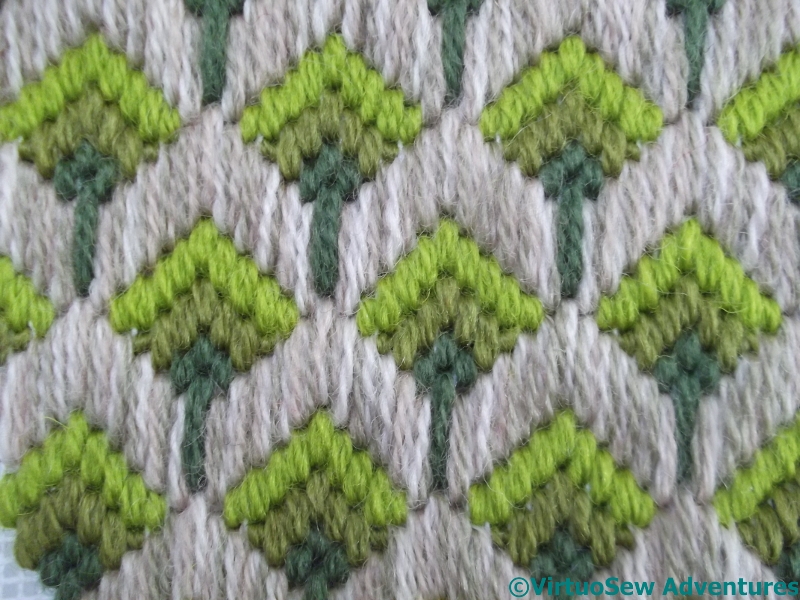
Tree Pattern
This tree pattern is one I’ve been looking for an excuse to do for quite some time. The book in which I found it suggests using it for small pieces like spectacle cases, but I’m not sure I agree. I think it might make for a rather overpowering pattern if not contained by something else. That same book said it was easy, and I’m not sure I agree with them about that either – I had to unpick all the trees the first time I did them, because I’d repeatedly got one element of the stitch placement wrong, in a rather unfudgeable fashion!
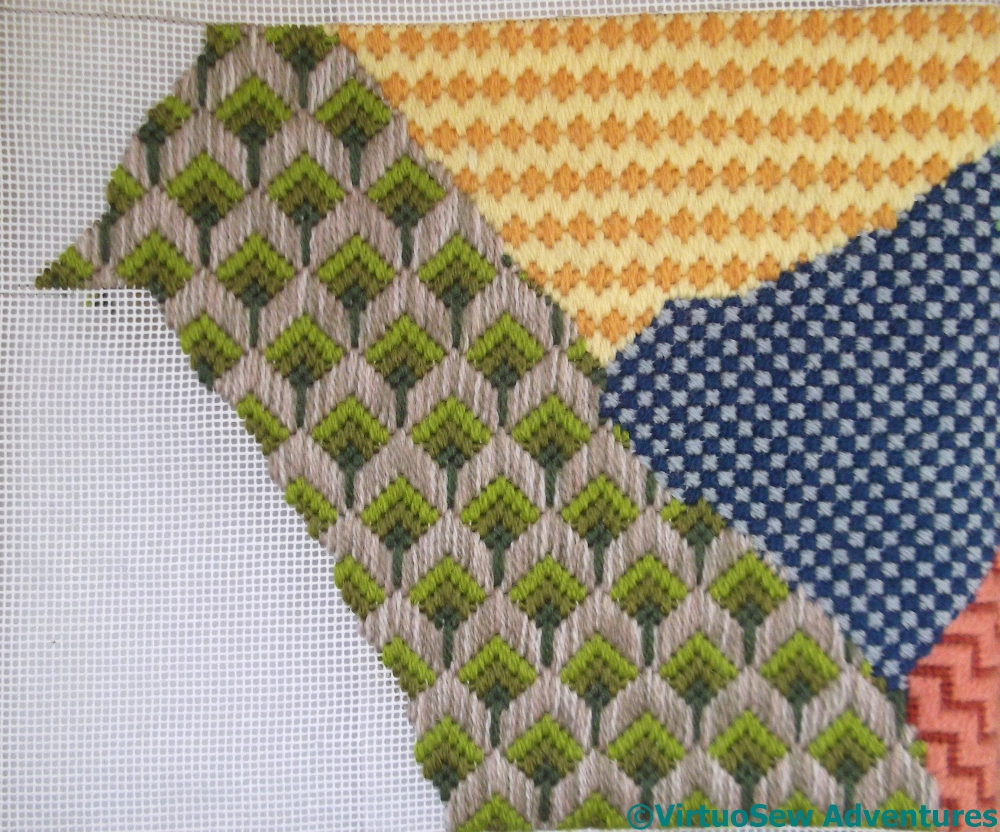
Section Seven
Section Seven covers – just – the whole width of the cushion, and makes a good interruption to the rhythm I’d built up.
It occurs to me that it might be a good candidate for a single colour design, one of these days, especially a light colour that will allow the ends of the stitches to cast shadows and build up the pattern.
As though I don’t have enough plans swirling in my head!
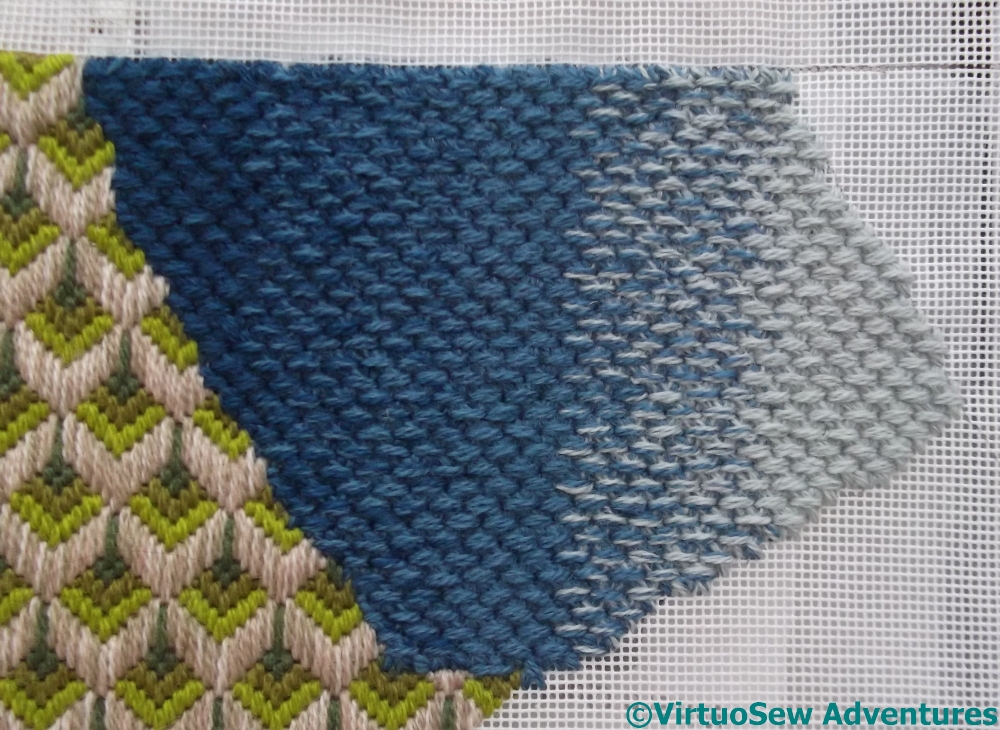
Section Eight
It turned out that the next section was rather tricky to pick a colour for, until my mother suggested blues, to help reflect the pattern around Section Seven.
I decided to create a shaded effect on Section Eight. I used three strands of wool, which meant that I could create a fairly subtle graduation starting from three dark strands, and progressing through 2 dark and 1 medium, 1 dark and 2 medium, 3 medium, and then 2 medium and one light, 1 medium and 2 light, then finally 3 light.
Dutch Stitch
The stitch is Dutch Stitch, found in Mary Rhodes’ Dictionary of Canvaswork Stitches. It is a condensed, closely worked crossing stitch. In fact it is so condensed as to be quite an effort when worked in three strands on this canvas!
Still, I expect it will prove a hardwearing stitch, and the texture is a good contrast with the smoother textures of the straight stitch patterns.
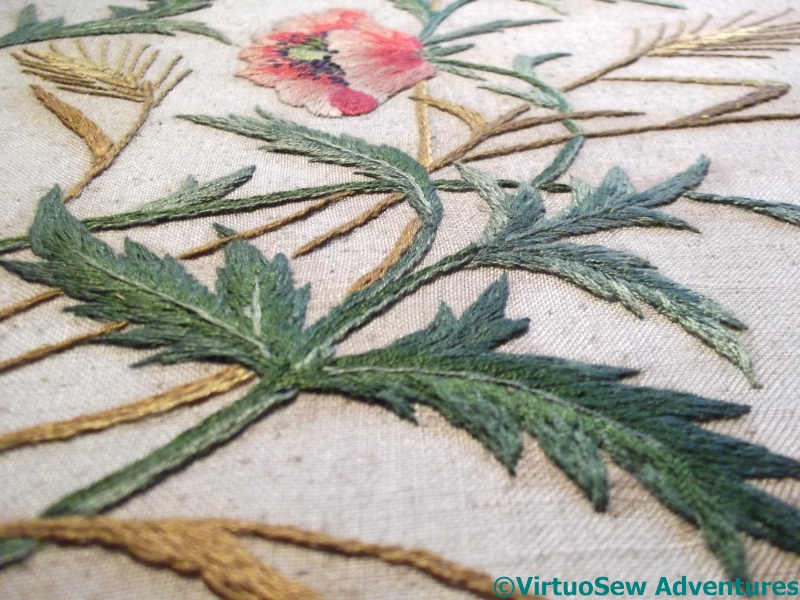
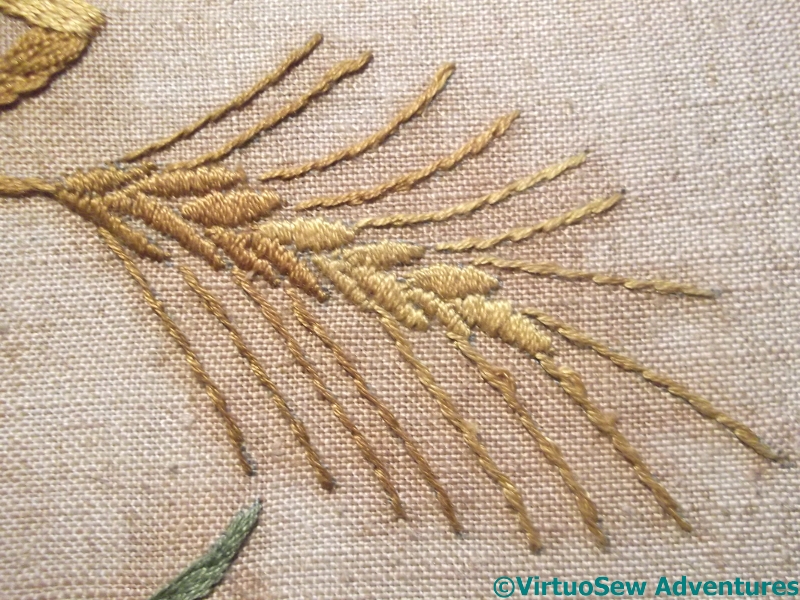
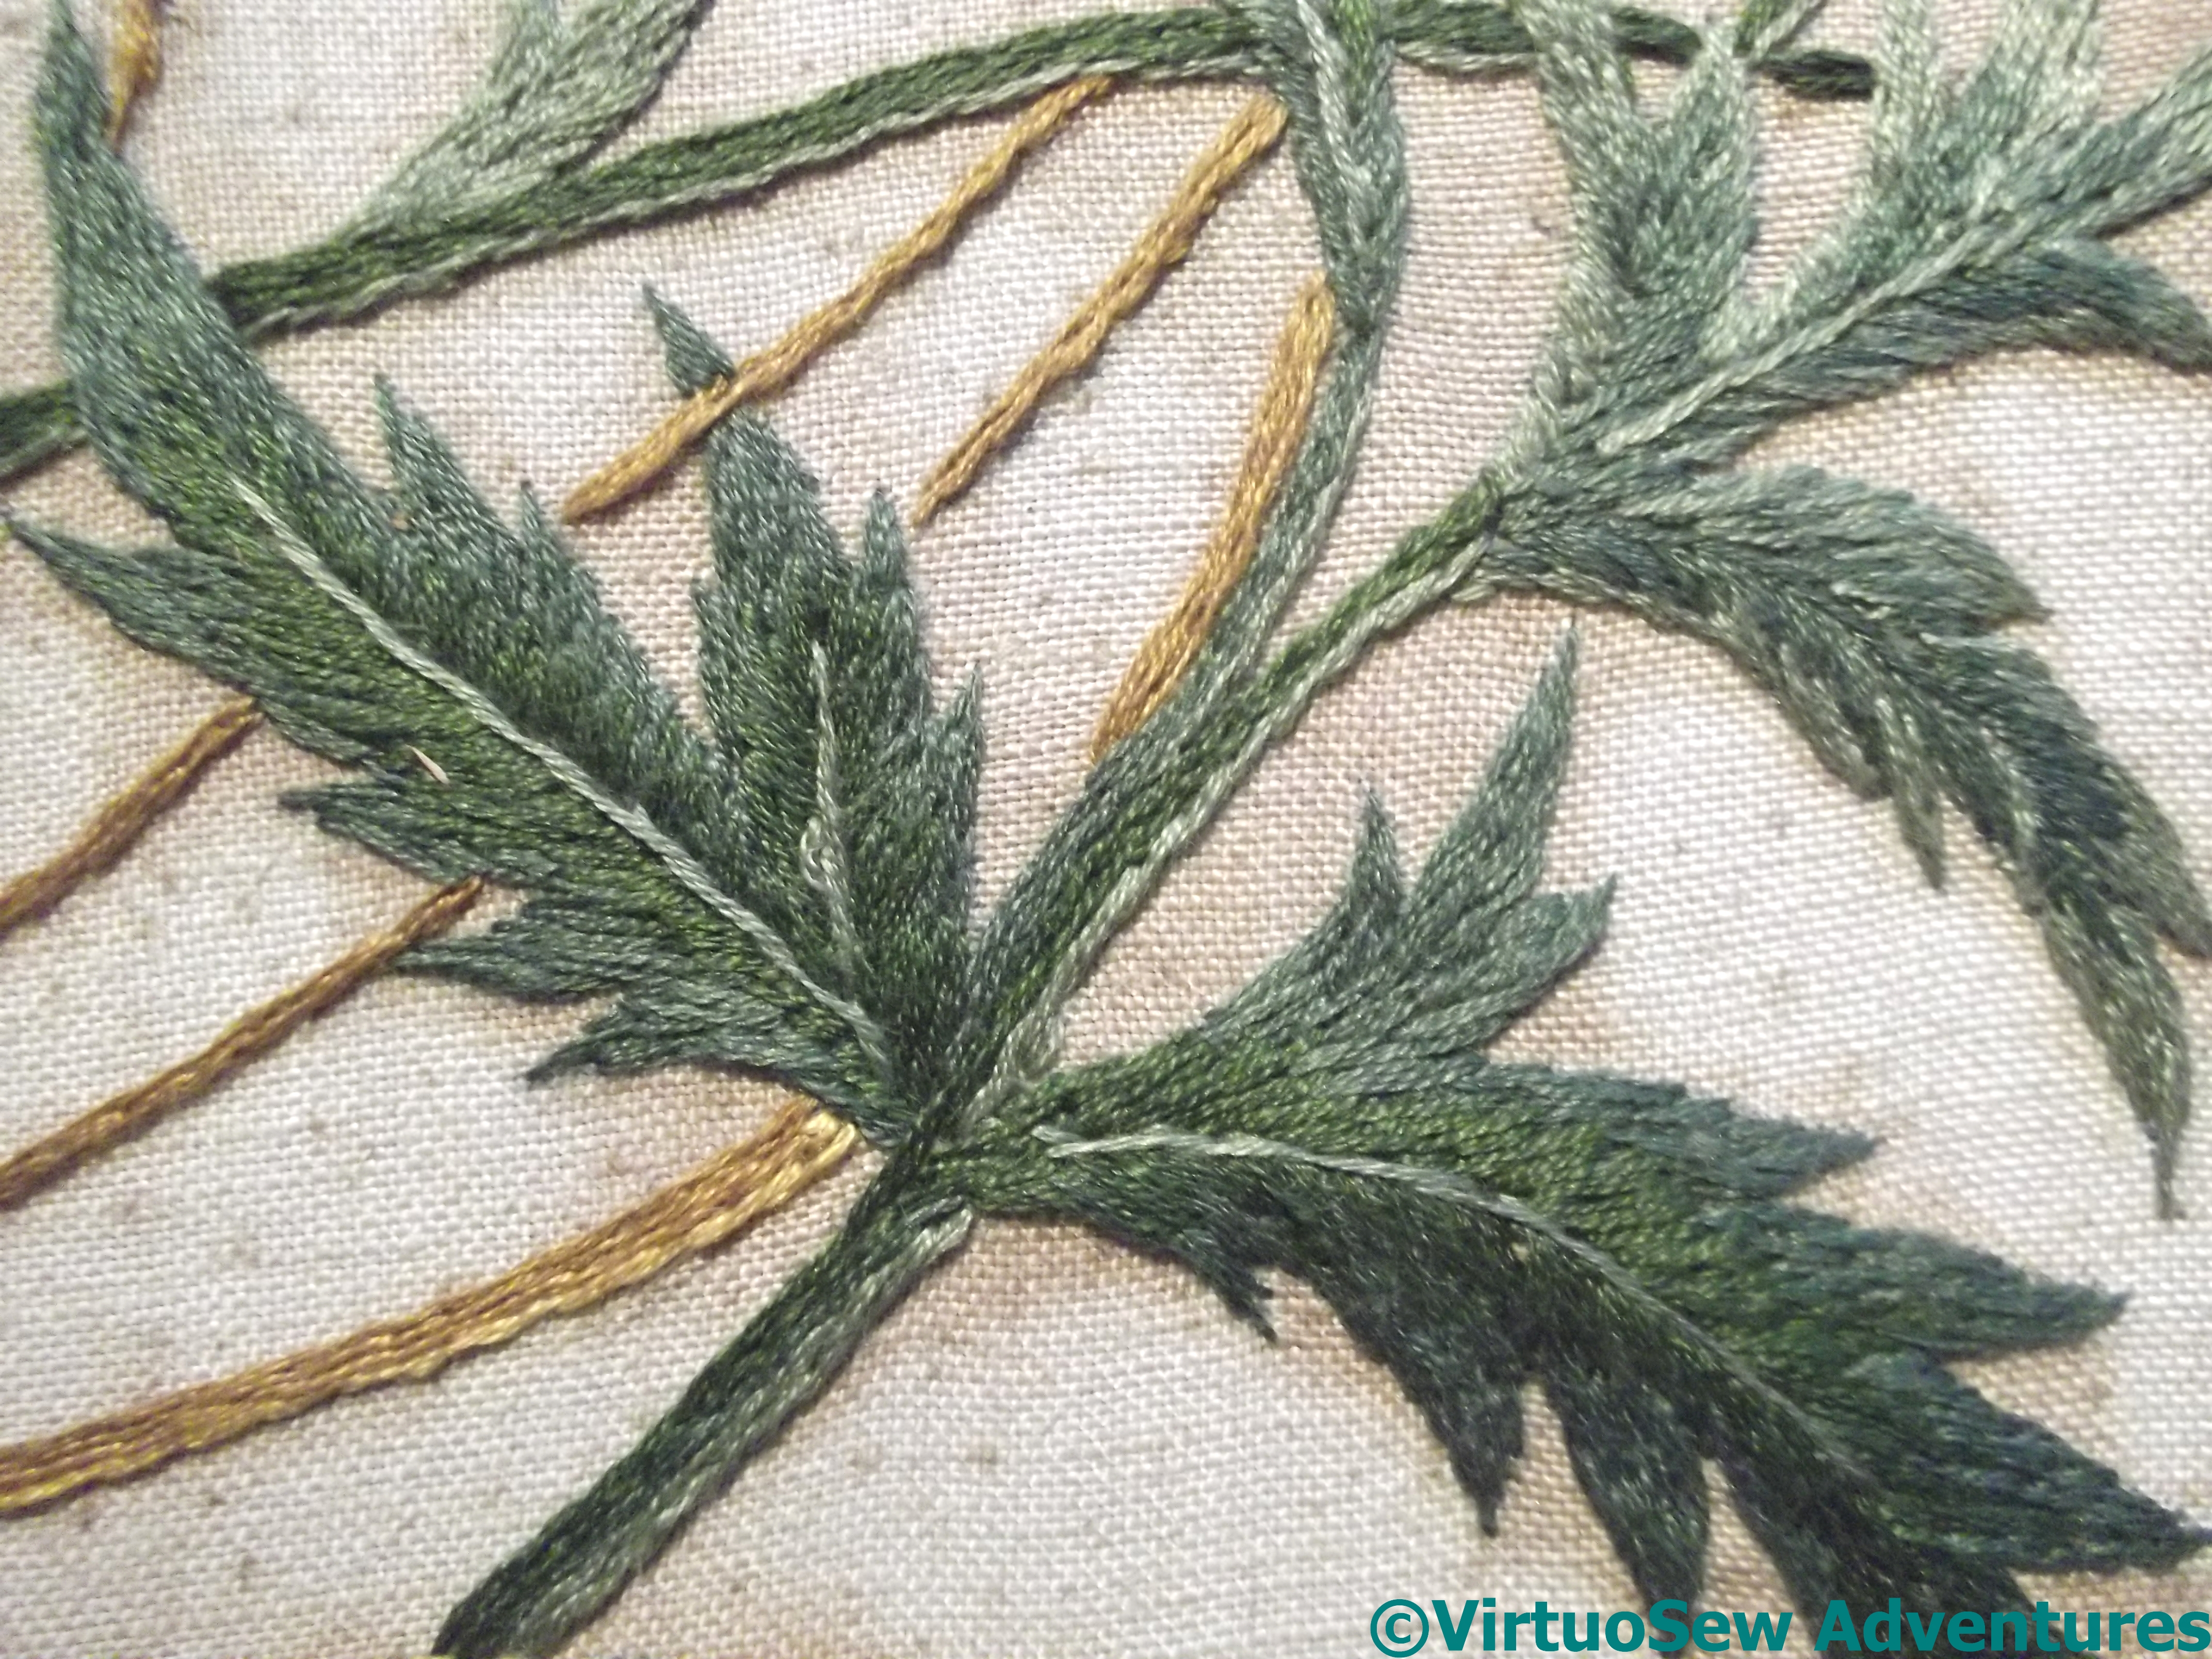
Poppies and Wheat – a closer look at Grandmama’s embroidery
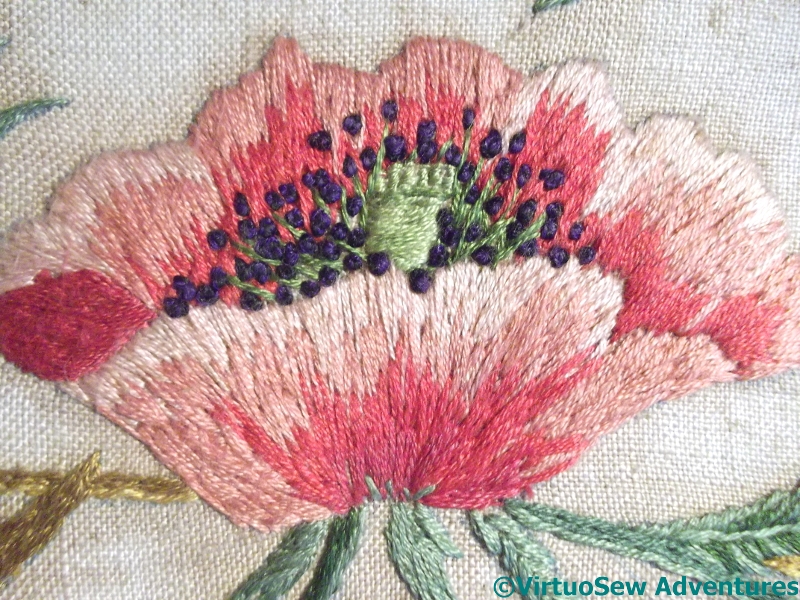 When we took the tray to pieces to remove the embroidery, we had a Nasty Shock.
The fabric was glued to the backing board and cut off flush with it. So much for our blithe expectation that we would be able to remount the fabric – carefully, of course! – and then get it properly framed to advantage.
In retrospect, we should maybe have guessed from the staining around the stitching that maybe some glue had been involved, but since I always mount over padding, it would never have occurred to me that Grandmama’s framer would have done anything else, still less that the legendary Miss Hunter would have presided over all that beautiful embroidery and then permitted it to be mounted onto any old piece of board using any old glue that happened to be to hand!
The embroidery is worked in long and short stitch, satin stitch, stem stitch, and French knots. I think Grandmama used two strands of stranded cotton throughout, and as it was wartime I’m impressed that she managed to gather ten different colours of thread for it.
It’s a salutary reminder to me that a riot of ornamental stitches and overdyed threads isn’ t always the very best way to achieve a striking result.
We are going to ask a textile conservator to have a look at the piece as it is, glued to its backing board, and give us some advice about the next step. Grandmama would be in pleats with laughter at the idea of any of her embroidery going to a conservator, but I hope she would be secretly pleased as well…!