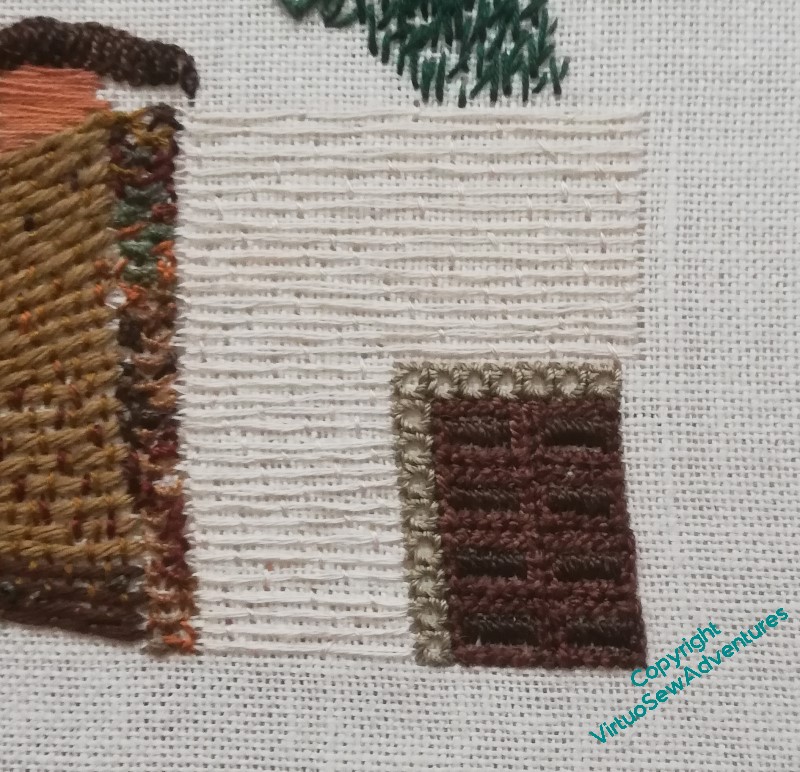
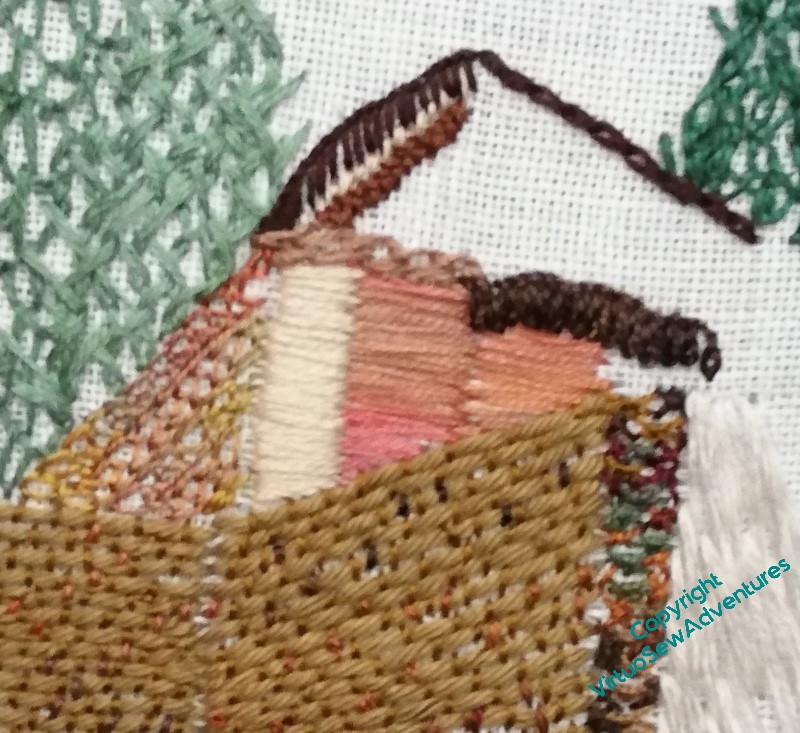
I finally had a couple of inspirations for the rendered wall and the door. I used two shades of brown pearl cotton for the panels on the door, outlining them using long legged cross stitch, and filling in the panels with satin stitch. While I was doing that, it occurred to me that this was a good opportunity to demonstrate, again, just how different a stitch can look if you use different threads to stitch it with. So the render is rendered (sorry!) in Burden stitch, using two strands of light coloured stranded cotton, and already you can see how very different it looks in comparison with the soft cotton. It’s very satisfying when something works that well!
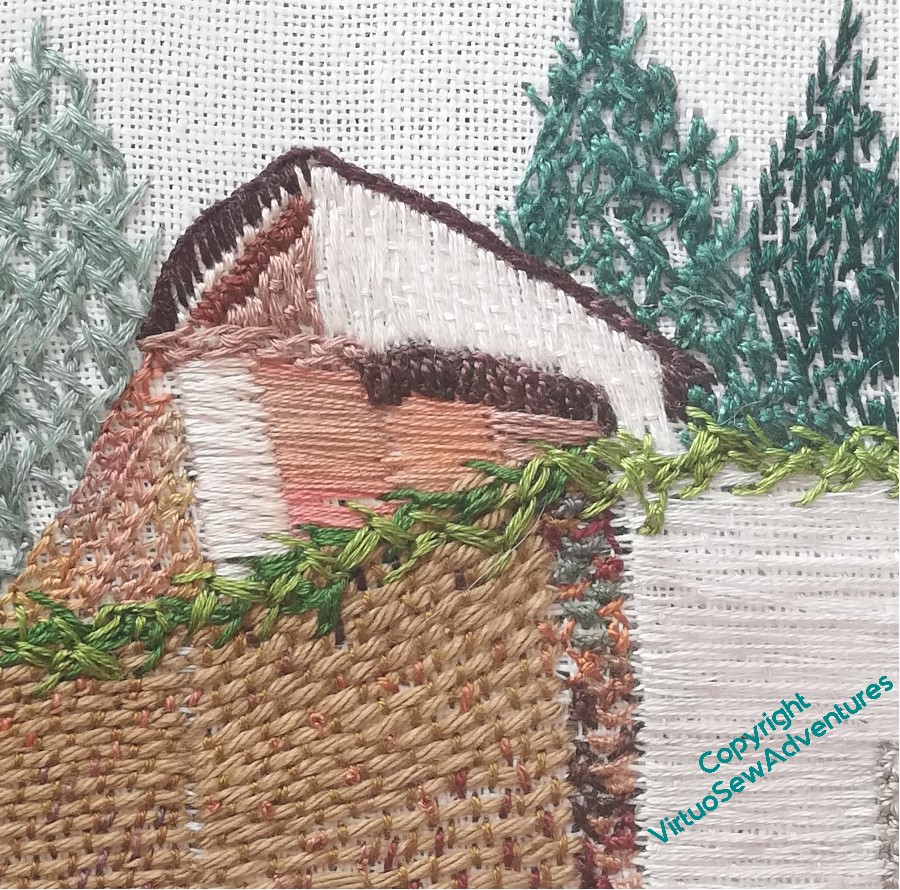
It was the golden light on the creeper that originally attracted me to this scene, so I need next to work out how to represent the creeper. I’m starting with feathered zig zag chain stitch, and I’ll use several colours of thread to create the variation of colour in the foliage.
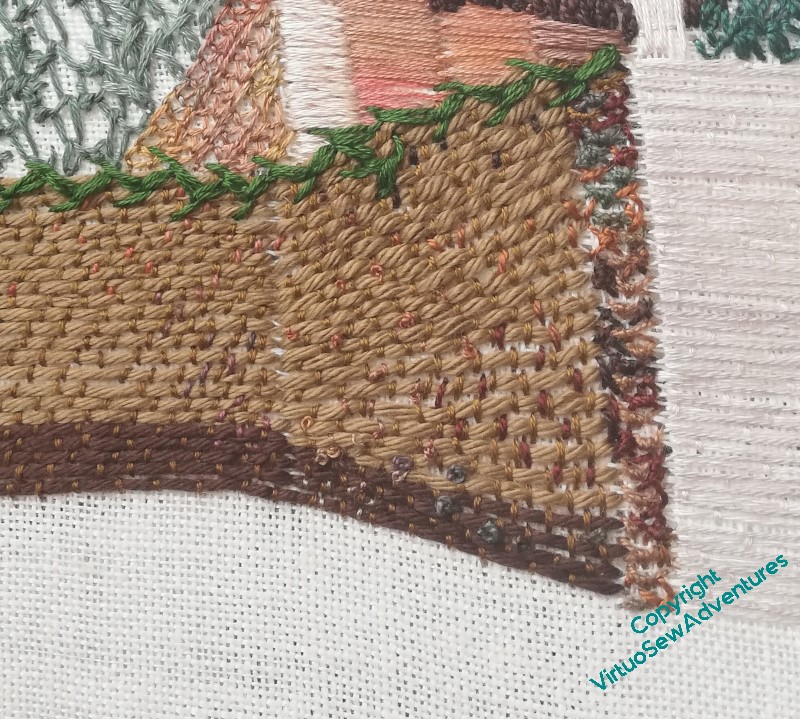
I’ve added a few French Knots to the rough stone wall, to roughen it up a bit, and tweak the colour balance.
You can see here the start of the middle shade for the creeper, again using feathered zigzag chain stitch, and trying to zigzag the zigzags to vary how much of each colour shows.
You can also see that the facing light rendered wall is now done, and I have simply turned the Burden Stitch through ninety degrees. I think I may be beginning to be pleased with it!
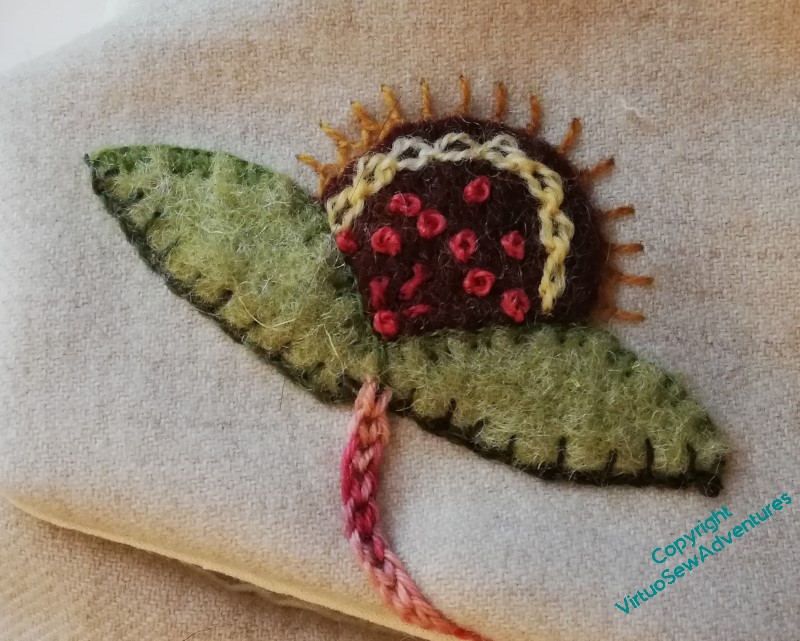
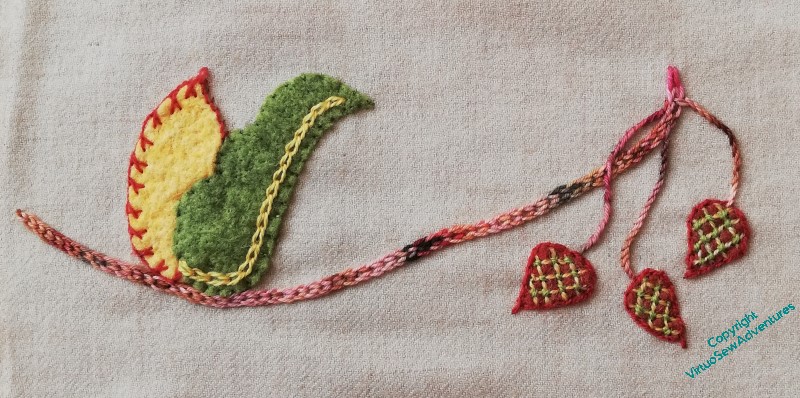
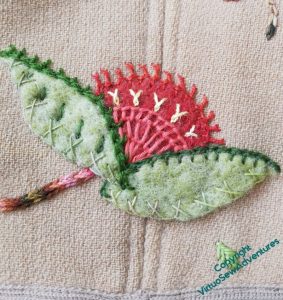
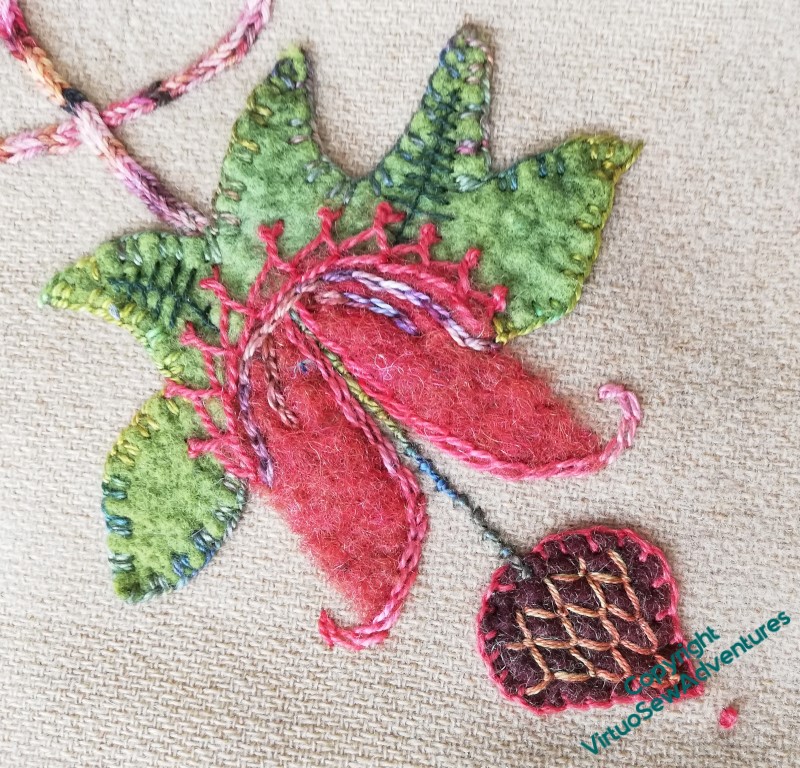
The style of the embroidery for the masks is just like on the Jacket itself; felt as the basis, enlivened with wool stitchery. In this case, Mountmellick stitch and grouped blanket stitch on the leaves, French knots, cable chain stitch and half chevron stitch on the bud (if that’s what it is!).
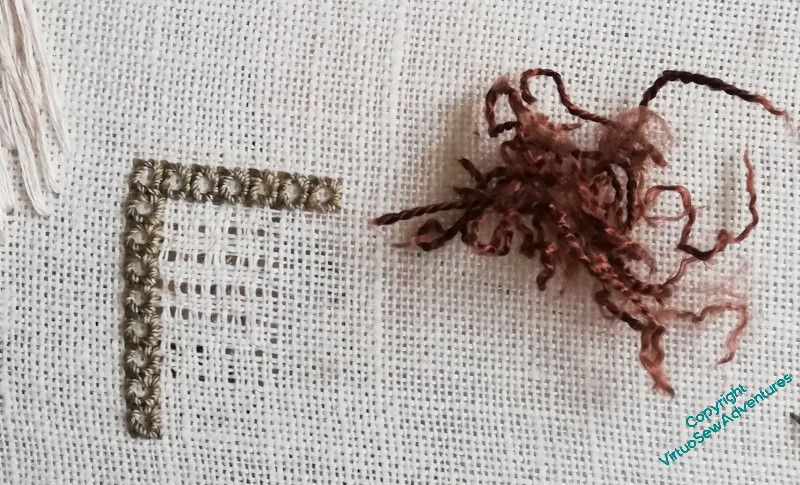
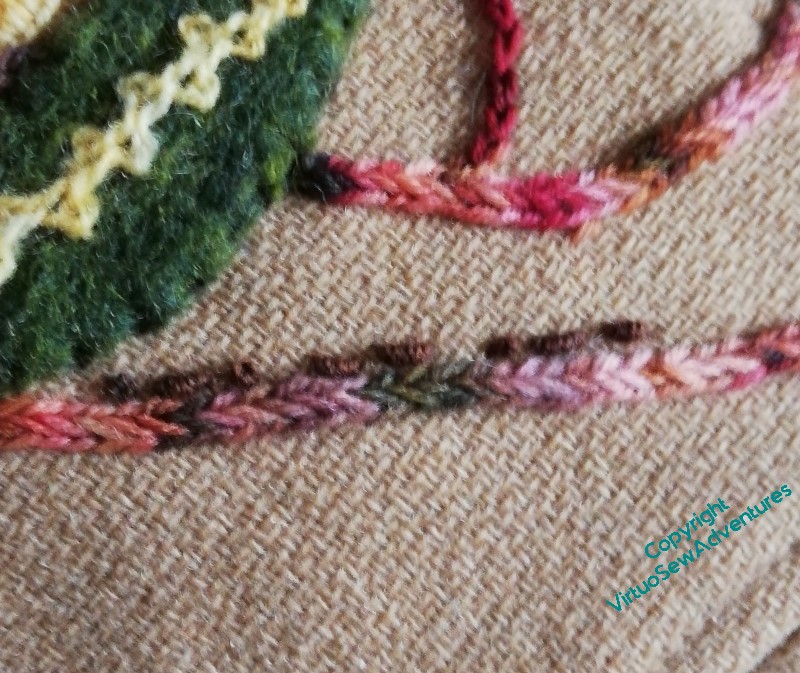
Since I worked the butterfuly entirely in isolation, I hadn’t had to think about the stems, but when I stopped to think, before I worked stems on the masks, I realised that there was a decision to make. The Holly Braid Stitch that I used for the main stems on the Jacket seemed just slightly out of scale for the size of masks, but at the same time, ordinary chain stitch didn’t have enough personality.
I gave some more thought to the question, and then thought that it was a perfect use for one of my old favourites, Hungarian Braided Chain. The finer stems are simple stem stitch, and it’s been fascinating to see how the various different stitches have displayed the variegated knitting yarn differently!.
Jacobean trellis stitch is another old favourite, and the crossed blanket stitch over the bright yellow pulls the orange across from one side of the mask to the other.
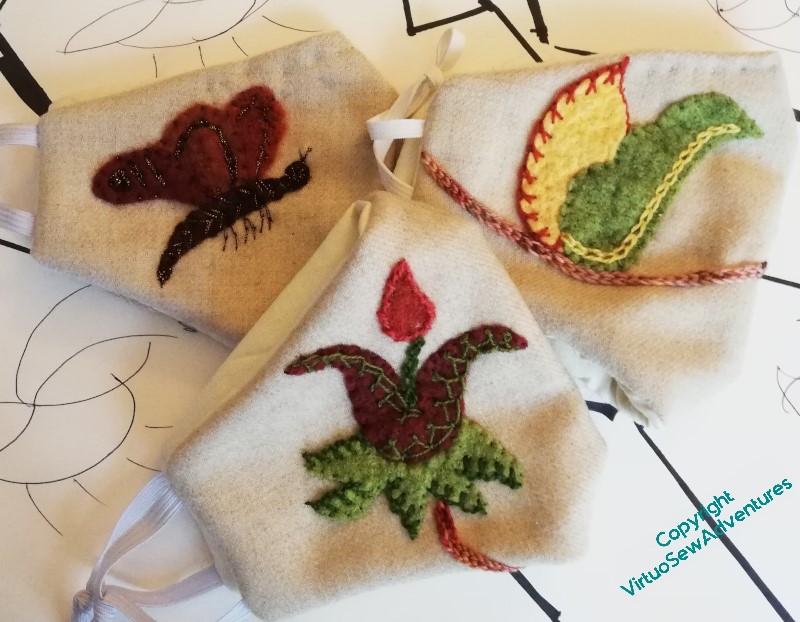
So I have ended up with three masks to go with the Jacket of Many Stitches, one with a single isolated motif, one with a motif on each side, and one with motifs on each side, linked by a stem. They’re lined with calico, and I’m adding the wires from a couple of defunct single use masks to hold them a little more closely to the nose.
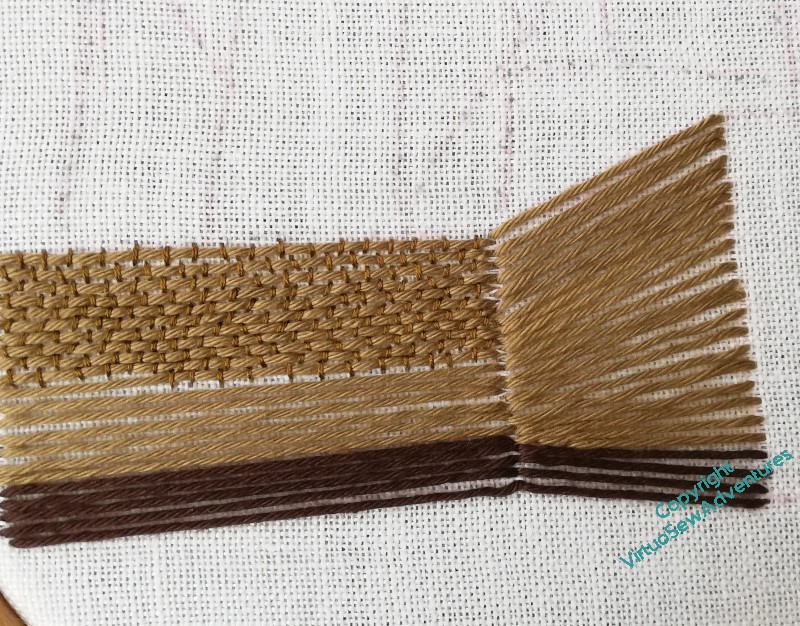
Burden Stitch does a good job for the wall – you can see it starting here. I’ve used Soft Embroidery Cotton for the underlying straight stitch and a mixture of single strands of ordinary stranded cotton with one of the slightly heavier and more tightly twisted threads from Caron Collection, which has a whole series of warm red and brown colours with some greenish ones to help suggest the variation of colour in the stone wall. I’ve used darker soft cotton at the base of the wall, where there will be deep shadows on the lawn to “ground” the building.
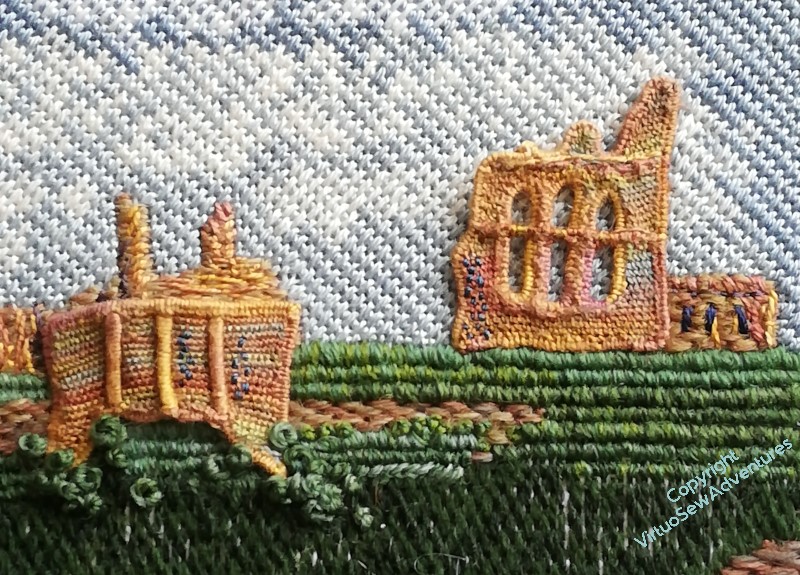
The buildings showing above the top of the creeper-bedecked wall are all rendered rather than rough stone, and I had a bit of fun trying to pull together stitches and threads to represent the tiled roof, shadows under the eaves, the render and the woodwork. How pleased I am with how this section work changes day by day, so I shall leave well alone, until I’m either Definitely Dissatisfied or Supremely Satisfied!
In the bottom right hand corner, you can see the first attempt I made to depict the render on the facing wall, and the rough-cast feel of the turn of the wall. I’m not happy with the roughly-done, diagonal encroaching satin stitch, but I’m very pleased with the multicoloured mixture of French Knots, diagonal cross stitch, and Danish Knotted Cross stitch.
While I was rethinking the render, I worked on the door, which again, was not without missteps. The door surround, I am happy with – it’s Squared Chevron Stitch (found in one of my Edith John books), worked as a counted stitch. I then tried alternating two versions of Herringbone Stitch, hated it, and unpicked it promptly.
It has occurred to me that one of the reminders of the past two years will be in the number of garments that have masks to go with them. I am planning two dresses for myself, and even though I doubt I’ll get to wear them until times are much less alarming, I’m going to make matching masks, just to be prepared!
Having finished the Jacket of Many Stitches, signed it in Morse Code (of course!), and noting that it’s definitely a garment for chillier weather, I thought that some winter-weight masks might be in order. So I took a pattern from one of the bought ones we’ve got, and drew myself some ideas.
I have some cream wool left over from a jacket I lost in Paris when I was working there. I’ve always regretted that jacket, so I’m hoping that using the leftovers for something else will reduce the sting a little. It’s been thirty years, so it’s about time!
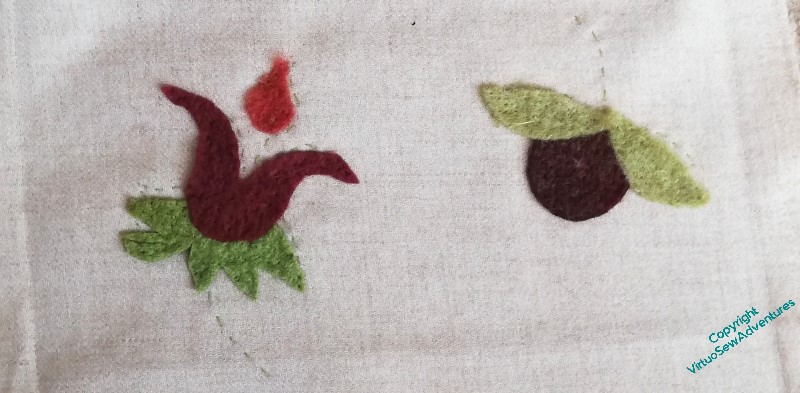
It was trickier than I expected to get my motifs small enough to fit on the mask, especially since I decided to use up some of the fragments of leftover felt at the same time, and sometimes I was a bit short of felt.
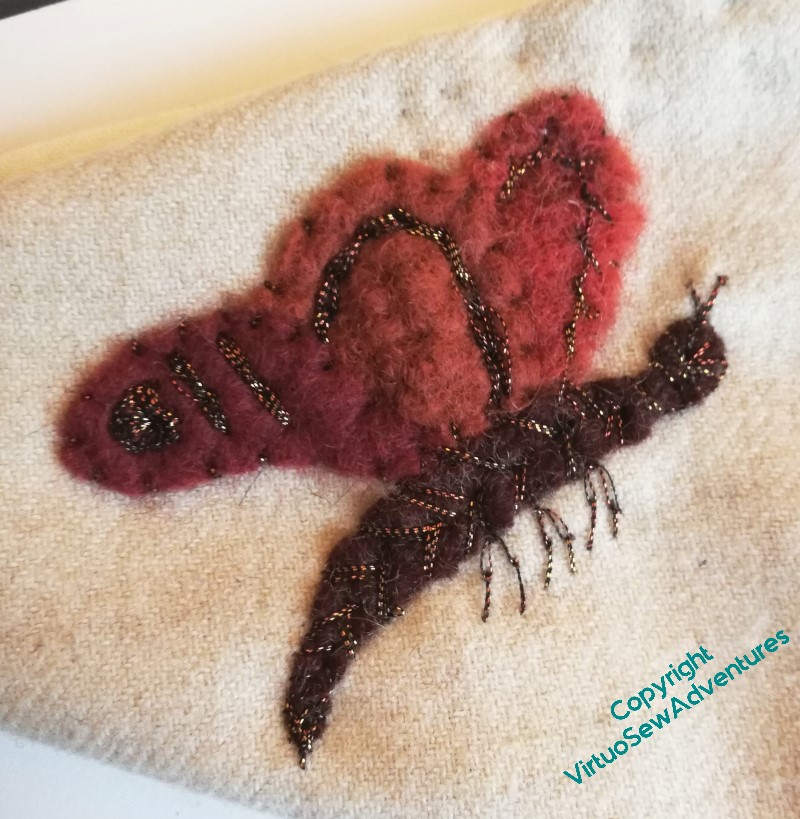
I started off with a little butterfly, and made him quite simple, enlivened with a thread with a bit of sparkle in it. I think it’s a machine thread, and the sparkle goes from gold to brown and back. I made up that mask, and realised that it was a bit on the small side. It does cover everything it needs to, it’s just that I prefer to feel there’s a bit of extra space in it.
So I tweaked my pattern a little, and drew my idea for the motifs on the fabric. At which point I realised that the pencil wouldn’t rub out, so I running stitched over the lines and turned the fabric over.
One of the things you need to know before you dive enthusiastically into family history is that the horrors are just as likely as the heroes. In our case, a land dispute at the turn of the 19th Century saw some ancestors of my maternal great grandmother getting their family tree professionally investigated and drawn up. They didn’t get the land (although what the Professor of Music at Cambridge wanted with land in London escapes me), but “The SheepStealers”, as we call them, have been updated ever since. As far as I can tell, we’ve got ancestors on both sides of every civil dispute since the Norman Conquest, so we can pick our favourite distant ancestor depending on our own historical hang-ups.
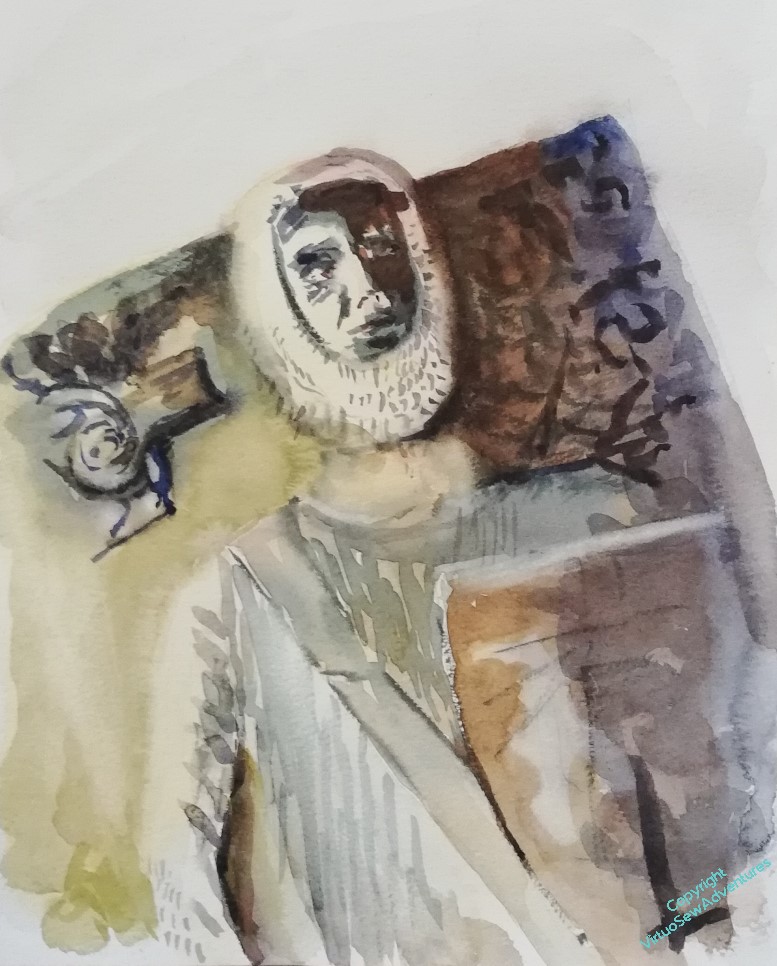
My mother, in particular, was completely thrilled to find that William Marshall, “the Greatest Knight” was on there. We went to his burial place in London, (pre-Covid) and I painted this watercolour of his effigy when I got home.
Fast forward some years, and Tanya Bentham of Opus Anglicanum blog, has published a book about Opus Anglicanum, which has got me thinking I would like to do some. I will probably do one of Tanya’s little heads to get the hang of the idea, but, being me, I decided that I would, as Ophelia (didn’t quite) put it, “wear my Opus with a difference”.
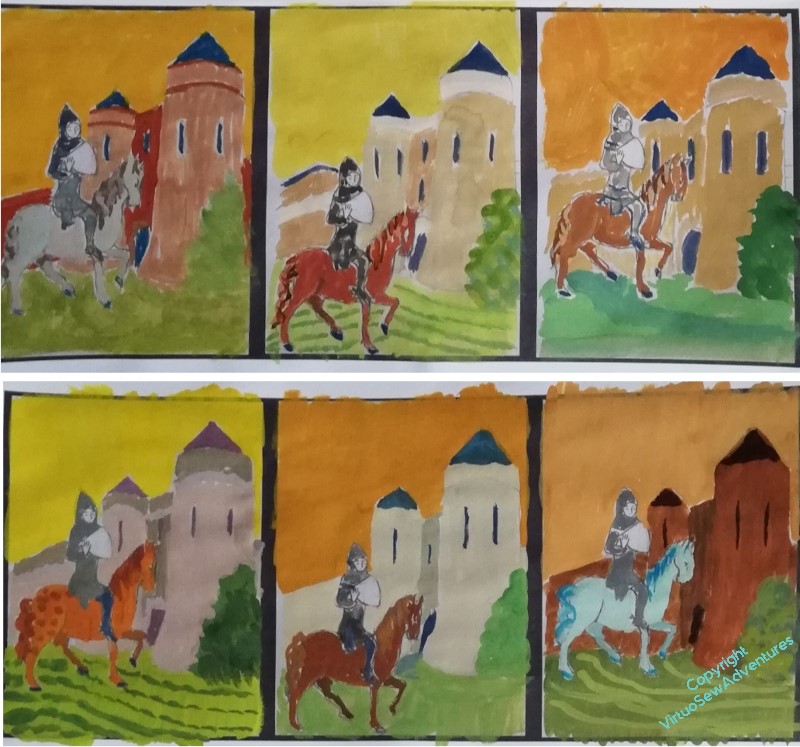
So I’ve settled on Umpteen-Times-Great-Grandfather William as my subject, on a visit to the Château de Tancarville, where he had his knightly training as a teenager. As you can see, I’ve got out my gouache to try to pick the right balance of colours, bearing in mind that the sky is going to be underside couched in gold. I can’t decide whether to make his horse a chestnut, a roan, or a grey – although given it’s opus, I get the impression I could make the horse blue and get nothing but praise!
One of the changes I’m going to make to the knight I’m adapting for William, is that I’m going to make his shield a bit bigger, so that his correct coat of arms (this was from memory so I need to look him up) is clear and it is obvious that I’m not doing just any knight, but specifically William. I think I should do something different with his hand, as well as remembering to give his horse reins and a saddlecloth.
So, I need to get to grips with William’s real coat of arms, settle on my colour scheme and order my silks.
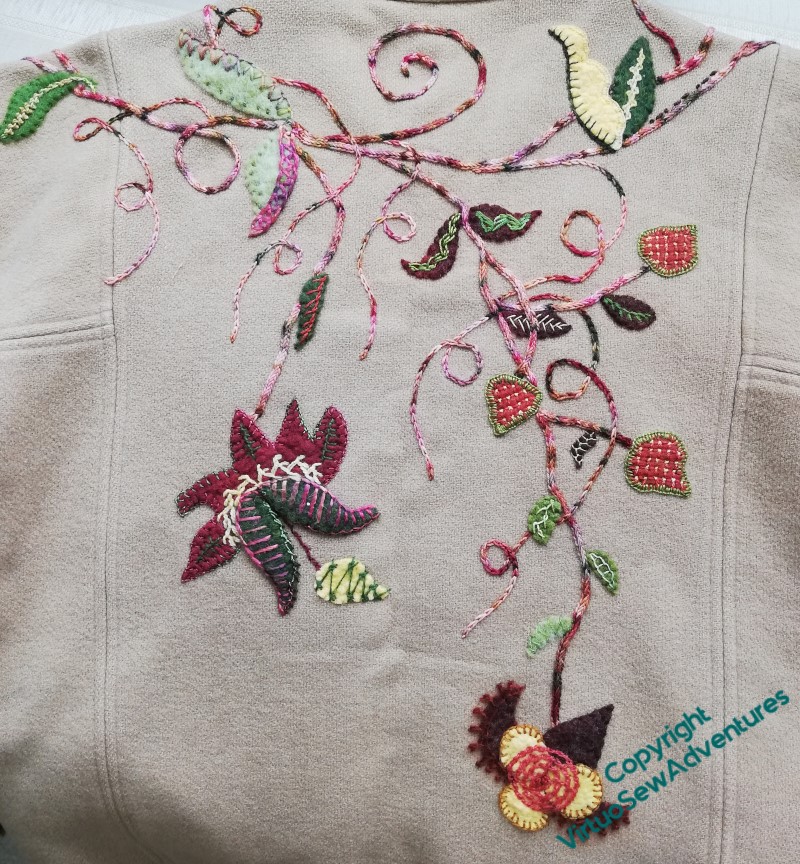
So, here’s the finished back view. When I had done most of the work, I looked at it, and realised that there was still a rather spare look to it – hence the assortment of chain stitch tendrils, worked out by asking my mother to wear the jacket while I scrawled chalk tendrils in all the places I thought they were needed.
The front left (from the inside) didn’t seem to me to be quite as open as the back, so it didn’t need quite so much in the way of tendrils. Just a couple, making sure that all of the pattern goes across all of the jacket.
I could maybe do with a bit more practice at drawing curlicues, but to be honest, drawing on a garment on a live body is not something I am likely to do very often!
You might also have spotted one of the tiny leaves I decided to put in covering a blemish near to the lowest bloom. I was rather pleased with that idea – if there are more difficulties, or weaknesses in the fabric, I will merely be adding more decoration!
The butterfly makes a neat little reference to the bugs and beasties in Jacobean embroidery, while covering the worn section on the patch pocket, and the tiny green stitches on the brown felt lift the colour nicely.
The front right also didn’t need too much additional work – a couple of tendrils, that’s all.
I realise as I look at this, that I didn’t change the curlicues on this fruit/flower thing for lighter ones, or, indeed, add stems to the brown leaf shapes, but I don’t think it was necessary, in the end.
I’ve already chosen a lining material – a bright, warm green.
I’m looking forward to wearing this later in the Autumn!
I’m a little behind with posting this, but there were a few details to finish off-video…
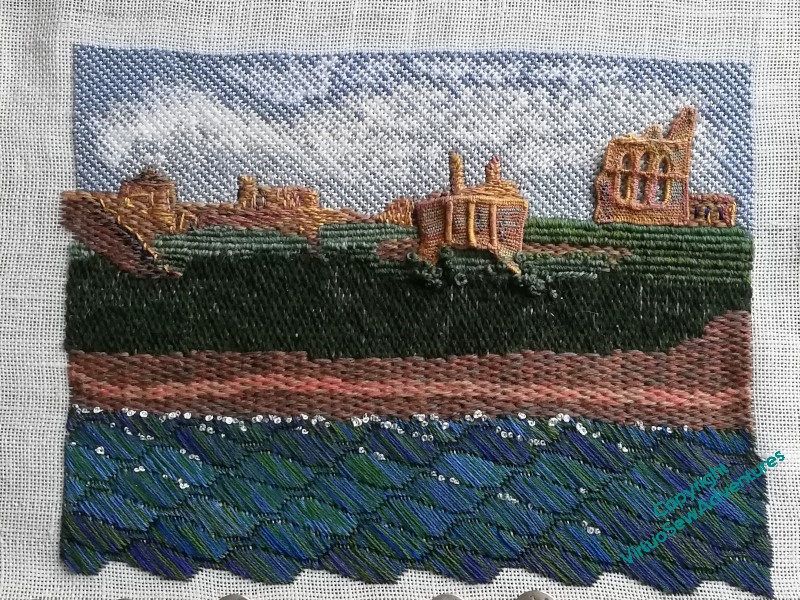
I didn’t want to overdo the water, but I wanted to break up the pattern a little, to create the sense of foam on the surface. I’ve used French Knots, in white silk and very very pale blue single strands of cotton. There were more, but having put them in, I took them straight out again!
Finally, I got to add in the two needlelace slips. I hope you can see that I’ve added a few green French knots to help one section to bed in nicely.
The other one, I’ve twisted and pulled a little, and I’ve tried not to stitch it down too firmly or in too many places. I want the shadow of the slip to help create the sense of distance and disintegration, and I think it’s turned out rather well. I did jam it up hard against the rows of raised satin stitch, and again, I had to be a bit careful, to make sure I didn’t pull those stitches through to the back.
Finally, the first attempt at Tynemouth Priory for “Leaving the Tyme 1915”, finished in its own right. I suspect that when I frame it, I will crop at least some of the water out, but for sure, as I said in the video, adding it in if you didn’t do enough the first time becomes really, really trying.
As you know, I don’t feel comfortable planning to the last detail before I stitch. I like to have space to explore and experiment. That in turn means I have to be comfortable tweaking how I work and how I display what I’ve done, and it is often the case that embroidery responds to close mounting in a way that watercolours, for instance, do not. I would far rather do more stitching than I really needed to – even with an exasperating stitch like this! – than have to go back to it when I thought I was finished and my mind has moved on to something else!
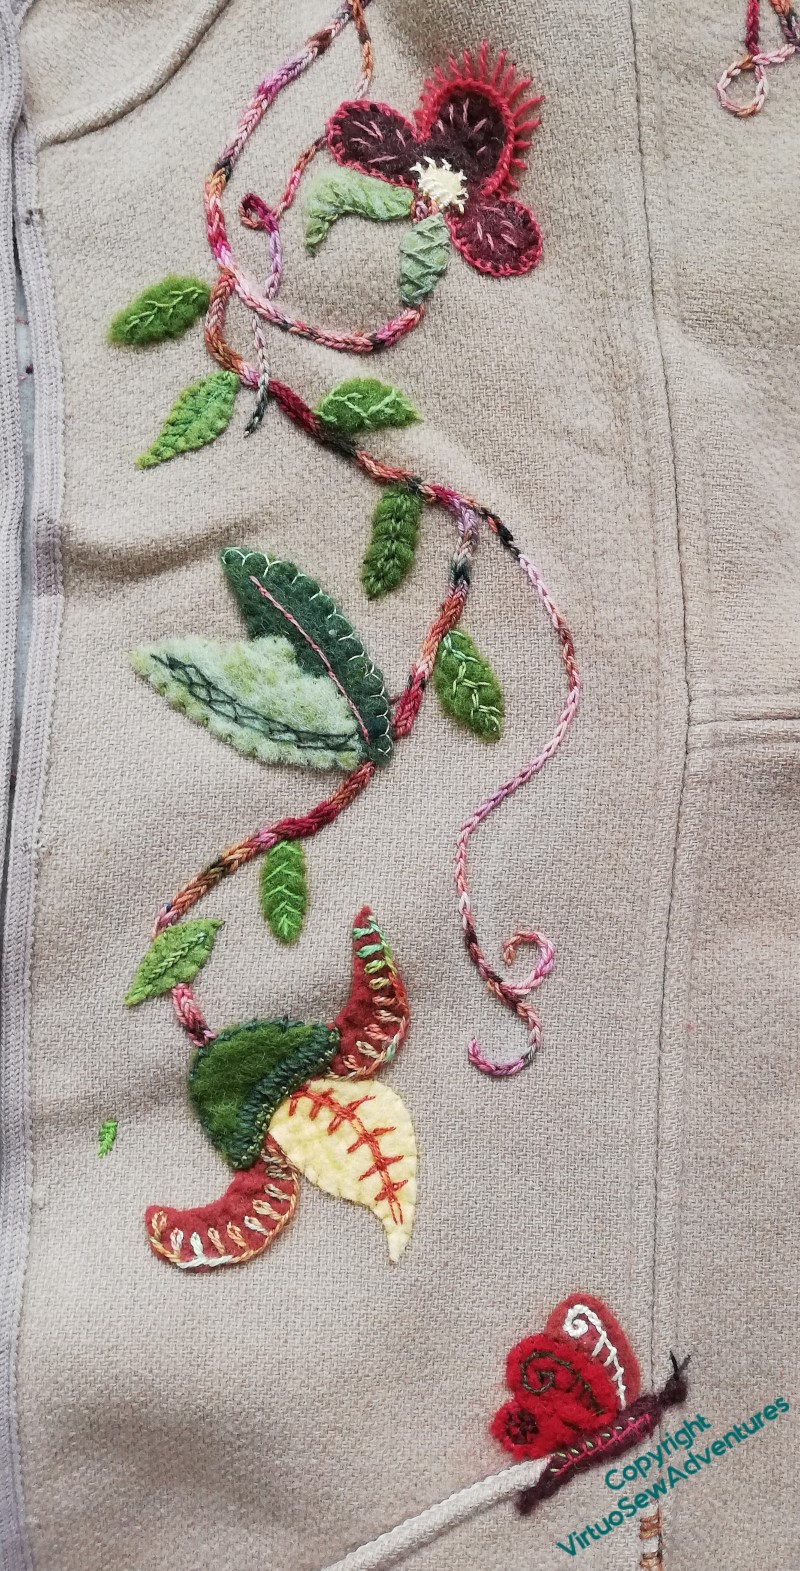
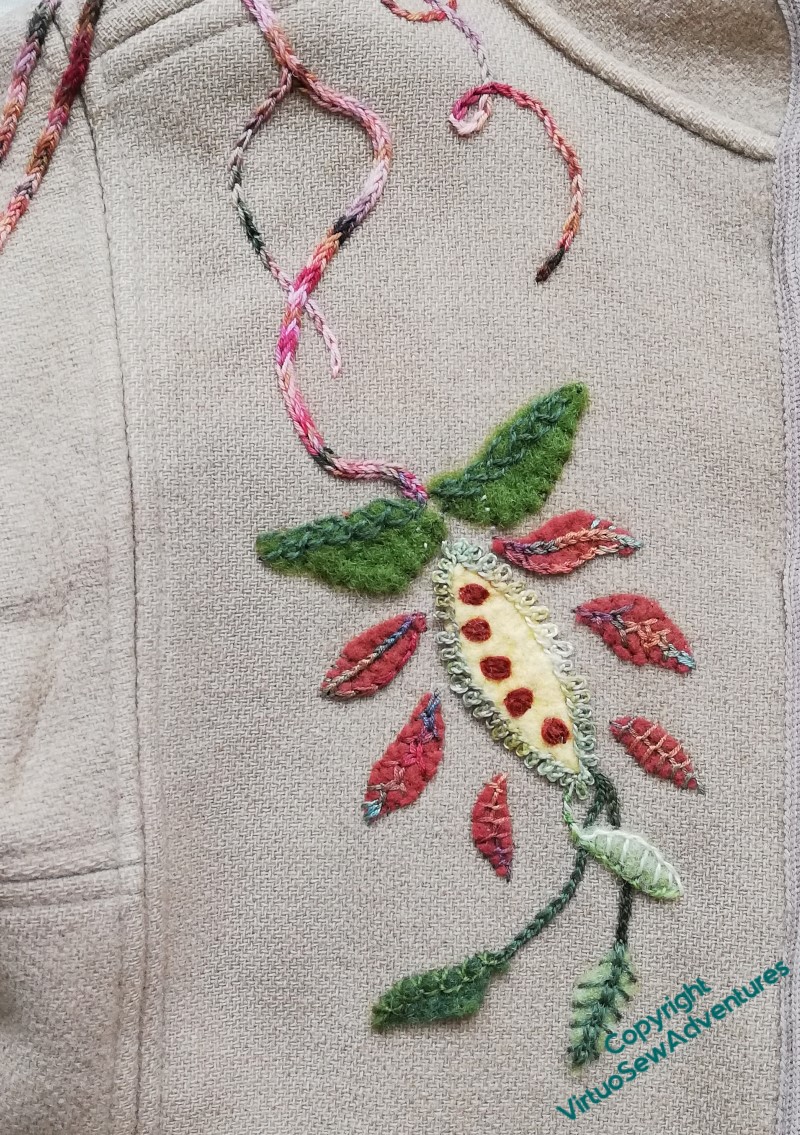
You might recall that this shape gave me some trouble when I was working the Coat of Many Flowers. Somehow, that wasn’t the case this time. It appears twice, and while this one is very different to the other, I think it works.
I like the contrast between the Mountmellick stitch facing inwards on one leaf and outwards on the other, the Bonnet stitch edging over the central red section.
I do wonder whether there should be more of the single twisted chain stitches, but I think I’m happy to leave them as is. You might also note, just behind the copyright notice, a tiny Fishbone Stitch leaf. There are a few blemishes on the fabric – to be expected with a jacket that’s probably at least thirty years old – and I’m covering them with these little leaves. I can add more if I find more snags or blemishes, and they will add a bit more fragmentation and frivolity.
The whole theme of this design (if you can call it a Design, when it “just growed” like Topsy!) seems to be counterchange.
This one shows variegated thread and plain thread against plain felt and variegated felt. I’ve kept greens with greens and pinkish reds with pinkish reds, but the whole idea still lies in the layering of detail.
I’m pleased that I found a place for coral stitch as the stem supporting the brown shape, although the rayon yarn is an absolute monster to use. It tangles if you so much as look at it sharply, and while I would normally use a hoop to hold the fabric, giving me two hands for the thread, I’m reluctant to use a hoop on this fabric, so there was instead much muttering ..
There was much muttering, also, as I took the toggle loops off. I’m not quite sure how I’m going to finish the edges of the jacket, when I get there, but I’m already sure I won’t use the toggles and toggle loops which were already there.
They were attached by multiple overlapping lines of machine stitching, and since I wanted to avoid damage to the edging braid in case that remains the finished edge, I had to be very careful. Two evenings of fiddling and muttering produced this rather sad little heap of redundant loops.
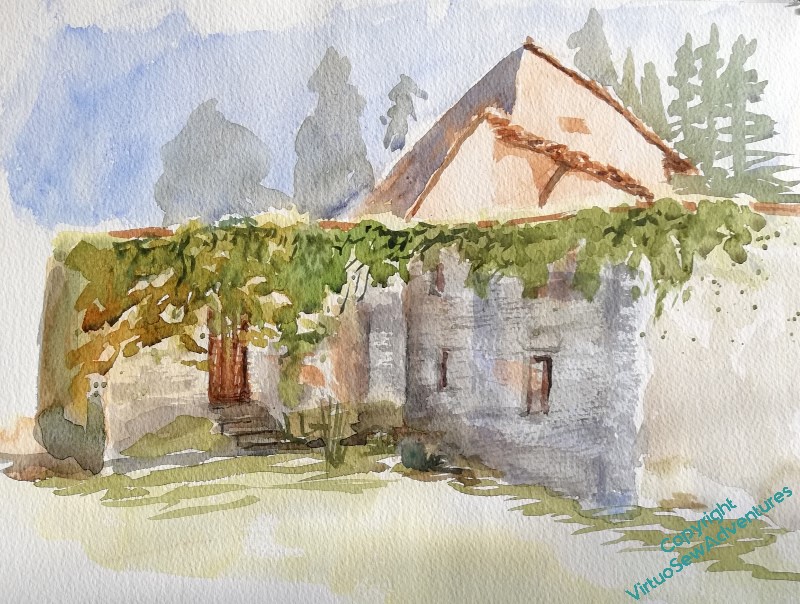
Very wisely, Bill and Lois, who run The Watermill At Posara, organise a variety of places to visit and paint, and in particular, the peace and quiet of the Convento del Carmine came the day after Excursion Day, which has people everywhere!!
I painted this watercolour when I was there, and in fact it shows something other than what I remember when I don’t look at it. What I mostly remember is dark foliage setting off the building in front, so for the embroidered version, that is what I intend to emphasize..
Now, remember, each of my Watermill Stitcheries is a sampler of experiments and ideas. I may or may not like all of them, but they should give my students points to ponder and places to start.
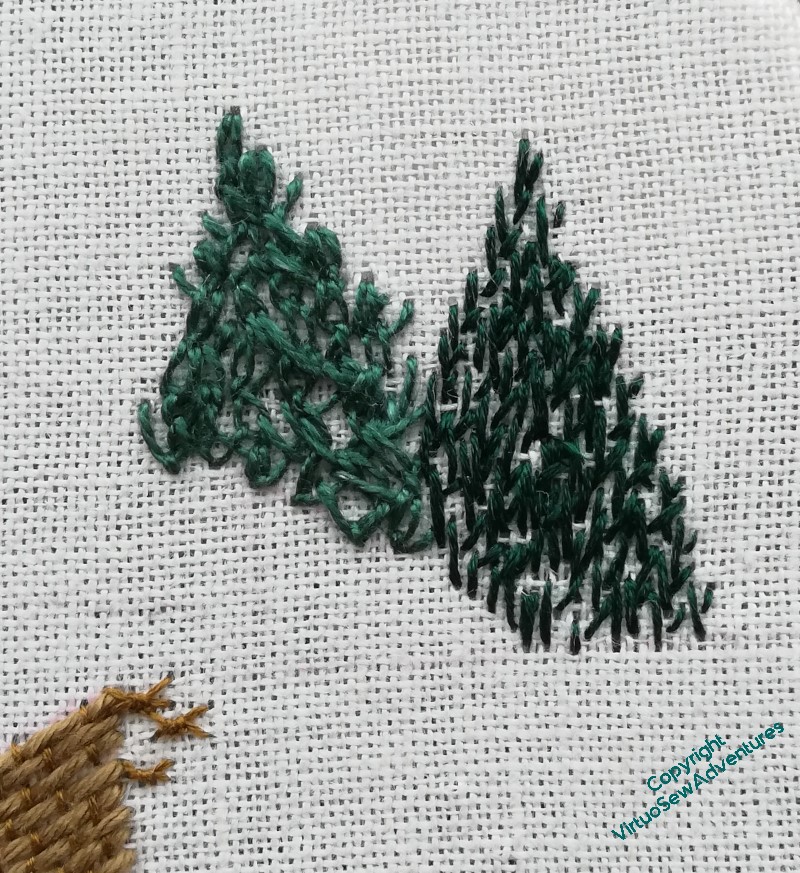
With that in mind, each of the trees is going to be in a different stitch. In each case I have worked vertical rows of the stitch, overlapping and interlocking them as best as I can to evoke the texture of the leaves.
I started, on the left, with Feathered Zigzag Chain Stitch. I’m quite pleased with this – you entirely lose the pattern of the stitch, but it evokes the movement of leaves in a breeze rather successfully.
I can’t say the same of Kerman Stitch, on the right. The breeze has stopped here, even if the impression of texture remains!
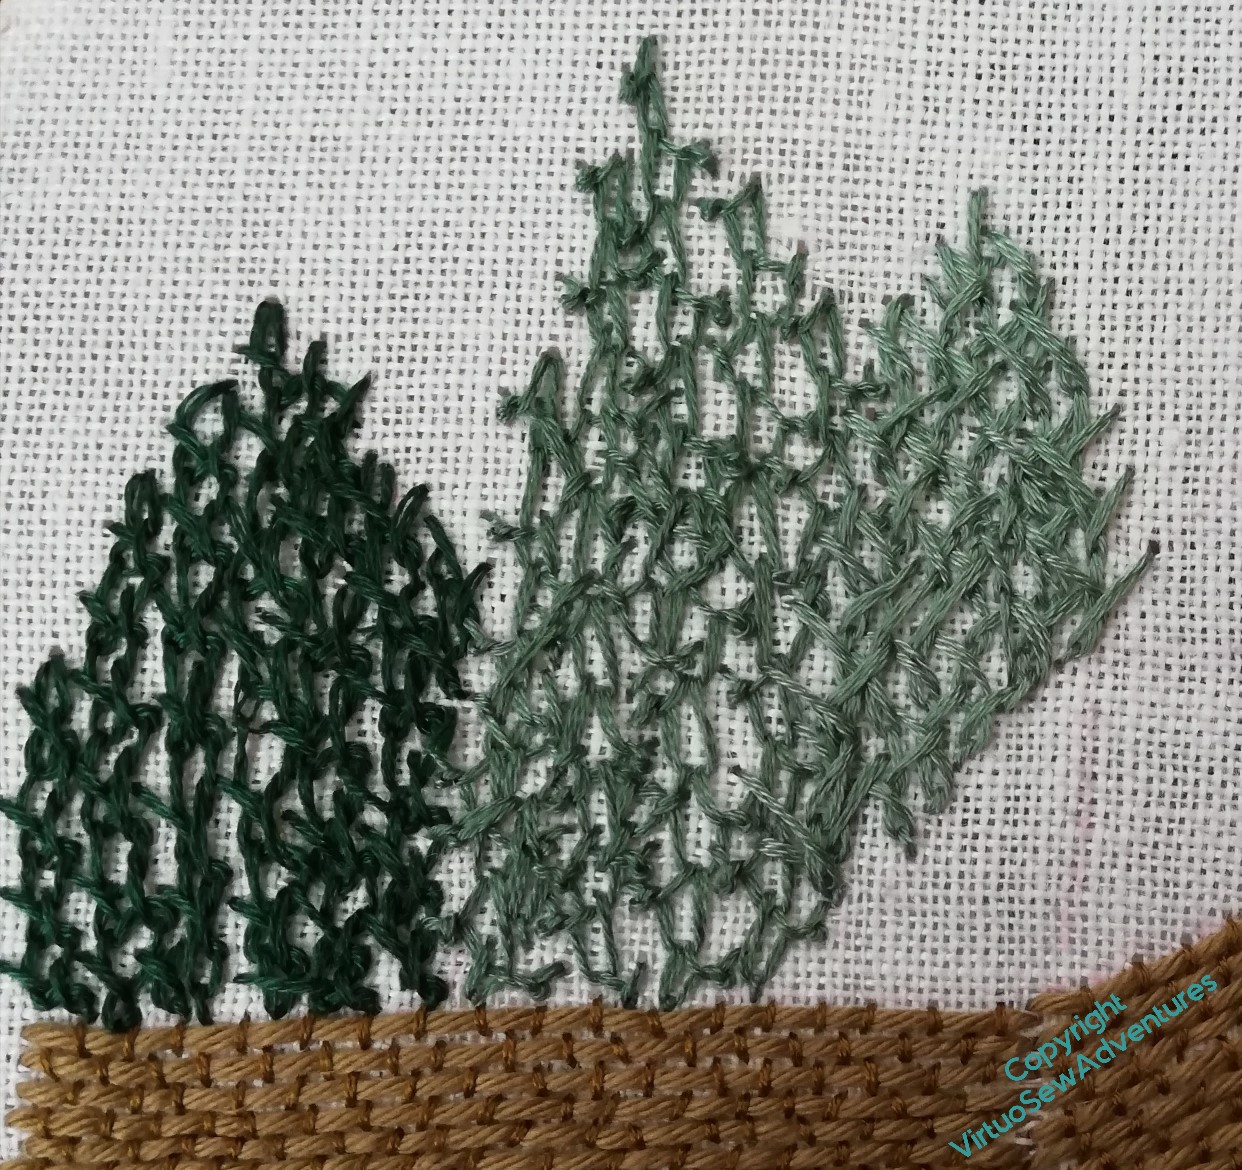
Working inward from the left, the first of these is Rabbit Eared Chain Stitch, found in Edith John’s “Creative Stitches”. This stitch is based on twisted chain stitches, which encouraged me to hope for a sense of movement again. I don’t think I quite hit the mark with it – maybe I never got quite comfortable enough with it – but I think it has possibilities.
The next one is Zigzag Crested Chain, again from Edith John. Crested chain is a stitch I enjoy but always find it moves under my needle. This time it ended up longer and thinner than I intended it to be – but maybe that was right for the purpose…
The final one is the slightly less peculiar Twisted Feather Stitch, and here, perhaps because it felt a little more familiar, more akin to the feathered zigzag chain I started with, I have my sense of movement and breeze back again.
I’ve begun the building in Burden Stitch, and now need to finish that, add more of the roof, and finally the creeper falling over the top of the wall. So watch this space!
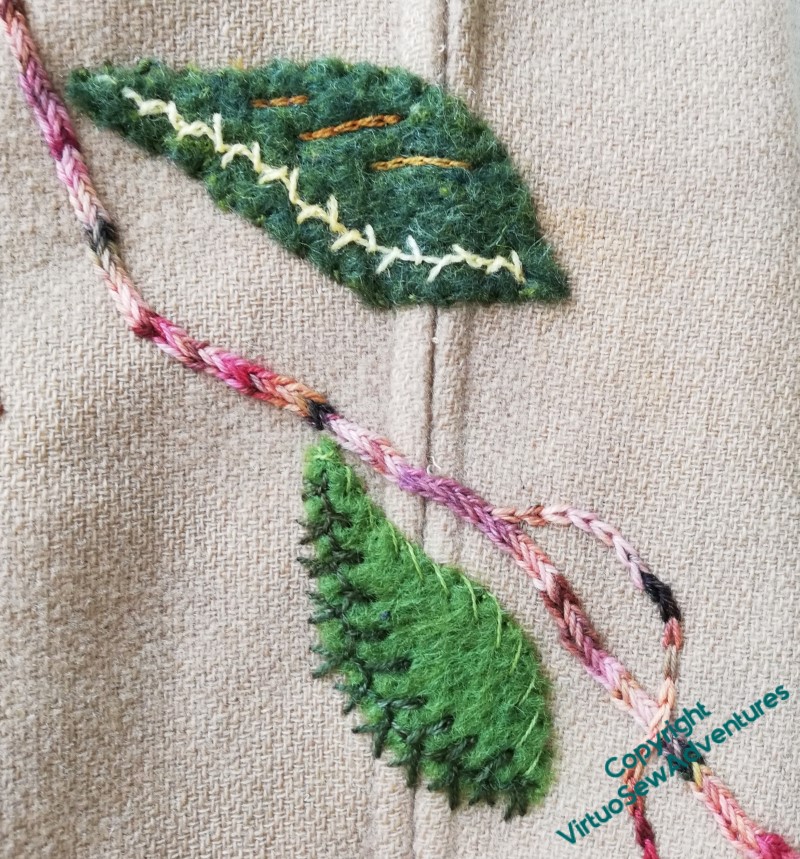
Adding the large leaves involved some thinking, because I wanted to keep the variations going. Some of them are edged, some of them emphasise “veins”, and some, like these two, are asymetrical.
The darkest green felt helps the pale yellow (alternating twisted chain, I think) to shine, and the three lines of darker yellow just add another variation which ties in with some of the colours in the yarn I used for the stem.
I found the middle shade of felt a little harder, always. I wanted to ensure there were contrasts and changes of texture, but middling shades are just trickier to balance. The different textures here help a bit – mercerised cotton as against a fine crewel wool.
Wheatsheaf stitch down the centre of the lower leaf turns into chain stitch as the leaf narrows, and the Cretan Stitch in the upper leaf presents a nice contrast, dark red-browns in a finer yarn opposed to the fluffy wool of the lower leaf.
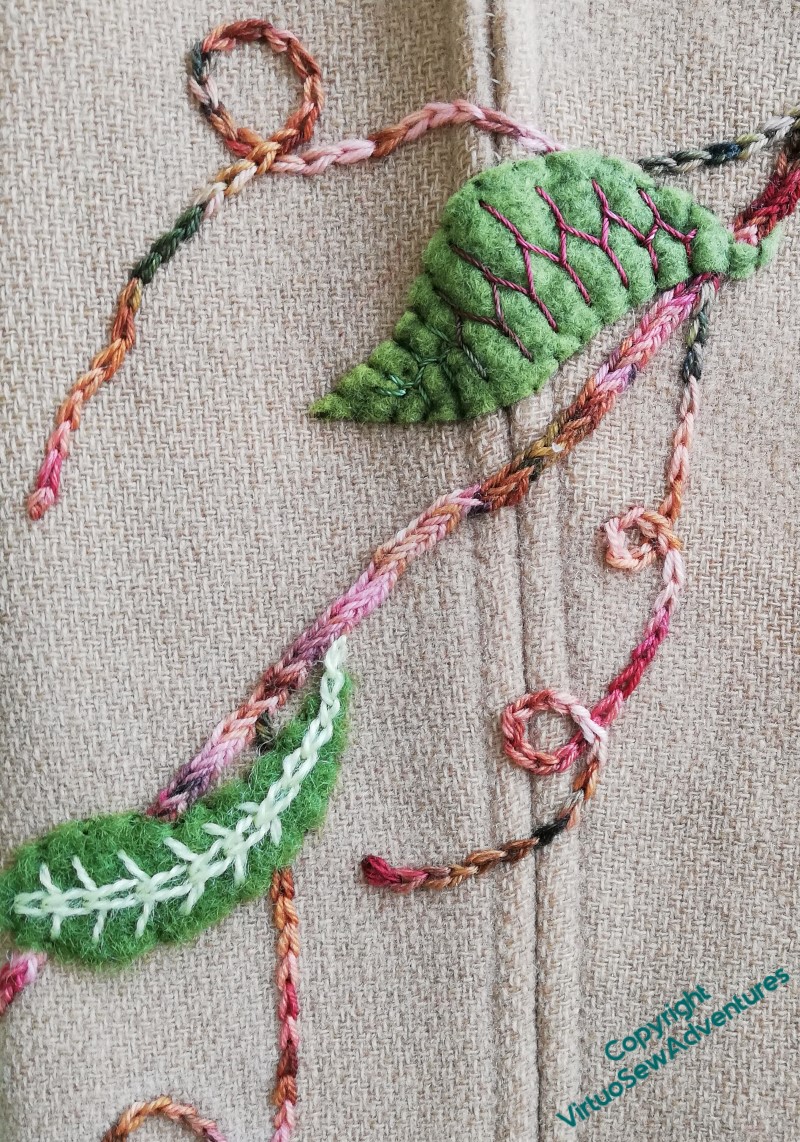
All of these leaves also run over one or other of the seams I had to release to do most of the stitching, so they were a bit trickier for that reason as well. I will have to steam-press these when I’ve finished, to settle the seams back the way they should be.
This picture also shows that I am adding chain stitch tendrils. One of the things I learnt from all the Online University courses with Thistle Threads is that sometimes More Really Is More. As most of the stitching came together, the jacket still didn’t look quite luxuriant enough or joyful enough, so again, my Mam modelled it for me, and I drew in tendrils in chalk to stitch over later. That way I could be sure they made some sort of sense when the garment was on..
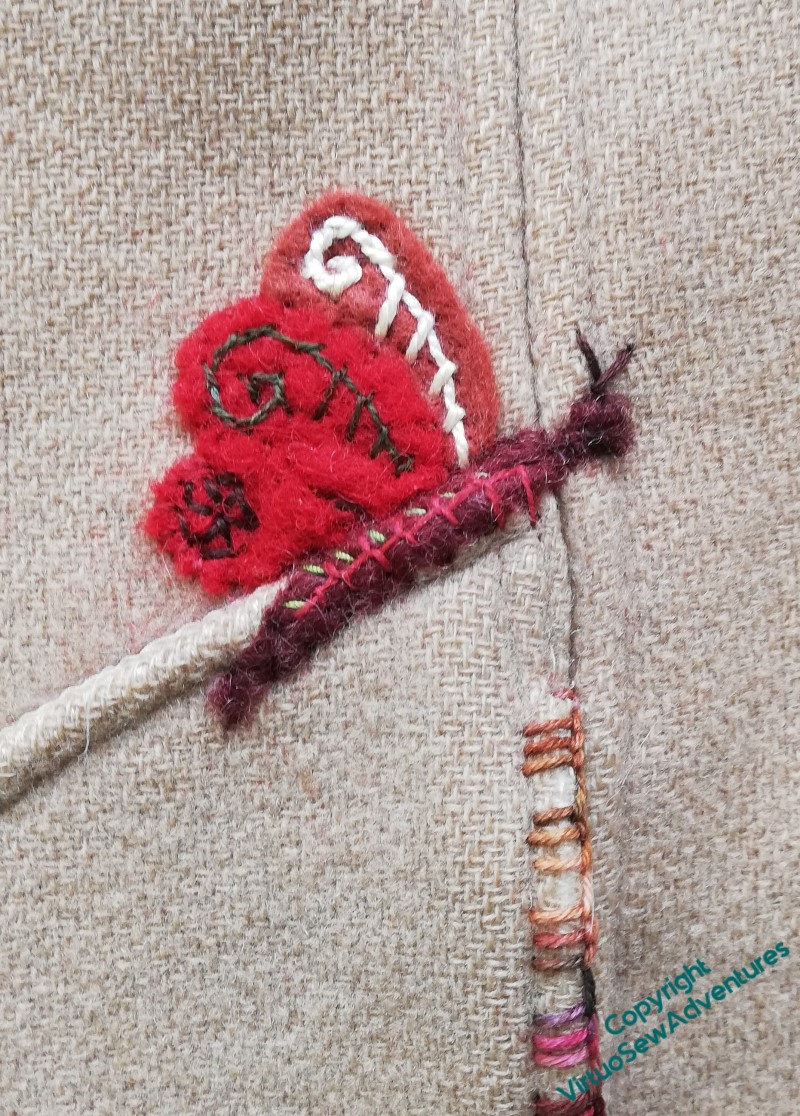
Some of the leaves over seams were to cover patches of wear, and as I looked over the jacket, I found more wear, on the top of one of the pockets and down the pocket edges.
Taking the pockets off wasn’t a good choice, as the fabric would look different underneath them, so I had to think of something else to do, and this is it. Grouped blanket stitches down the edges of both of the pockets, and a sneaky little butterfly to cover the bit of wear on the top of one of them.
You can see that the butterfly is one case where I’ve added lots of little details, including tiny little stitches on the body to break up the fragment of dark felt that I needlefelted in place as the starting point.
Who would think the top of the pocket was worn right through the top layer of fabric?