Colossus of Akhenaten
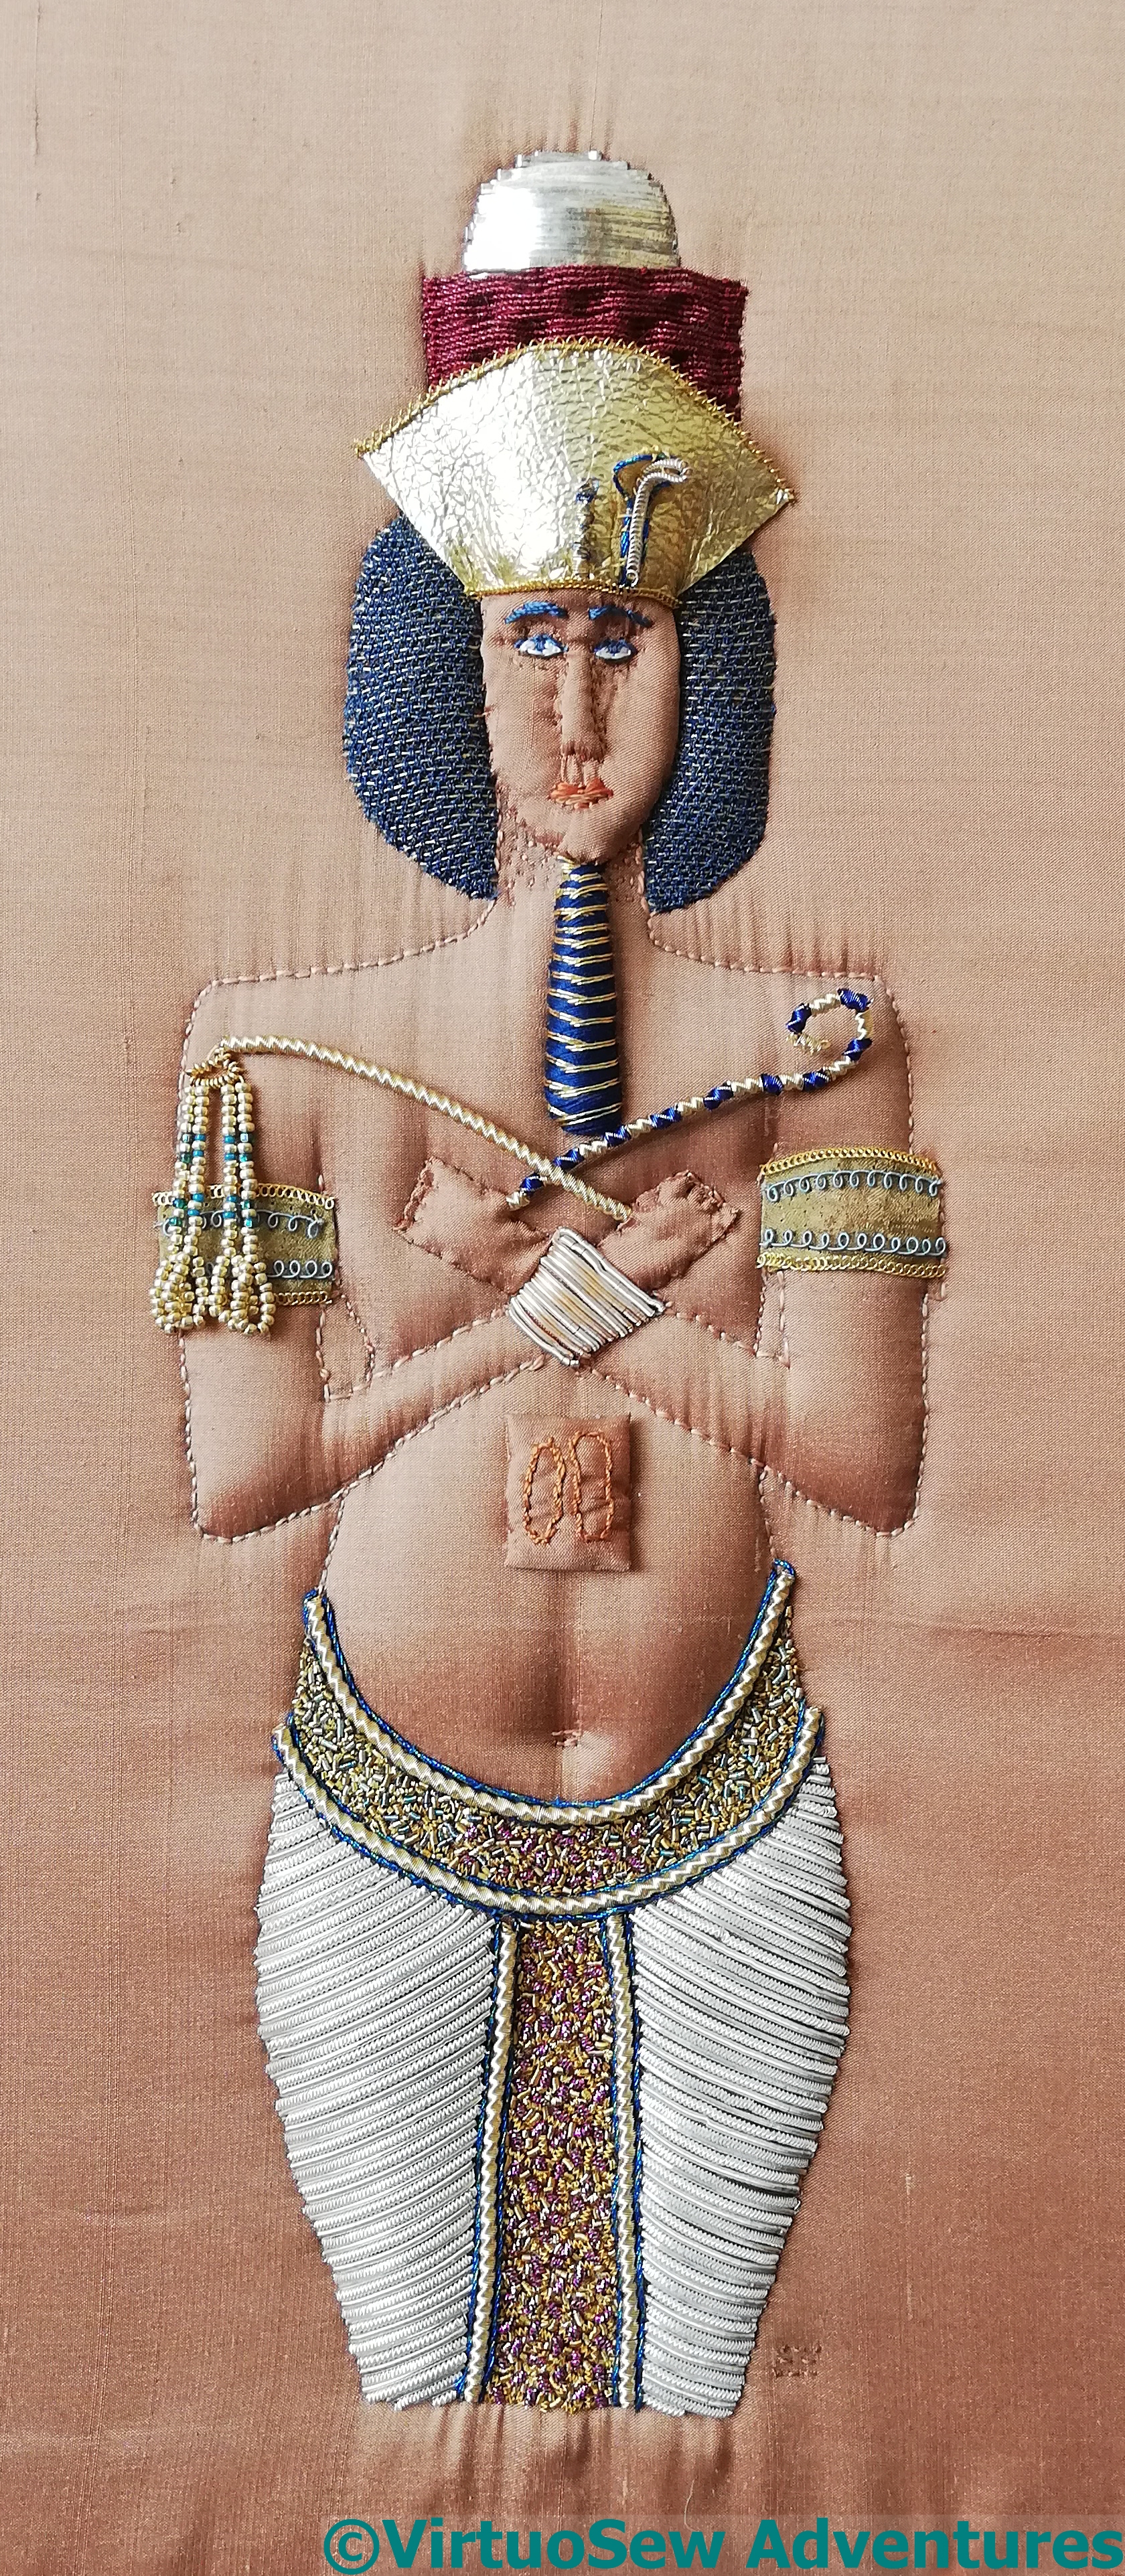
The Colossus of Akhenaten, in a combination of trapunto quilting and goldwork, is now finished.

The Colossus of Akhenaten, in a combination of trapunto quilting and goldwork, is now finished.
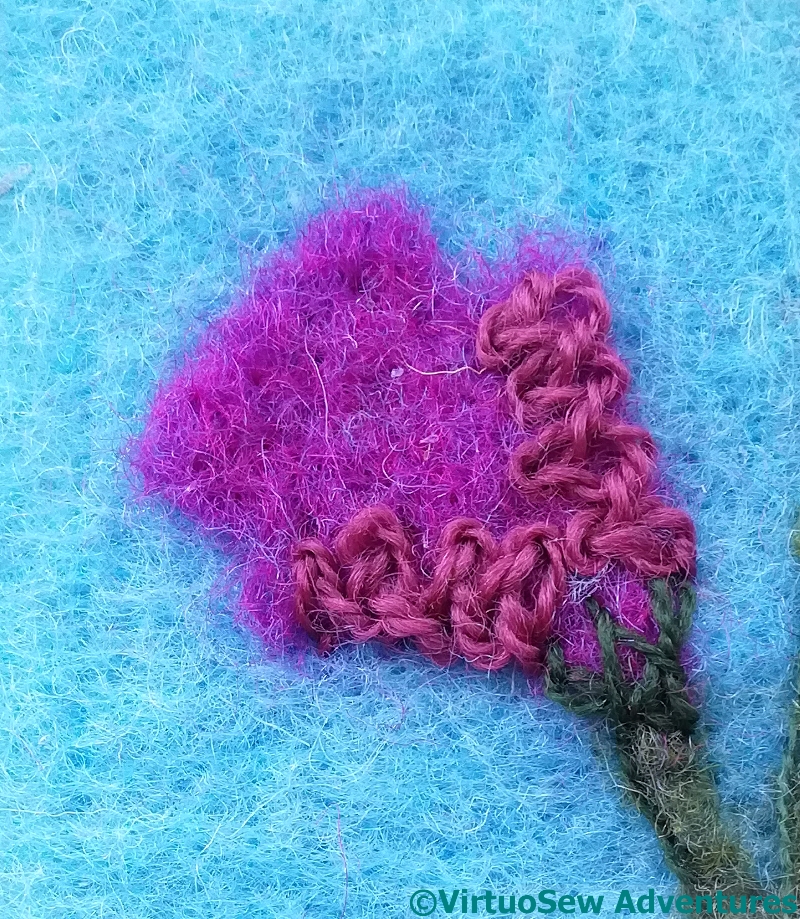
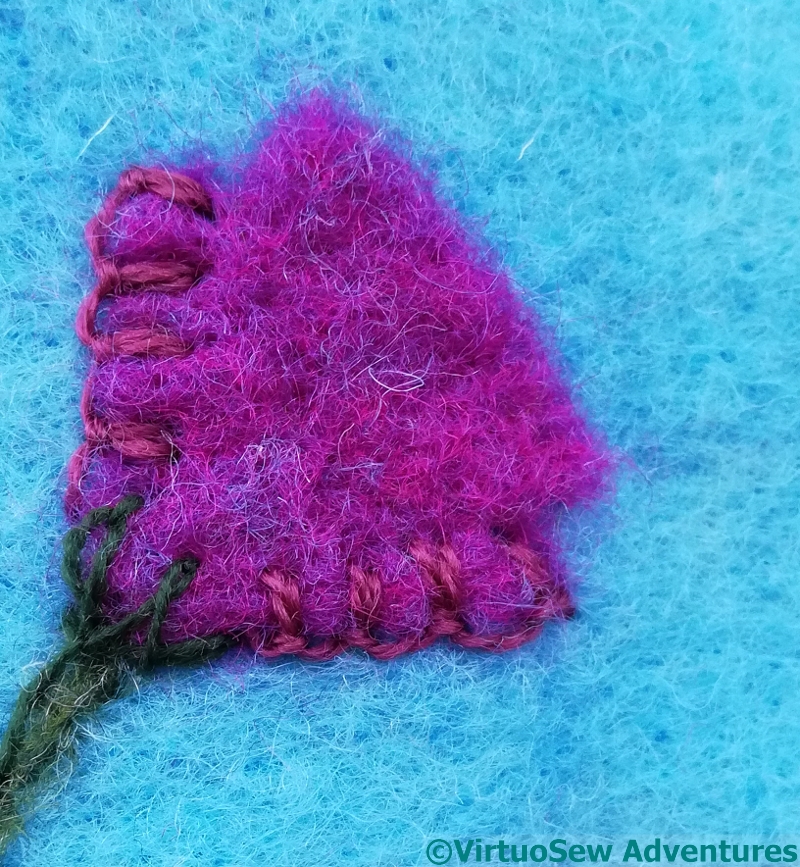
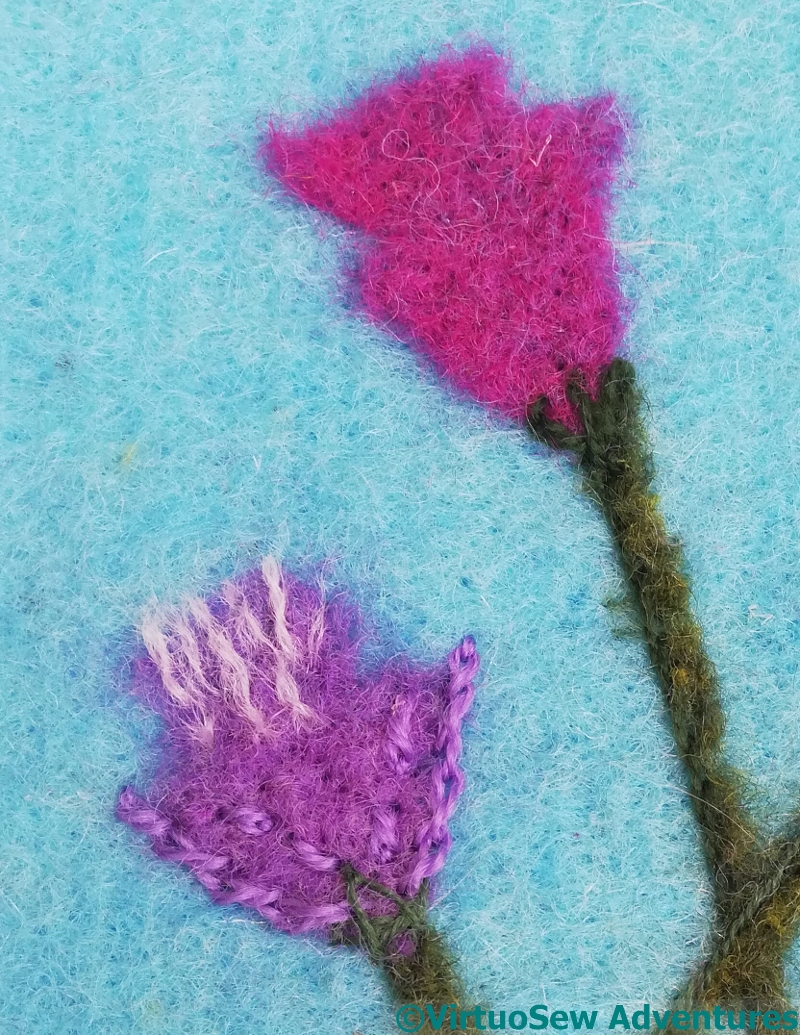
I wanted to do something slightly different with the pink flowers, but still modify the colour with stitching. The braid stitch made the shape too angular, and emphasized the edges too much; up-and-down buttonhole stitch, a favourite from the Jacobean Coat, might do a better job. Certainly, it provides a delicate edge that doesn’t impose itself too much.
You will see that the left-hand side looks sharper than the right hand side. There is stitching and there has been extra needlefelting on the stems and flowers, while the right-hand side still looks rough, like a quick, splodgy sketch. I found I rather enjoyed narrowing the stems and rounding them off – by hand, with a single needle, not the embellisher, of course. There’s a gap in one of the stems because the calf will go over the top!
I may not have managed quite enough curve and flow in the lighter stems, but we will see how I manage to develop them later. They will have leaves added, and that will change the effect and the emphasis…
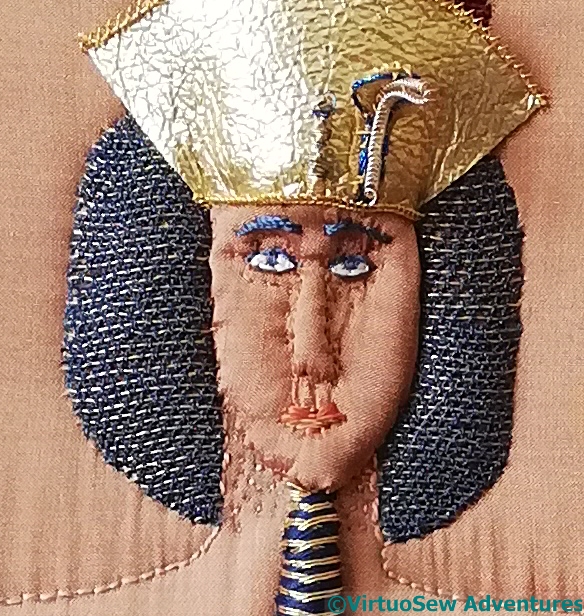
I added a few extra details, to sculpt the face a bit more – tiny stitches in silk, broadening and deepening the eye sockets, altering the shape around the nose, adding more stitches attaching the face.
In fact, to make sure the silk was fine enough, I twisted it myself from a spool of Japanese silk bought for the purpose. I think I ended up with three twisted threads from one length.
The gold kid of the headdress now has an upper edge trim as well. That would have been much easier to do if I could have done it before attaching the kid to the head!
As I was looking over the whole thing, it occurred to me that Akhenaten’s hands weren’t convincingly grasping his crook and flail. Fixing that wasn’t hard in theory – new hands cut from the edge of the silk, padded with padding from the edge of the piece, and attached with more hand-twisted silk thread.
In practice, it took several attempts before I was at all happy with the result, and I could be seen contemplating my own closed fist thoughtfully at various points in the process. Which doesn’t always help as much as you might think, when the aim is something slightly different to a realistic representation….!
However, I now think he’s probably as finished as I can make him. As I wrote to a friend: I may have doubts about detail, but I think Akhenaten is now as good as my current level of skill will allow. I hope someone will take him off my hands before I get good enough to shudder every time I look at him!
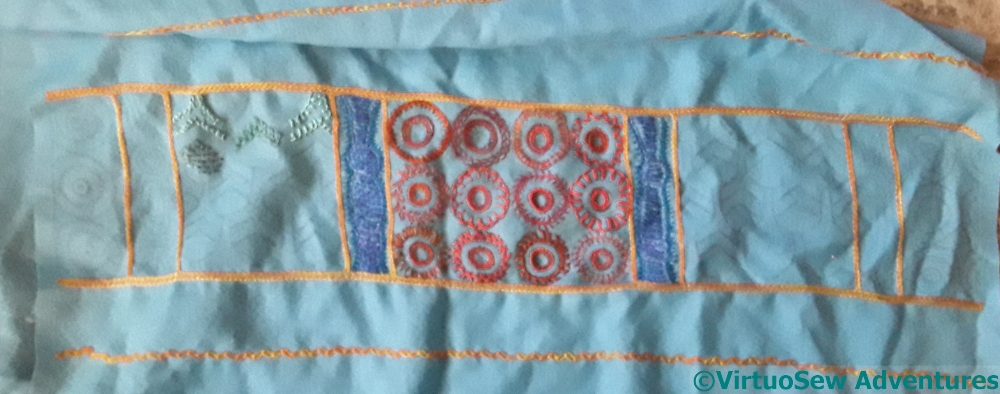
The Nefertiti Shawl started with great enthusiasm, but I ran into a few hitches. I’m not at all confident of the blue panels, and my first couple of efforts on the green ones took me nowhere at all.

Finally, I came up with a possible way forward. The scale pattern is taken from one of the Tutankhamen coffin panels, among other places, and each scale is outlined in gold, but the coloured fill is in progressively darker colours, not edged.
I’ve edged the scales with a very pale shade, and outlined the colour progressions in darker shades. The fabric is very mobile, so a little more definition may help..
I’ve picked several filling stitches, and I’m working them in various orientations, and several different combinations of solid and overdyed colours in stranded silk and silk floss.
That paragraph glosses over some considerable confusion and head scratching. Being so closely involved, I lost track of the sequence of patterns, and had to call for the assistance of The Australian’s mathematical and analytical eye!
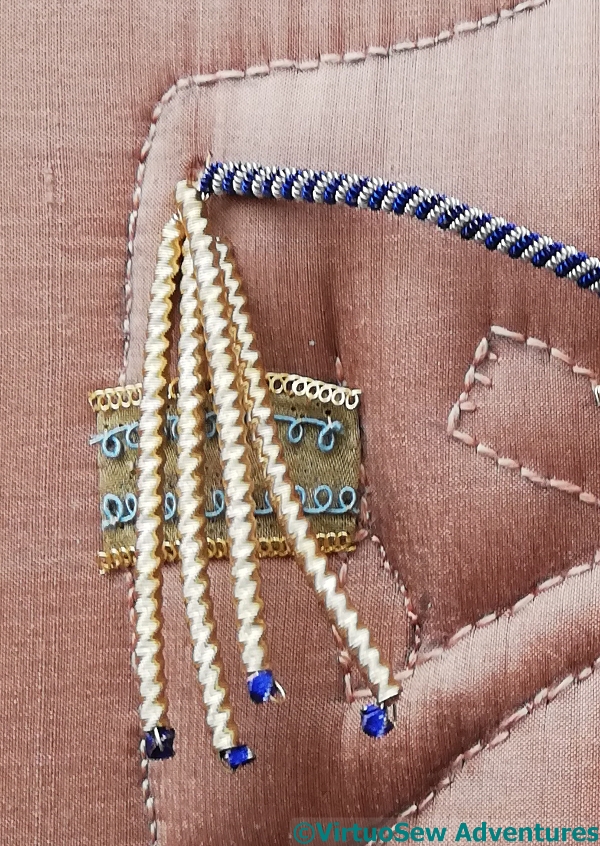
I feel as though I’ve spent as much time on Akhenaten’s accessories as I did on the silver purl loincloth, and tied myself in as many knots as I did when I was doing his wig!
I do hope he starts to approve of my efforts again soon…
When last seen, I was content with the crook, done in alternating blue and gold wire rope, strung on a former made of fuse wire, but I was expressing doubt about the flail.
The gold purl and silk wrapped purl was too frail, and this version, using gold wire rope, was visually too heavy, and much too springy. So I knew that something else would have to be devised, and racked my brains repeatedly for ideas.
The ideas finally came late one night, and – too drowsy to wake up properly and write notes – I fell asleep hoping I wouldn’t have forgotten in the morning.
Fortunately, I hadn’t!
I’m assured that the word for the parts of a flail that flail is “swipple”, which sounds too outrageously appropriate not to make use of.
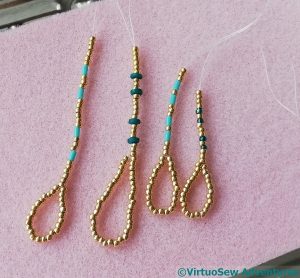
The various turquoise beads came from a friend on Instagram, who saw my wrestlings with the armlets and offered some treasures from her stash to assist. After several trials, I settled on a combination of gold and coloured beads, and a particular length of loop.
The finished flail has a handle of gold wire rope, a head of gold pearl purl, and four strung bead swipples. In fact, the inner two swipples have different coloured beads to the outer two. This is part of the layering of detail I’m trying to develop with Akhenaten, to help with the impression of rich gorgeousness I want to convey. It might be barely noticeable (although more so in real life), but it will break up what might otherwise look a bit monolithic.
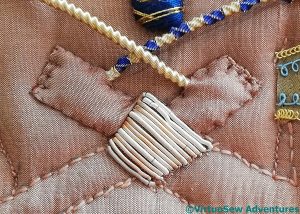
I’ve taken the same approach with the wristlet, which uses silver rough purl (leftover from the loincloth) in combination with a pale pinkish rough purl. Anything single-coloured was too obvious and argumentative, especially as it’s placed right in the centre of his chest, but when I left it out entirely, that looked worse!
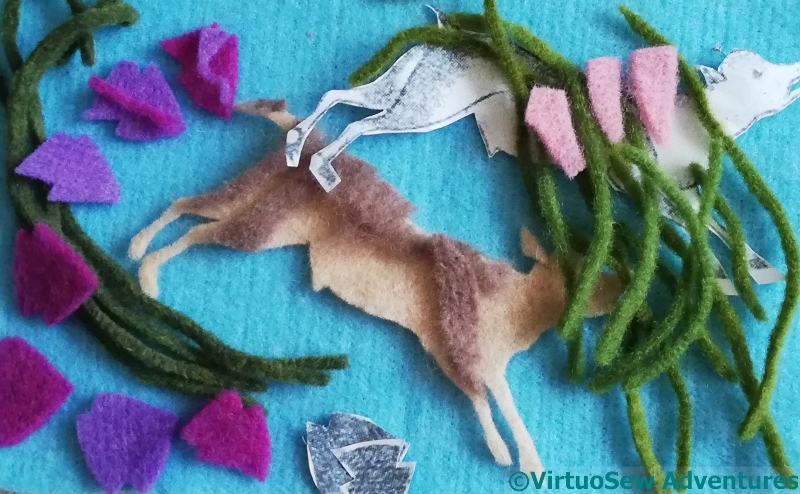
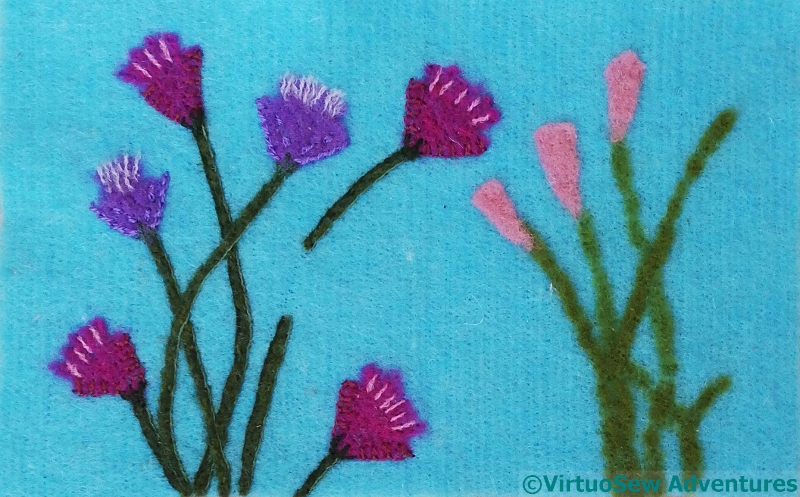
In among my image sources, I found a really joyful image of a calf bounding through vegetation, kicking up its heels. I decided it would be fun to do another felted piece. Like the Two Princesses, there will be stitchery, too, but it’s a change of pace and scale compared to Akhenaten, and I try to have more than one project on the go so that I can think about tricky bits of one while doing easy bits of another…
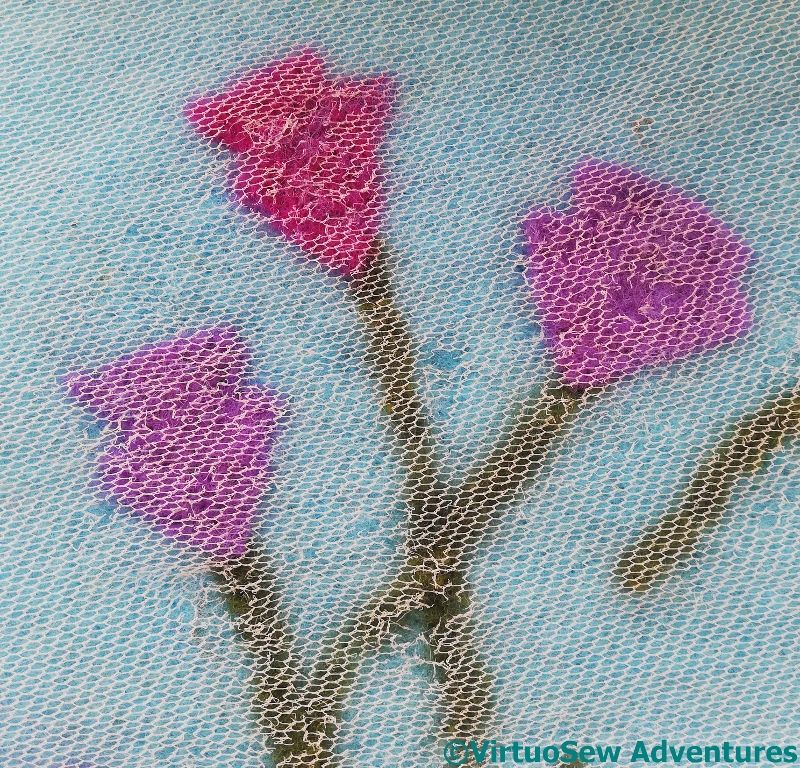
When I first bought my embellisher, the lady demonstrating them told me about using hexagonal net to control pieces of felt and wool while running them under the embellisher. So I bought several yards of cheap hexagonal net, and I’ve found it very useful indeed. It doesn’t get felted in, or at least, not to the extent it can’t be picked out with tweezers, and you can see through it to what you’re working on. So I begin by laying out the pieces I want, hand-needlefelt it roughly in place, and then lay the net over the top and run the embellisher in little moving circles to attach the layers properly.
Once the initial felting has been done, I can start adding stitchery. In this case, I’ve stitched a dark line down one side of each of the stems, and twisted chain down the edges of the lilac flower. I wanted a slightly ruffled effect to the mouth of the flower, so I’ve hand-needlefelted some detwisted yarn into place. I’m not quite sure that I’m pleased with it as it stands. Still, more to do!
The pink flower is still entirely un-detailled. I don’t want to use the same stitches and processes for those, so there’s more thinking to come…
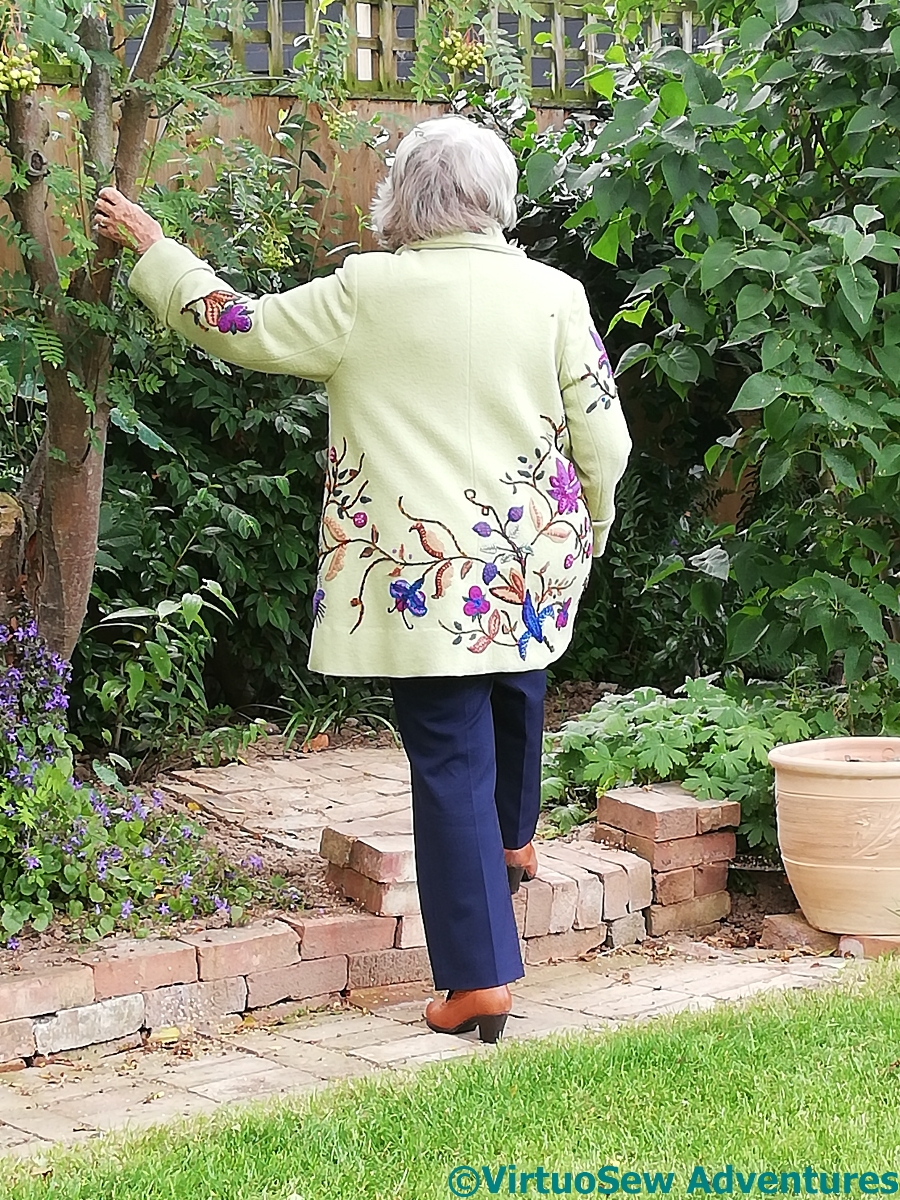
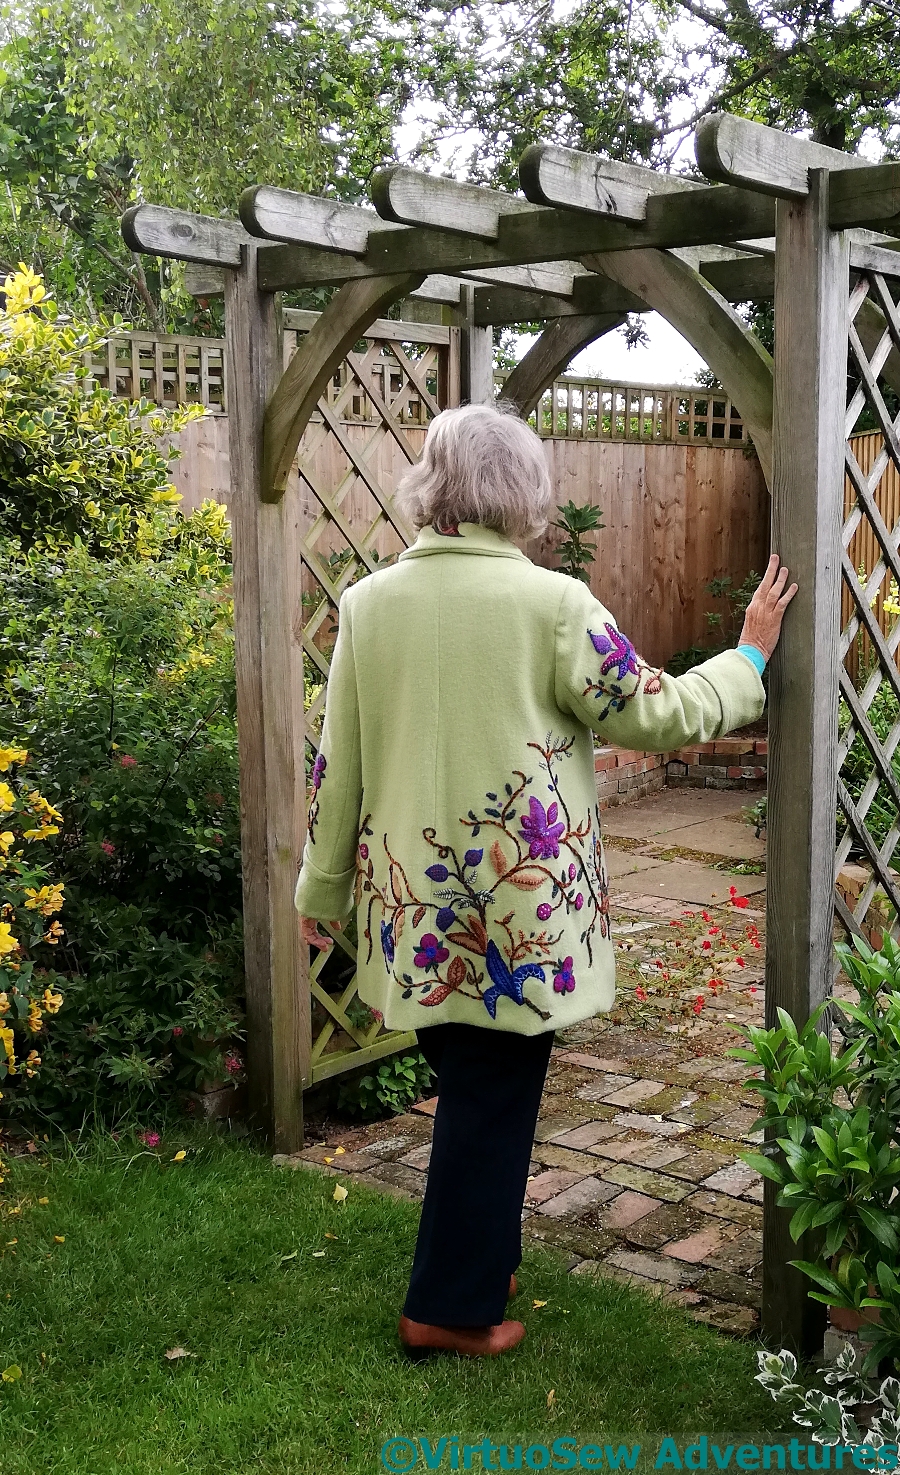
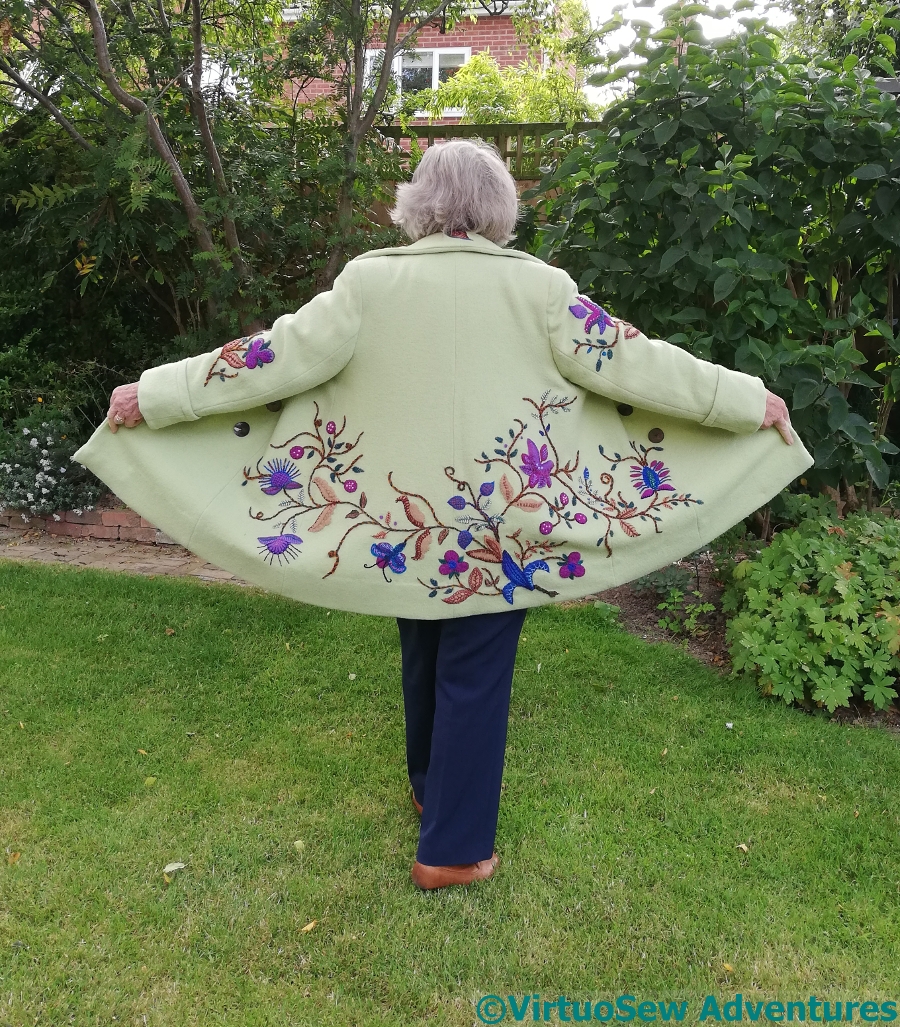
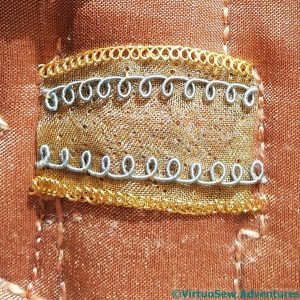
There’s not much to say here, except that the Jacobean Coat has been re-christened The Coat of Many Flowers (thanks to Sue at Tortoise Loft for the inspiration!), and is a great success.
It’s double-breasted, slightly shorter than three-quarter length, and lined with a nice figured satin to slide over woolly jumpers if necessary.
And if it doesn’t stop the traffic when Mam next strolls into town, I shall be vastly surprised!
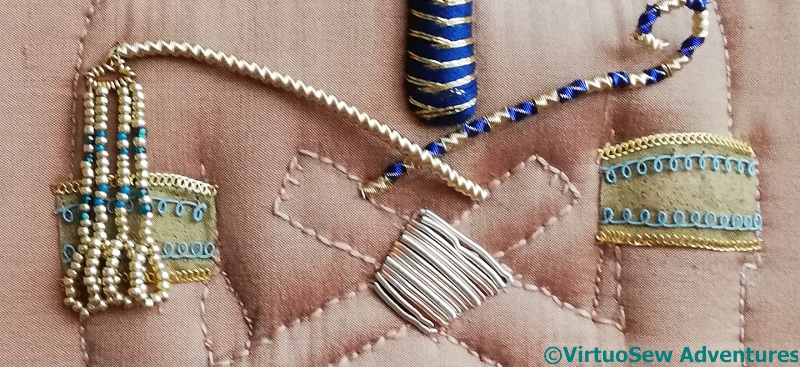
You may recall that I had some trouble with the armlets the first time I was working on them. Now, as I’ve come back to Akhenaten again, I’ve decided that the gold kid I’d settled on isn’t at all right. Off it came, and after some puzzling, I attached the brass mesh instead.
Only to decide that no, that looks dull, doesn’t capture the effect I’m after, and even edged with a flattened gold spiral, doesn’t stand out enough against the silk.

My next thought was to do some patterned chipwork. I chose a rather gorgeous, very ancient-Egyptian-looking blue, and a sort of diagonal basketweave pattern which is not a million miles removed from some of the patterns I have seen on ancient pieces.
The blue did at least help the silk to show something like true colour, but when I looked at the whole piece, I found the blue too bright, and the pattern altogether too much of a good thing.
I thought that was strange. The alternating directions should have echoed the beard and helped the two sit nicely together, and there is so much personality in the silver purl loincloth that you would have thought nothing could have been too much!
Then I had a thought – the kit for the Stuart Silk Purl Flower contained some bonus silk-wrapped wires and purls, and fortuitously, when slightly overstretched, there was just enough of one of the turquoise ones to do top and bottom on each armlet.
At this point I decided, somewhat tentatively, that maybe I’d got this bit right, or at least right enough to move on.
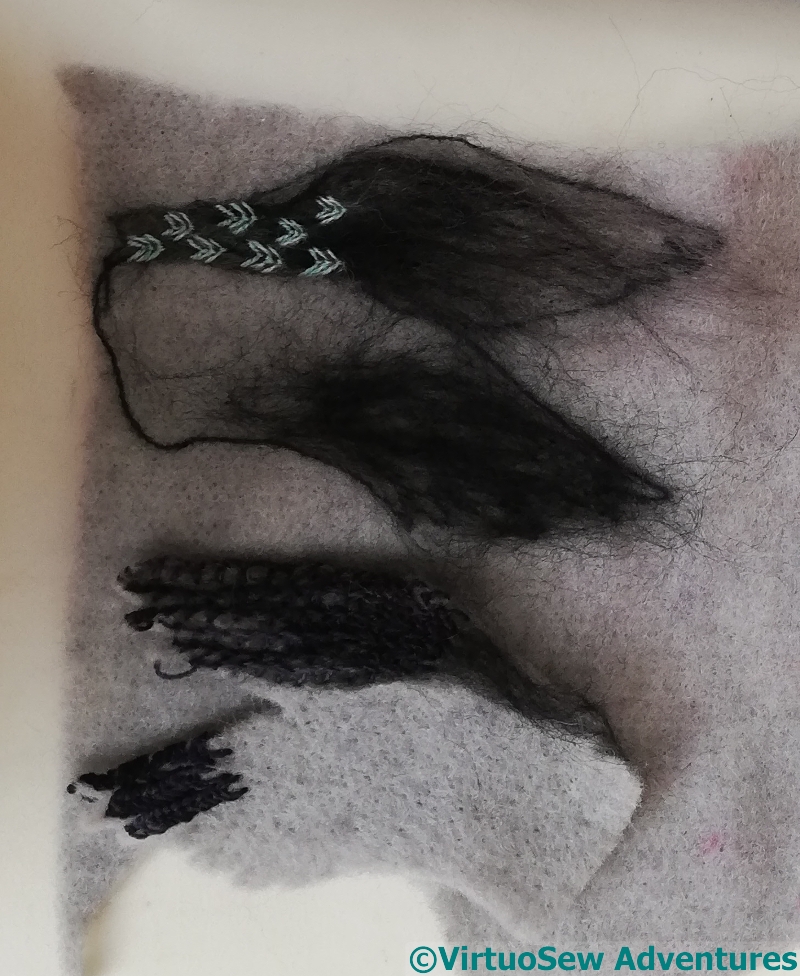
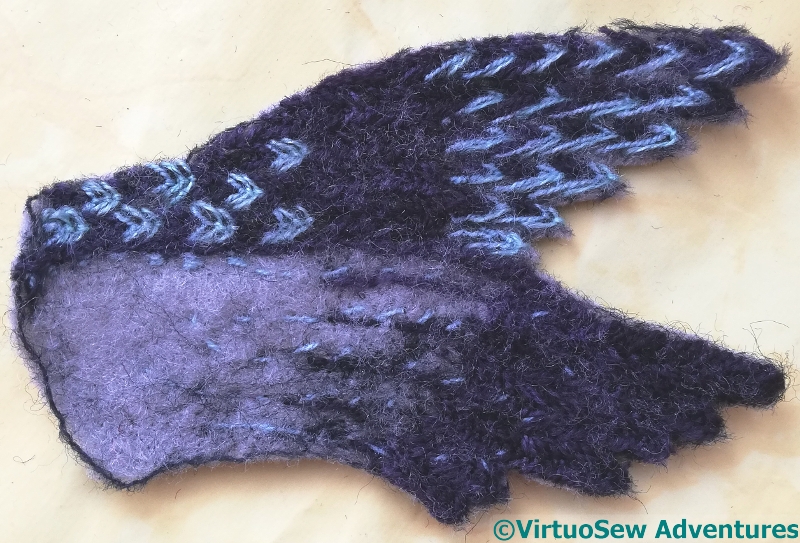
The wings caused much struggle and heartache.
After a morning’s stitching, I realised that all the details I had added were on the wrong side of the felt base, with the result that the wings were facing the wrong direction for the composition.
So here you see a start on the second pair of wings. I learnt from the first attempt, and the difficulties I’d had around the edges, and left the wings as part of the fabric as I worked them, using rows of fly stitches for the pinions.
After working over the wings with the embellisher to reduce the potential for stitches unravelling, I cut them out, with as much precision as I could. But I’m really not happy with them.
They are dark, heavy and clunky, too densely stitched, and much too sombrely coloured. No bird will soar on wings like this.
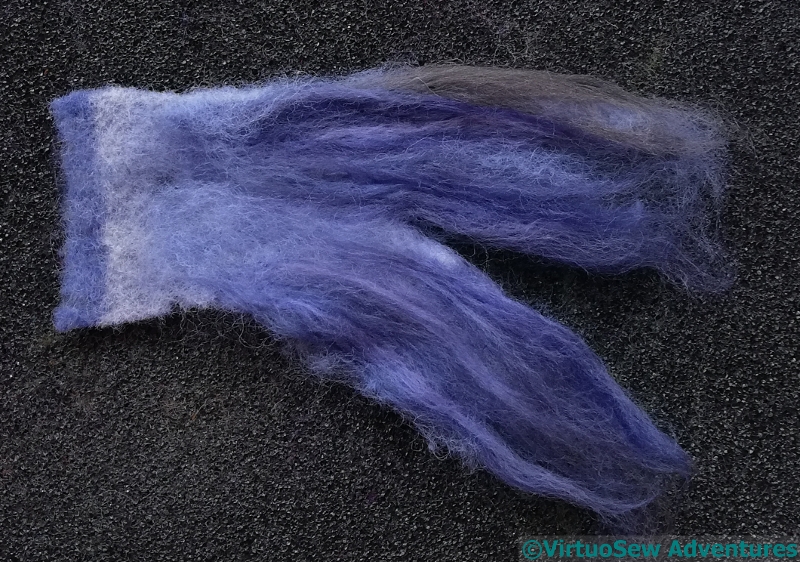
So, the third attempt begins. I used a fragment of felt as the leading edge of the wings and then added lengths of fibre. I’m outlining the wing shapes using a single needlefelting needle, and I’ll try to creep up on more successful wings, learning from all my past mistakes.

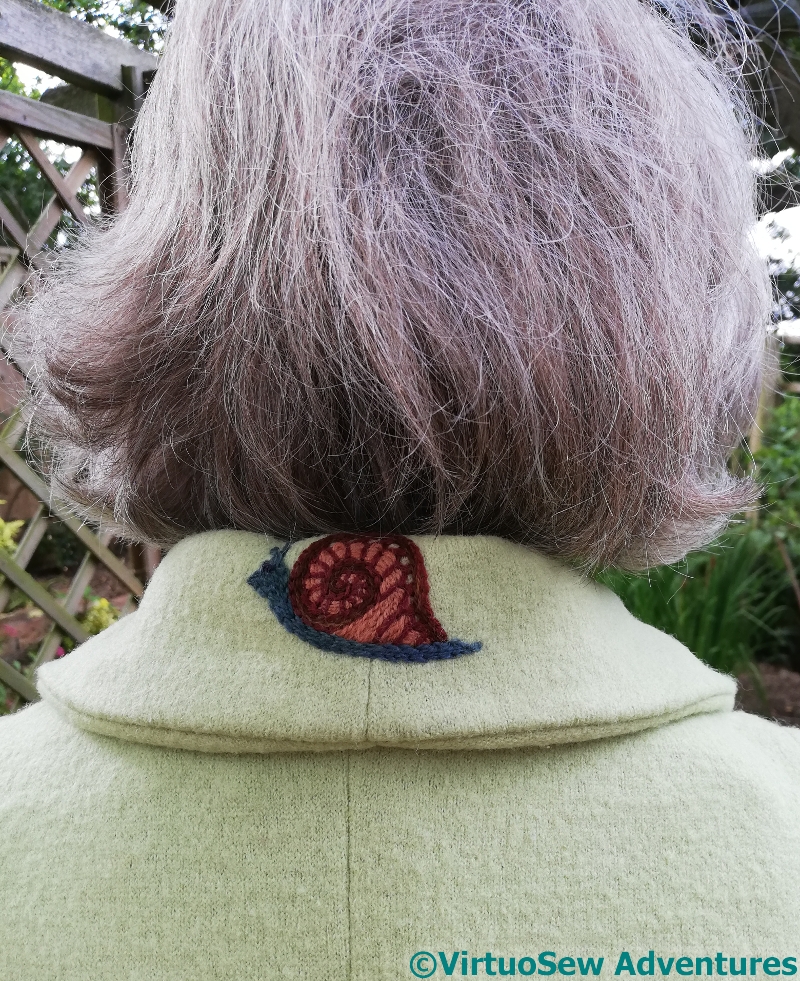
Just when I thought I had no more to do, suddenly my mother asked, would I add a something-or-other to the back of the coat collar.
We thought about it, and decided that since I’m going to do a Morse Code signature that looks like a caterpillar, and there’s already a butterfly, I could maybe add a snail…
The tacks top and bottom show where the seam allowances and turn of the collar leave space for Something. I drew a snail on a bit of tracing paper (loosely based on the one on the Jacobean Firescreen), and tacked on the outline.
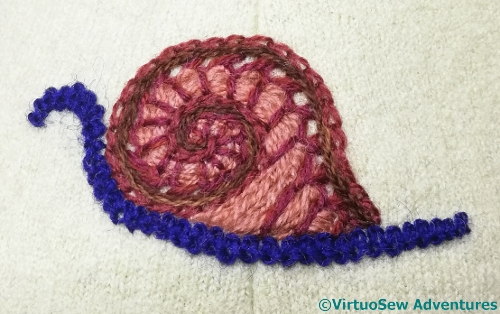
The shell itself came together easily, two rows of reverse chain stitch, then a row of half-cretan stitch which was then threaded with wool to create a slightly raised effect.
Inspiration briefly halted when I came to the critter himself. I tried several shades from among the ones on the coat, and two or three different stitches, and was underwhelmed by all of them.
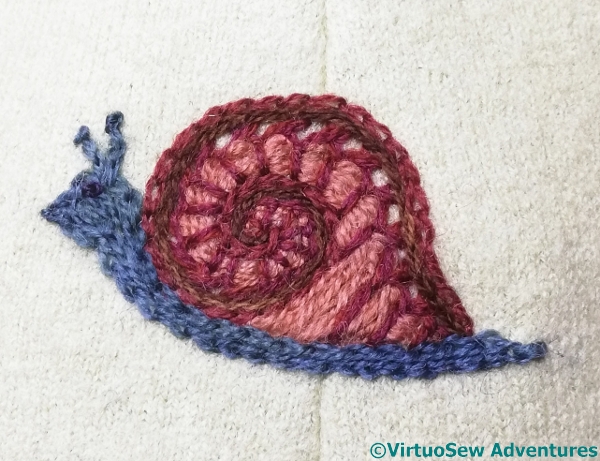
Finally, I picked the right colour (a middling shade of teal) and the right stitch (chain), and he came together beautifully.
Two tiny antennae, a French knot for an eye, and hey presto, one cute little snail to add the final embellishment to the coat.
Now it’s over to my Mam to sew the whole thing together…