Happy Christmas to you all
Christus Natus Est

Christus Natus Est
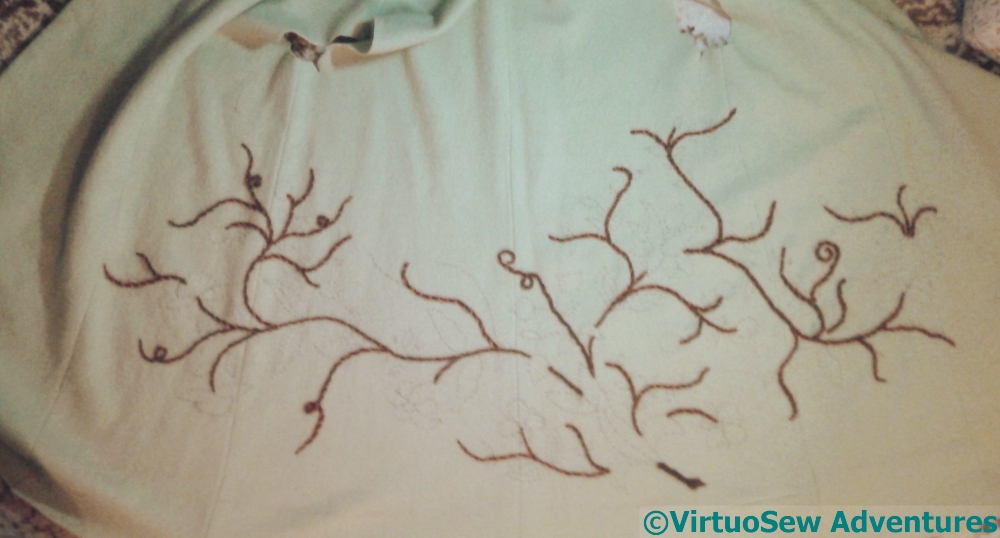
Stems Done!
I’ve got all the stems done on the Jacobean Coat!
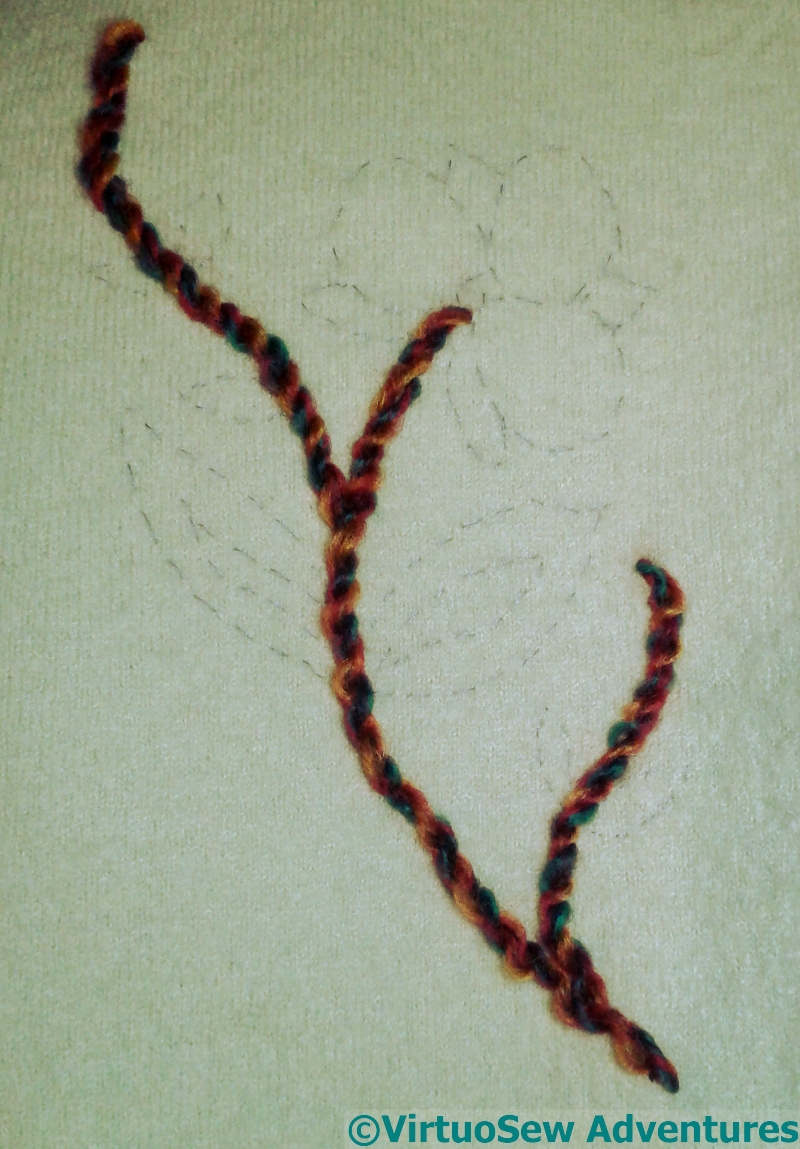
Sleeve Motif 1
I’ve been quietly attaching the chunky knitting wool along the lines of the stems, and I’m quite pleased with progress so far. I’ve tweaked a couple of tendrils, and there are a few details I’m not quite sure about, but it’s a start.
In fact, it’s better than that, because I have started on the felt appliqué!
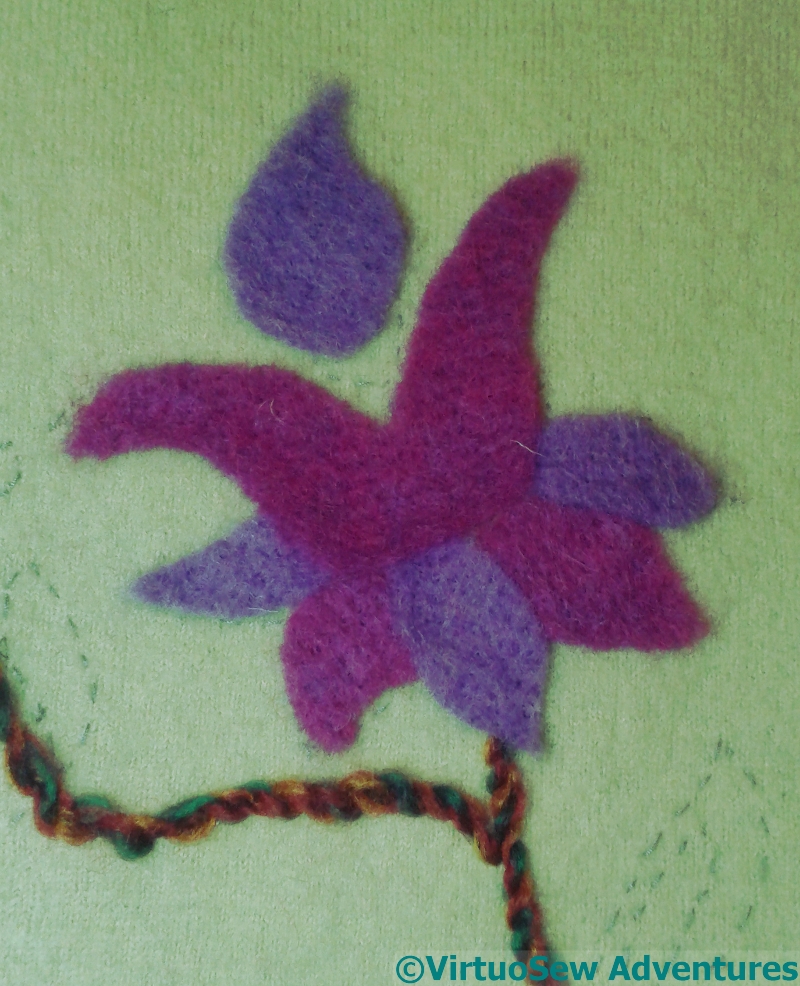
Sleeve Motif 2, Stage1
Both of the sleeves have motifs on them, one placed above the sleeve and the other below.
I decided to test the next stage on one of the sleeves, in case it didn’t work, but I rather think it will. I’m using the same lofty, fluffy felt I used for the Amarna Princesses, and I have lightly needlefelted it in place so that I can add the embroidered details without stabbing myself on a pin.
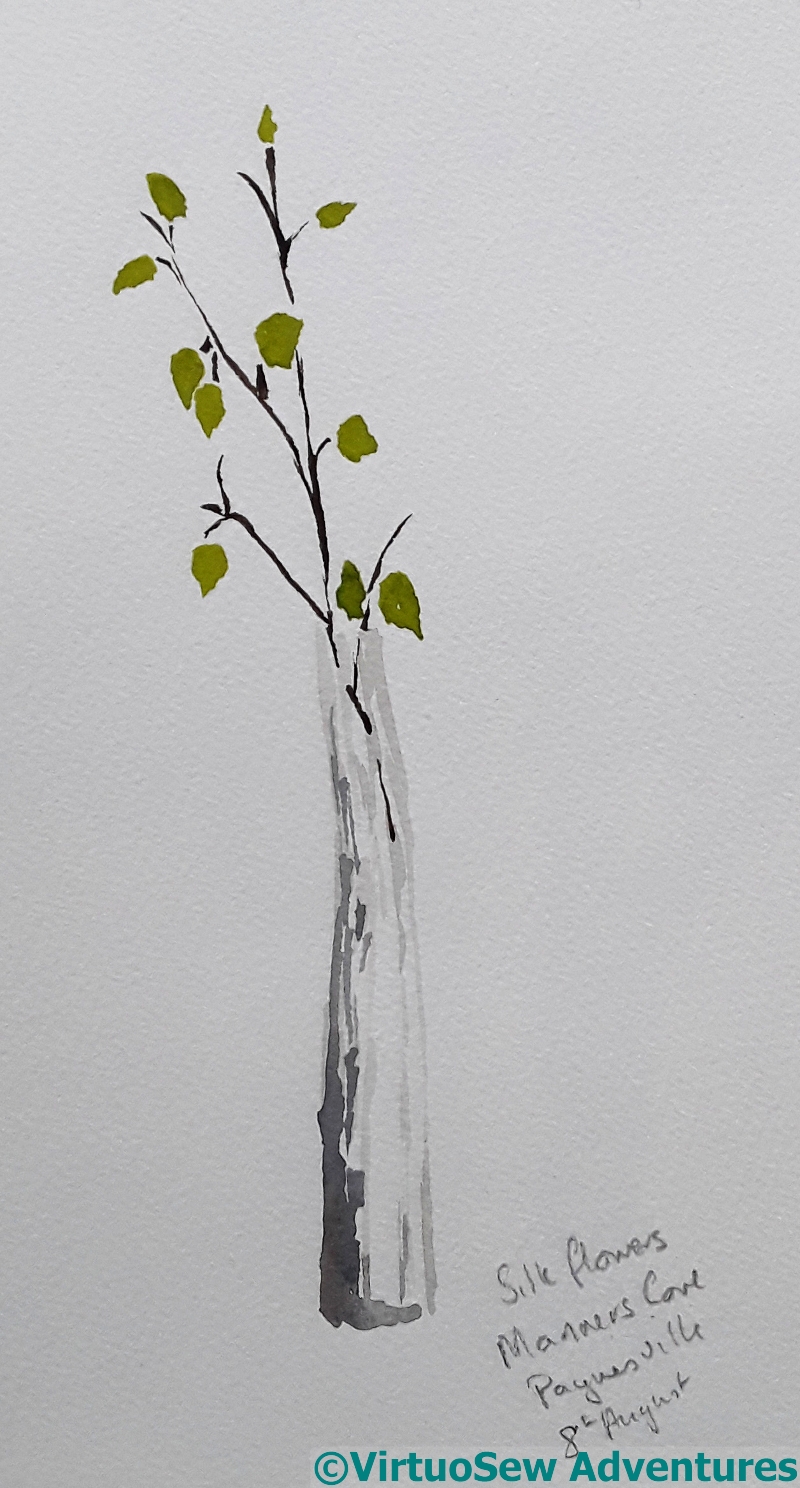
Watercolour : Silk Flowers at Paynesville
This vase of flowers was on the table in a motel room we stayed in, many years ago. For some reason they caught my eye, and for our whole stay – which was full of activity and outings – I wanted to paint them. But we were never in the room for long enough during the daytime.
Finally, on the morning we were going to leave, I got out my paints, sat down, stared very hard, and painted this. I’ve noticed that if I really want to paint something, it often works much better than paintings I’ve done because I want to practise painting.
I don’t think I even bothered to take a photograph. Everything I wanted to remember about the vase is in the painting.
When we got home, however, it seemed to me that the painting offered possibilities as the basis for a simple embroidery.
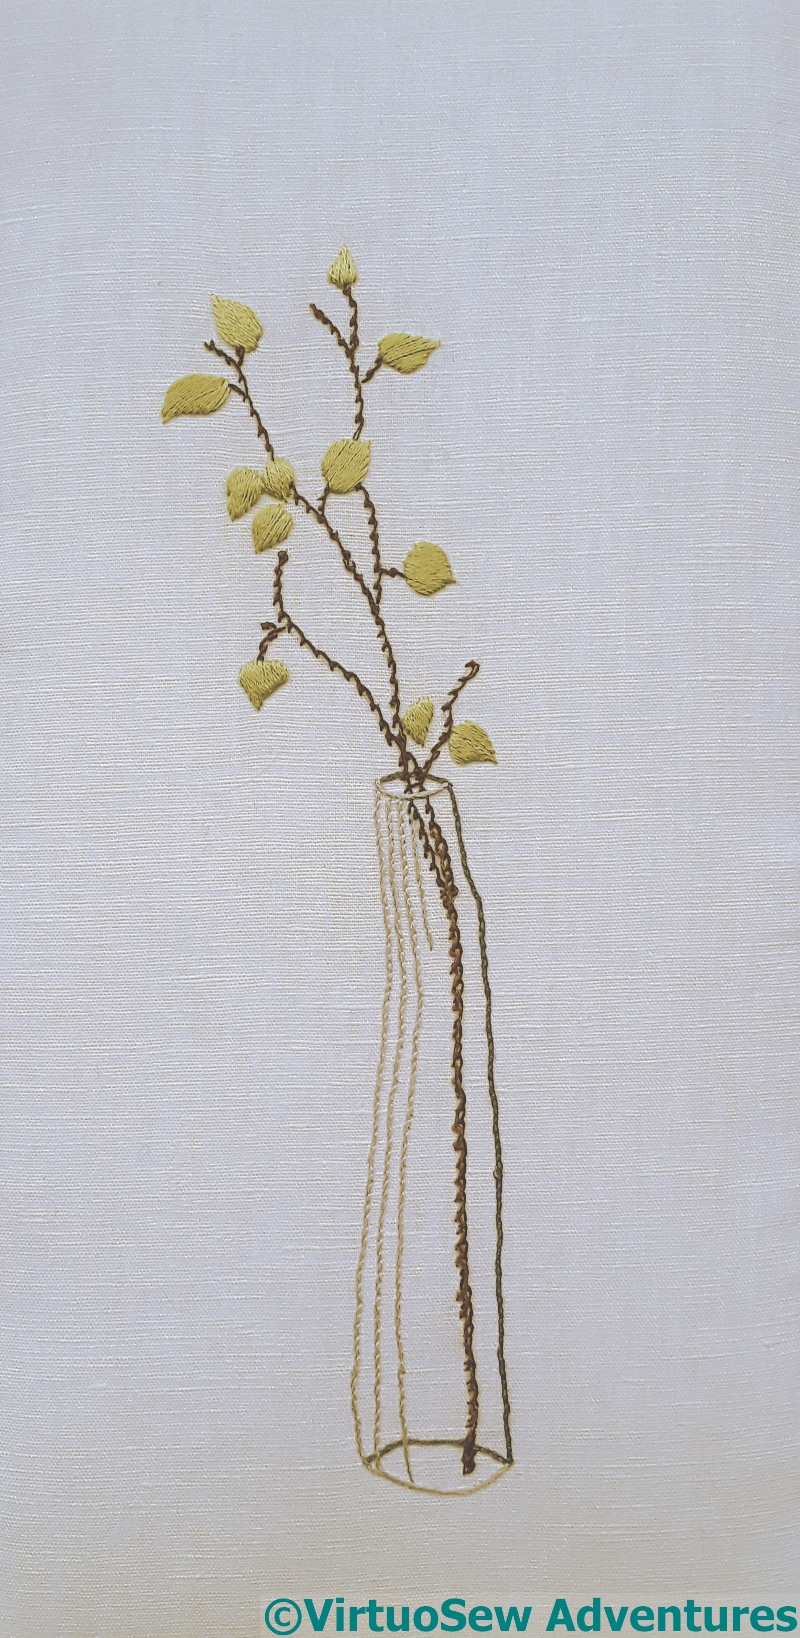
Embroidery based on the watercolour
A very simple embroidery, but, as you see, making use of a variety of stitches.
The vase was textured glass, not clear, and I represented that using lines of coral stitch among the stem stitch. I didn’t work it more densely, because I wanted it to have a certain lightness of touch.
The twigs were very rough and twiggy, so I used scroll stitch.
Finally, the simple shapes of the flowers were best represented using my neatest and most careful satin stitch. All I really wanted from them was the colour.
I haven’t the vaguest idea what to do with the embroidery, so I’ve laced it over a board to keep it tidy. But I thought you might be interested to see one of my very rarest stories – I know other designers often do detailed watercolours of their designs, but it’s not how I work. More often, I have a rough idea in my head, and work on each element while I’m planning the details of the next, waiting for the piece to tell me what it wants.
This has turned out well, but I’m still slightly bewildered that it happened at all!
Coat Design
The design wraps around the back of the coat, leaving the front mostly unadorned. There are sprigs placed on the sleeves, too, one of them above the elbow, and the one on the opposite side below it. Remember the comments I’ve made in the past, about taking inspiration from Grinling Gibbons, and aiming for balance rather than symmetry? That goes for the placement of design elements in apparel as well as anything decorative.
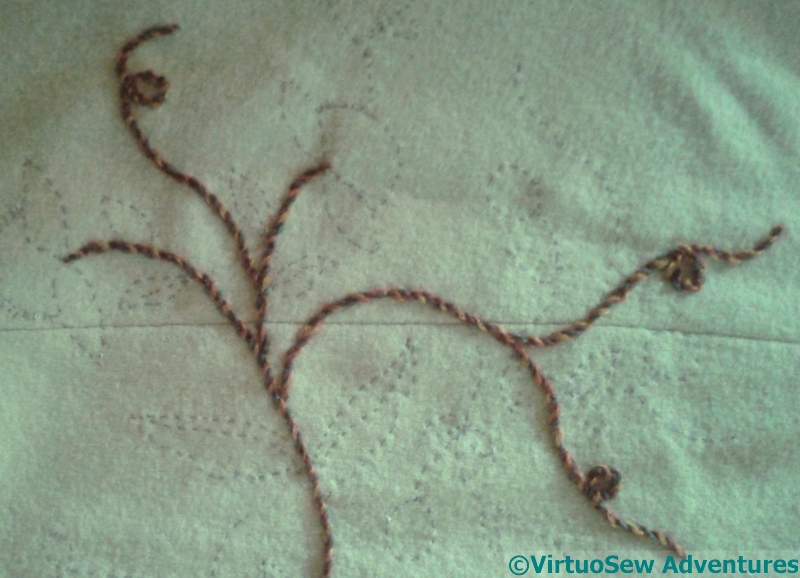
Starting Stems
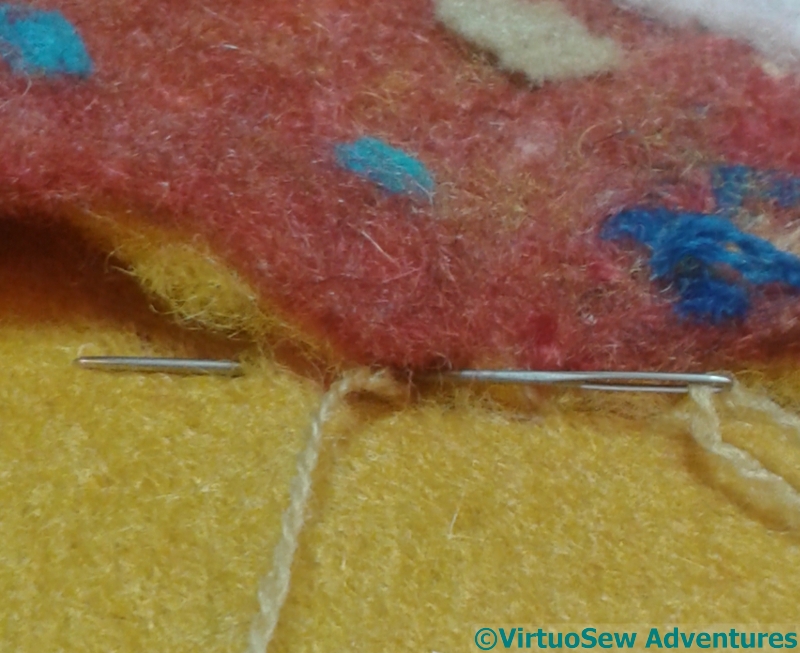
My mother has commissioned the coat with various other garments and accessories in mind, and one of the ways we thought would help to tie the coat in with them would be to use a knitting wool which is involved in those accessories. Now, as it happens, I have experience with this sort of trailing design (remember the Piano Shawl?), and I remember that it can feel very disjointed and dispiriting as you work individual motifs, and however confident you are of the whole, it’s hard to be motivated when it keeps looking spotty and halfhearted.
However, the stems pull it together, so I thought this time I would start with the stems. It’s a big, chunky, variegated knitting yarn, so I will end up with the skeleton of the design, and all sorts of colours within it. I’m catching it in place with a fine woollen yarn, using small oblique stitches buried within the twist. They should be almost invisible.
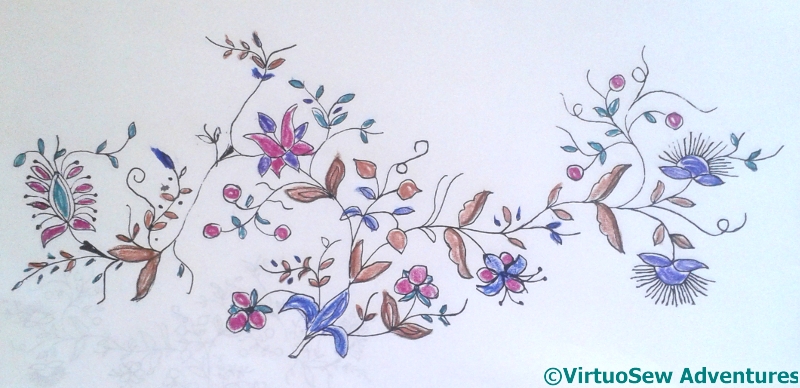
Trialling Colours
However, that too is going to take a while, so I can trial colour placement for the motifs themselves! As you can see, we aren’t aiming for a naturalistic colour scheme. This may not be the final arrangement, and there will be tweaks along the way, but I’m happy with this as a starting point.

Harrogate Haul 2018
The Knitting and Stitching Show in Harrogate has been a yearly treat ever since I first went there. It’s a chance for friends to gather to talk about embroidery (or anything else, in the case of my lunch with Elizabeth from Sew In Love Stitch Art!) or to make new friends, to stock up on weird and wonderful materials you can’t get anywhere else, and to look at exhibitions and go to workshops.
Oh, and I have breakfast in Bettys of Harrogate, which is a treat in itself!
This year I had a very short shopping list, and managed to get almost all of it on Thursday night! I got a copy of the new Goldwork book produced by Sarah Rakestraw and Susan Hinde of Golden Hinde Goldwork – signed by the authors, no less! – as well as having a long conversation with them both that resulted in a few ideas for unlocking my logjam with Akhenaten. I also bought a couple of threads that I hope will make it possible to try again to create the uraeus on his crown. The book is a good, thorough work of reference that will be very useful in the future. Yes, I know I already have others, but you would be amazed how often someone’s explanation fills in the gap in someone else’s!
The Needles Excellency
I also found some light navy blue wool (lighter than it appears in the photo), which I hope will provide a background for the panel of The Golden Fleece, if I get to it before the Conversion of Placidus (or maybe even after…!) and a couple of reels of silk which I hope might help me to do another version of Akhenaten’s face. It’s not really strong enough as yet…
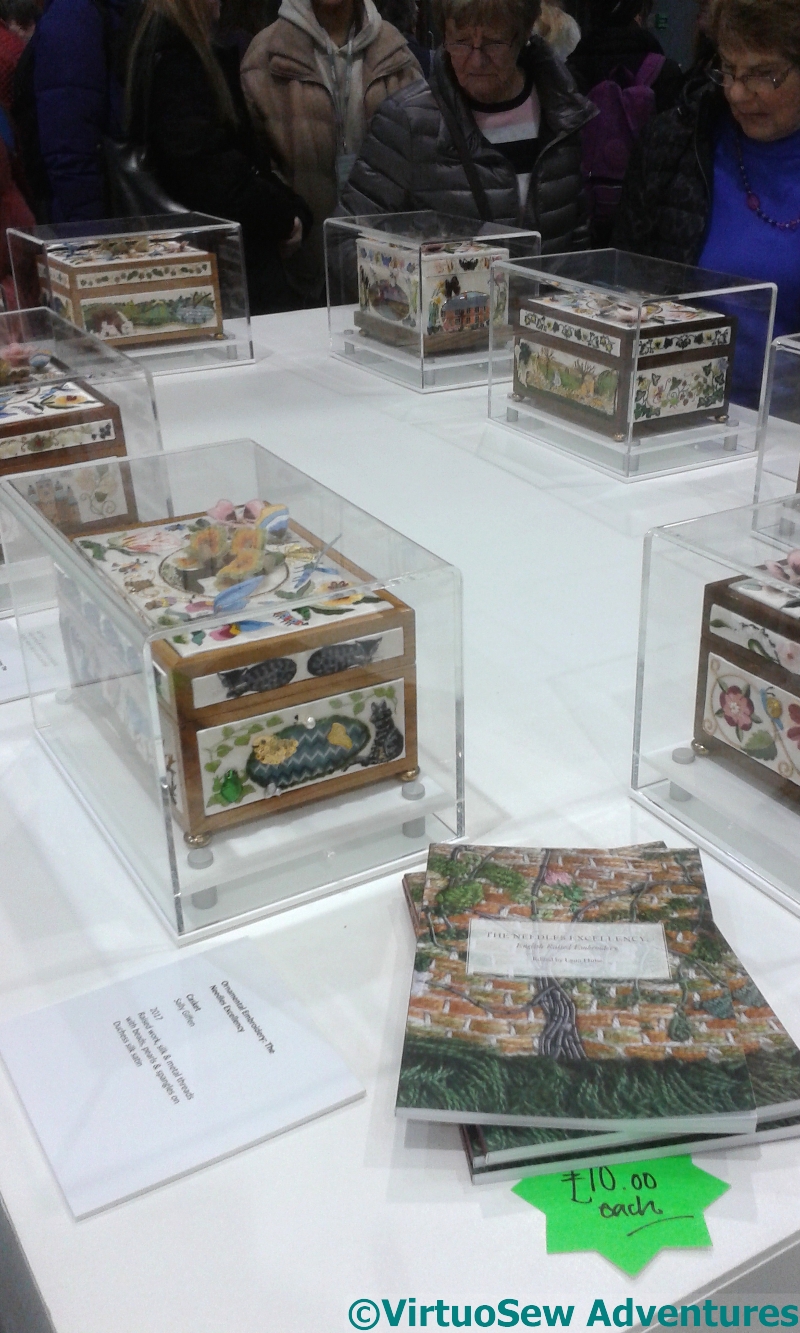
One of the really striking exhibitions was entitled The Needle’s Excellency, a display of stumpwork caskets worked by Nichola Jarvis and her students at the Ashmolean Museum. They are beautifully worked, the tops all largely similar, and all the sides worked in different designs created by the students from episodes in their lives or motifs they particularly liked. I believe there are thoughts of running the course again in a couple of years, so if you are interested, keep an eye open!
Harrogate 100 Hearts
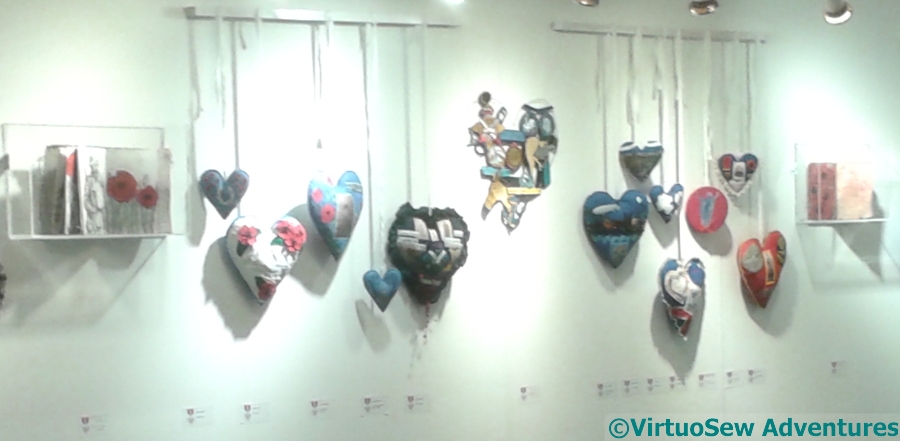
Finally, there was, of course the Harrogate edition of the “100 Hearts” project of the Embroiderers Guild. There were some old friends I recognised from the exhibition in Liverpool, but most of them were new to me, and there were some fantastic pieces of work, providing food for thought and some pointers to yet more untold stories.
Starting Second Layer
Once I had a single layer of stitches I removed the running stitch outline. Not as easy as you might hope, because my “real” stitching had caught some of them, but doesn’t it look better without!
The angle of the photo shows but doesn’t over-emphasize the slightly elongated skull the family had, and you can almost see this little girl as a daughter of Nefertiti – the same fine-drawn features, softened by youth and lack of care.
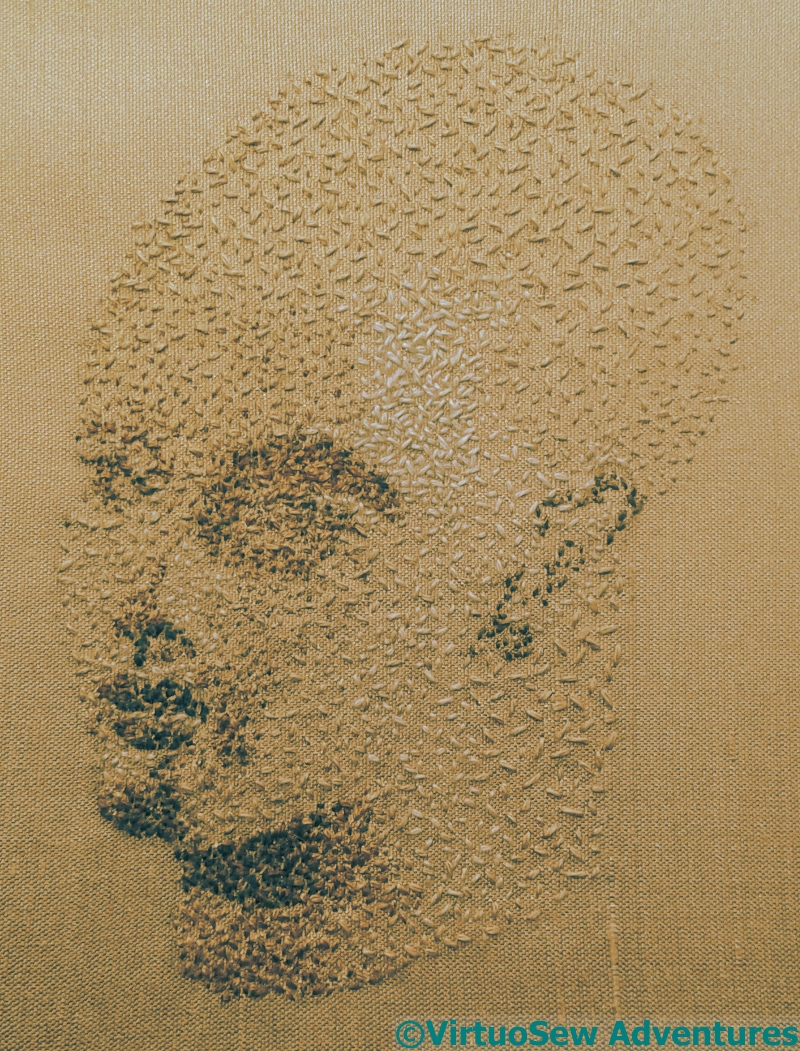
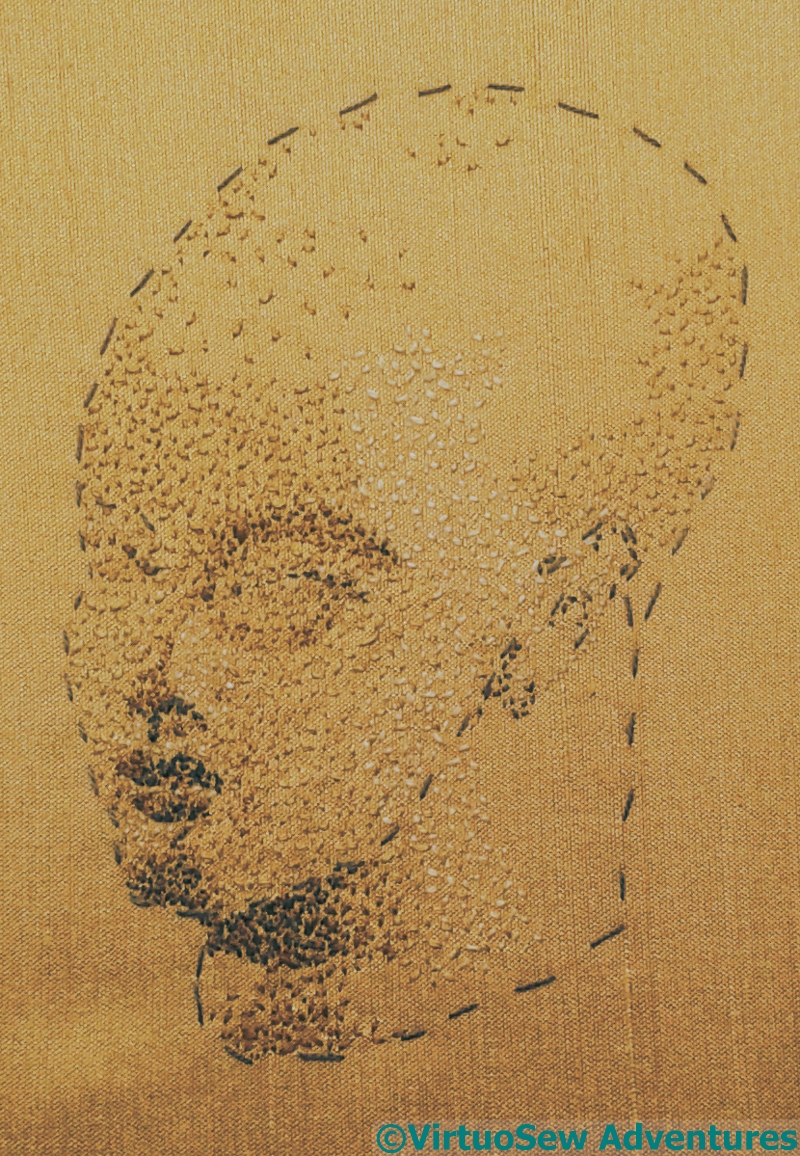
More Darks
The next thing to do was to add in some of the mid tone darks. The photograph I’m working from does have some quite strong shading, and I felt that in spite of my early Dark darks, there wasn’t quite enough form.
However, this point I had a bit of a wobble, because I was wondering whether I’d done too much dark. Looking at the photo, I now think not, but I do need a mid-mid-tone to blend in the curves of the face a little bit more.
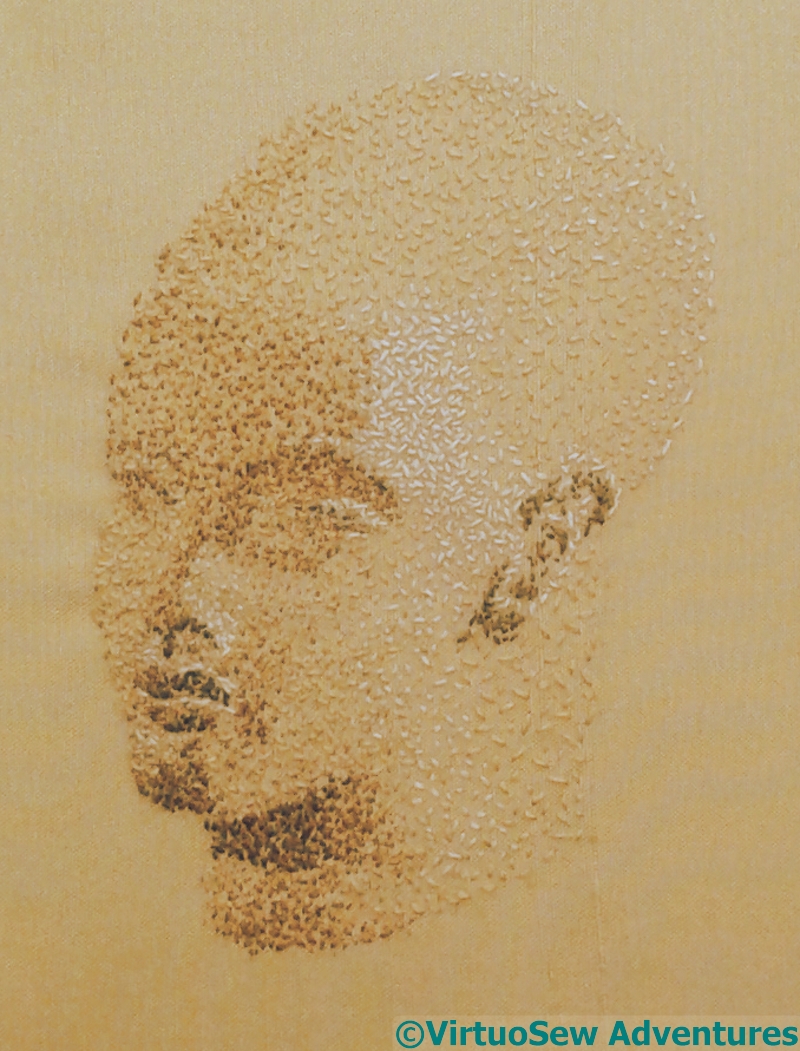
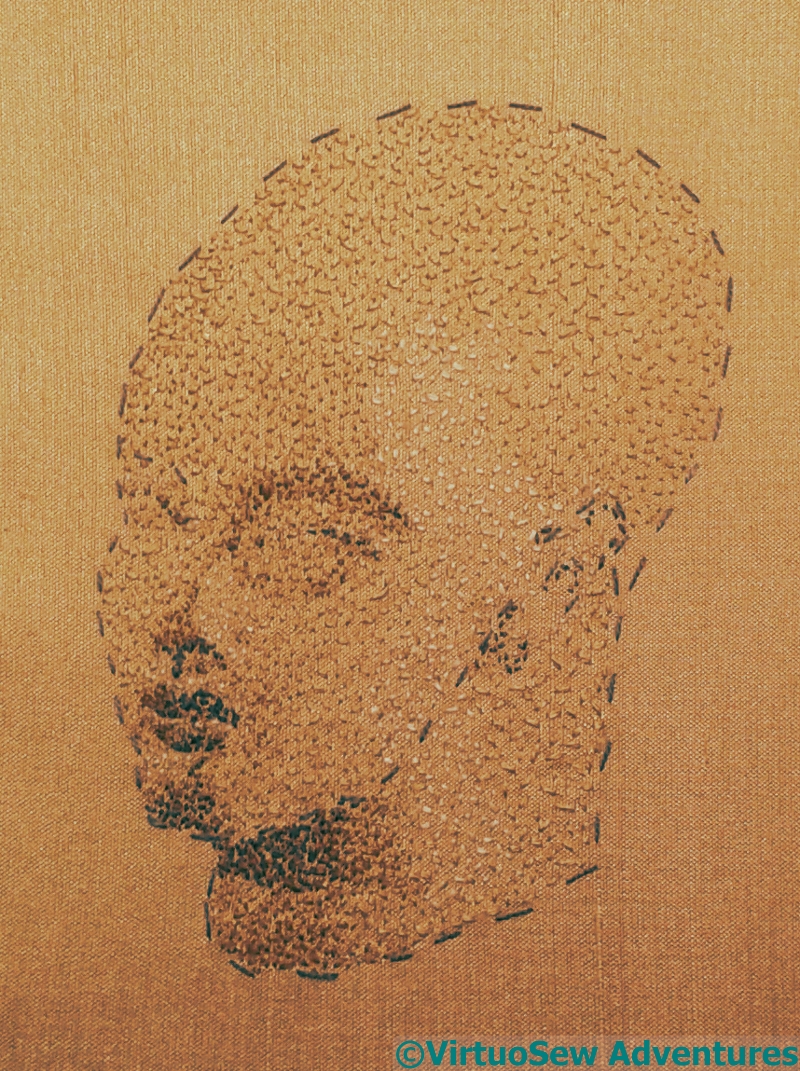
More Lights Too
However, I put in more lights to help myself back on track.
You can see, if you click to enlarge the photo, very light cream stitches around the highlight on the temple, on the eyelid and around the curve of the nostril and the light areas around the lips.
I need to extend some of these, and add those pesky mid-mid-tones. But I do think it’s going to work.
And I’m completely astonished at myself. I’ve approached this almost as I approach a watercolour, and you wouldn’t have thought embroidery – certainly not my embroidery – would be amenable to such treatment.
Gosh.
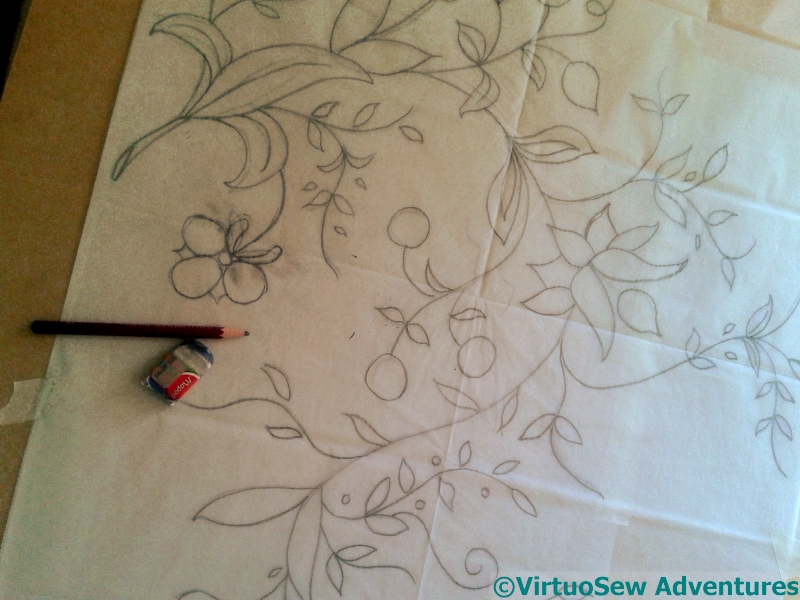
Coat Designing
This is going to be a truly multi-generational project. The design elements are stolen from a tablecloth my Grandmama did during the war, and I’m going to embroider it on a coat for my Mam (her daughter). I will write a post about Grandmama’s tablecloth one of these days, because it’s an absolute cracker, full of wonderful needlelace patterns I’ve never seen anywhere else. However, as it is stitched in white on white fabric, I will have to become a better photographer first!
Stage One of Design Transfer
You may recall that during the Great Lady’s Magazine Stitch-Off, I wrote a post about the different methods for transferring designs, particularly concentrating on their advantages and disadvantages in different circumstances. The fabric of the coat (this will be the second incarnation of this fabric!) is a pale green boiled wool. It’s dense enough to have some structure and weight, light enough to be easy to stitch (I think). You might have thought it would accept gracefully any method I chose.
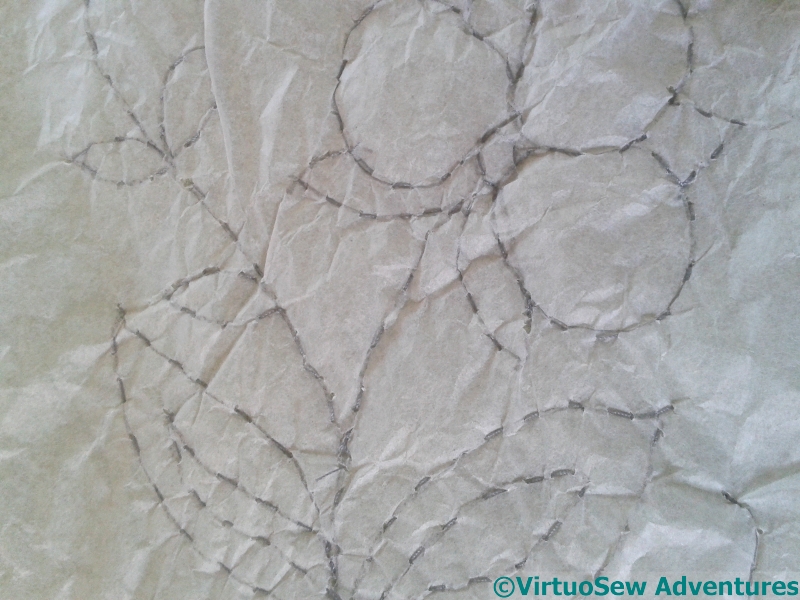
Stage Two of Design Transfer
However, when I thought about transferring the design, I found myself ending up with the most time consuming of the lot! Since the garment is unlikely to be washed, and rubbing may damage the surface, my options are somewhat limited. Transfer pencils spread, sometimes, if the ironing temperature is wrong, the chalks have a nasty habit of not always rubbing off when they’re wrong, and my quilter’s pencil doesn’t work on strongly textured fabrics.
So, running stitch through tissue it is, then. This will take a while…..
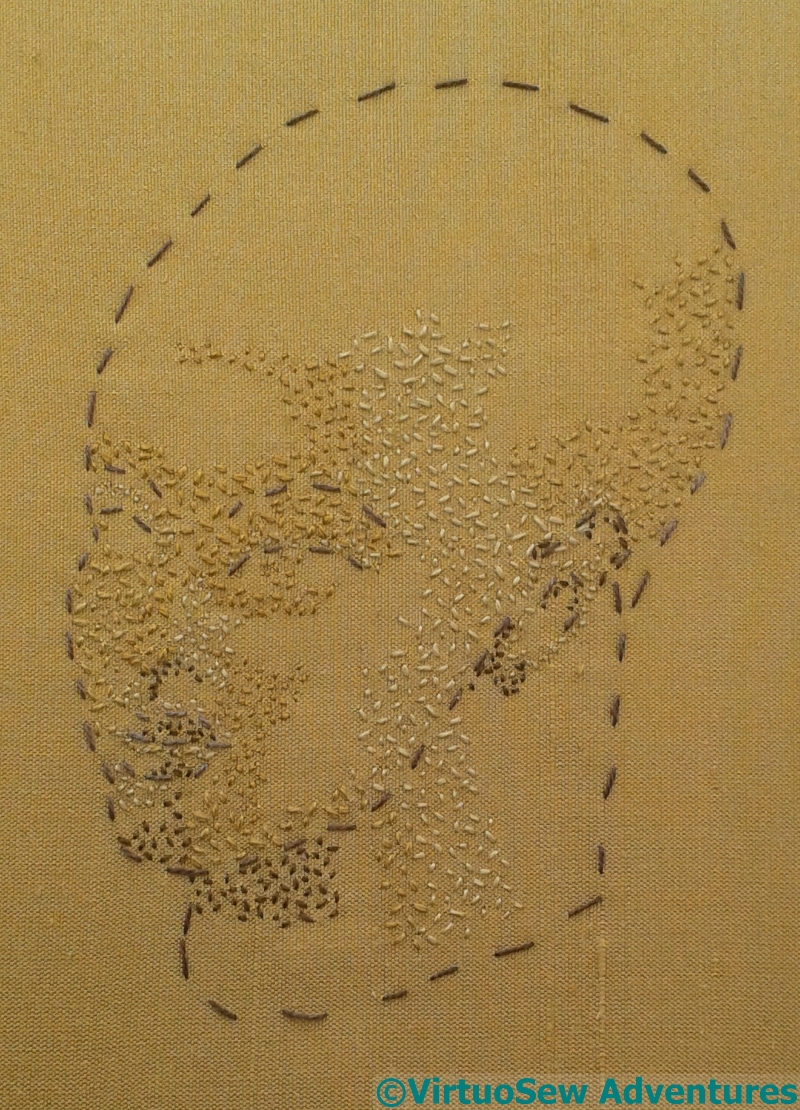
GettingStarted
There is relatively little to say about Ankhsenpaaten, because the form will be created with loads of seed stitches in slightly different shades of silk thread, so there will simply be more of the same.
However, you may find it interesting to watch it come into focus, so I will post a series of pictures, along with what comments I feel I can make.
Do click on the pictures for a closer view, and a better sense of what is happening.
Eye Socket
You can see from the earlier post that I only transferred the most basic of outlines, so I am using the photograph as my reference and working the various shades over one another to develop the layers of colour and shade.
I have started by trying to understand the most basic planes of the face and the shades needed to bring them alive.
Complete First Layer
I tend to find it much easier to get my bearings if I can get some of the darker areas in, because that gives me the beginnings of a sense of depth and form. It is, however, a slightly terrifying approach, because there’s something so very definite about a truly Dark dark!
One of the shades of silk is very close to the fabric, but there is just enough difference that the light bouncing off it creates a sense of difference between inside the lines and outside the lines.
Attaching Piece In The Thickness
I felt that the finishing technique for the Amarna Geese really worked, creating just the right impression of a fragment of fresco, so, after thinking it over a little more, I tackled the Princesses.
The depth of layering of the felts made it much easier to attach to the padded mount, although if I could only have found my curved needles, it might have been yet easier.

Princesses Mounted And Signed
Again, I couldn’t bring myself to chop the princesses into bits. If I had thought of the display method to begin with, and created the piece with that in mind, I might have been able to do so, but as it is – they are so exquisite, I simply couldn’t do it!
Finally mounted, with the separate bits on the corners. They look just the way I hoped they would!
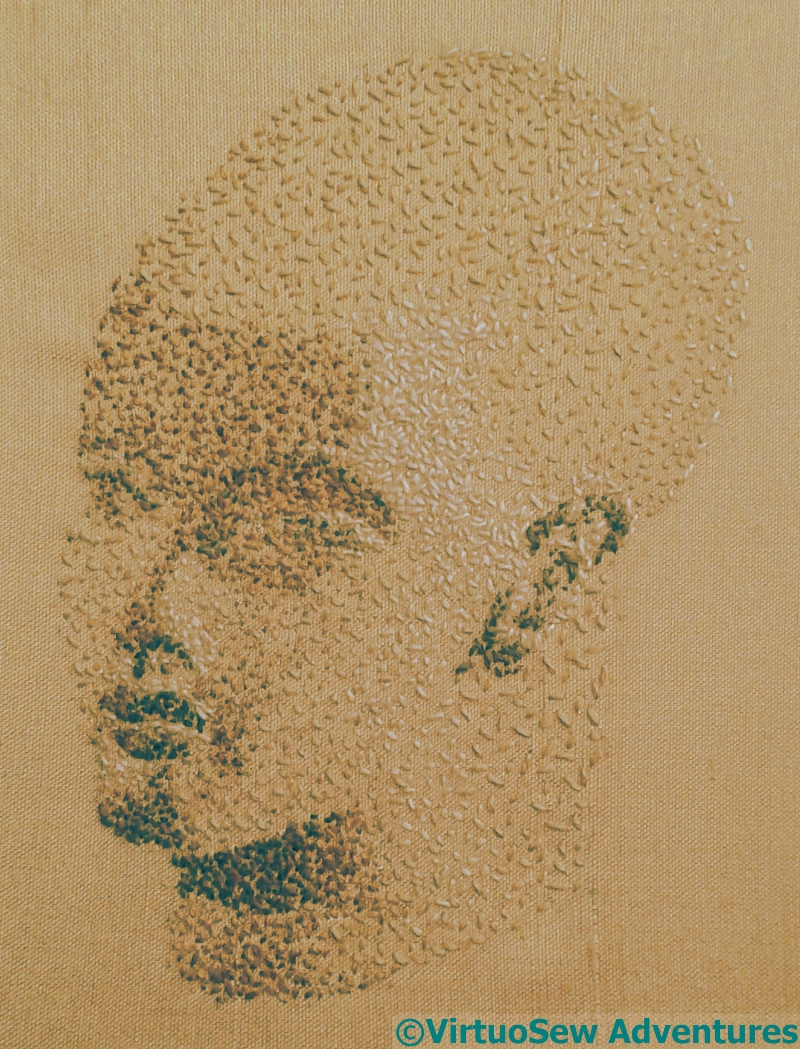
Head Of Ankhsenpaaten
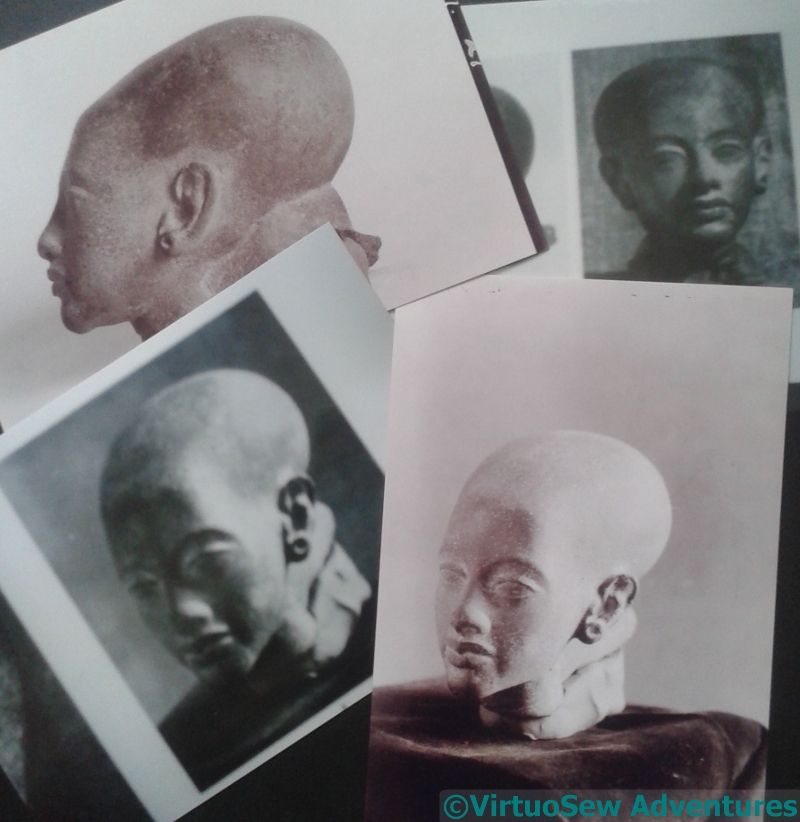
One of the crowning finds of the season was a small carved stone head, interpreted as depicting one of Akhenaten and Nefertiti’s daughters, Ankhsenpaaten. I know the princesses (two of them!) have already appeared, but that is a separate piece, whereas this version may be able to form part of the main panels.
I gathered several source photographs and some fabric, and Thought Hard.
And decided to challenge myself. Whenever will I learn?
Ankhsenpaaten Design
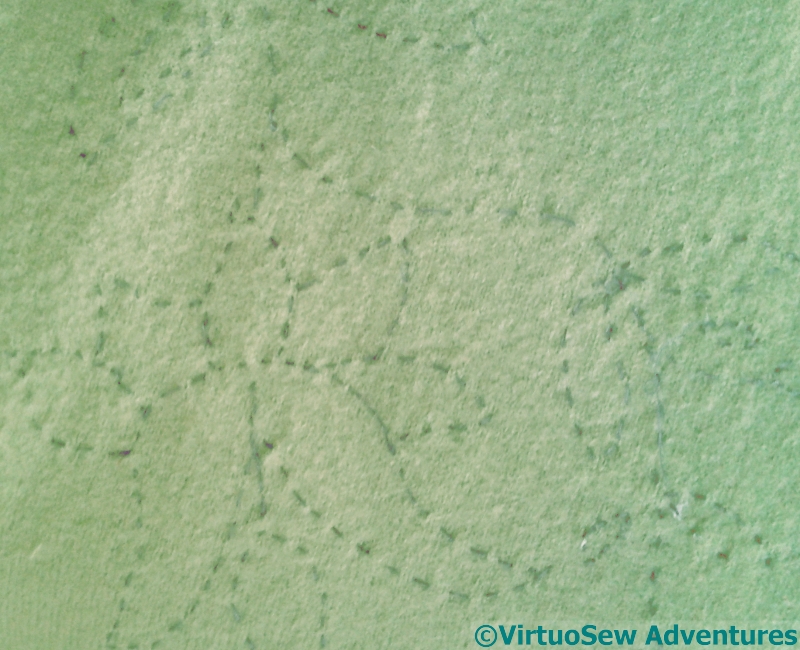
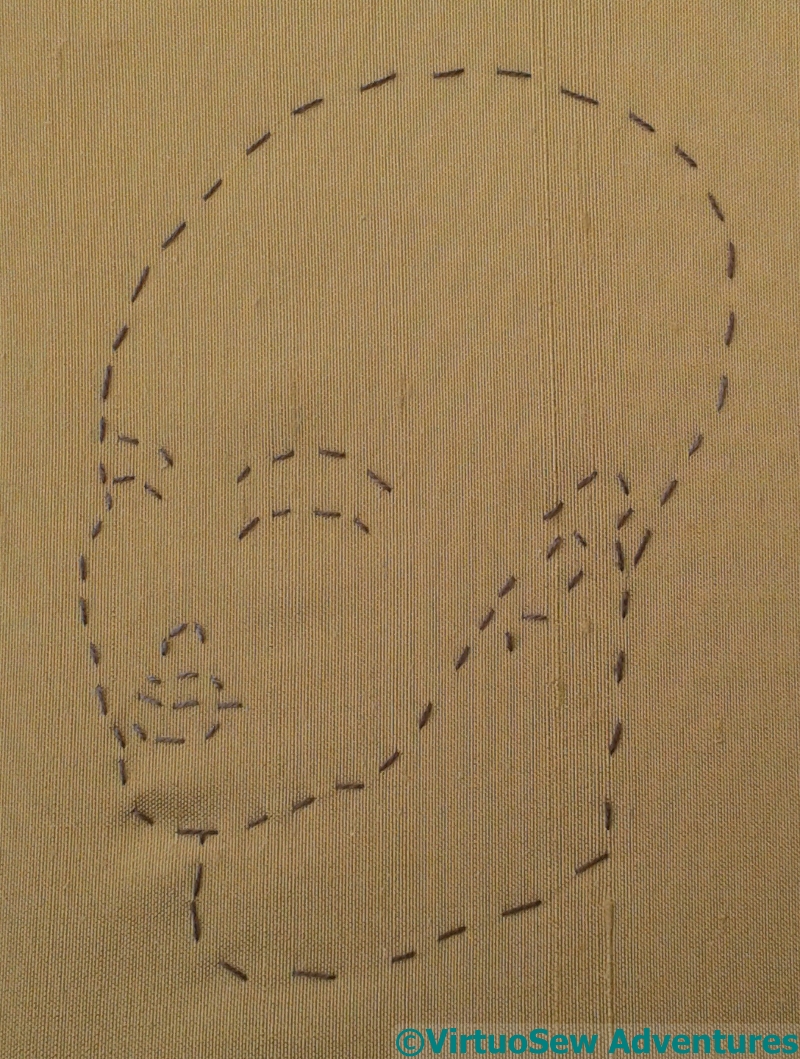
So I’ve stretched a piece of calico over some small stretchers, and attached a rather nice piece of silk over the top.
Then I’ve traced the main elements of the head onto tissue, and transferred it using running stitch. I’m going to need to be careful, because I want to be able to remove these running stitches when I’ve finished, but there is a lot of stitching to do yet.
I just hope I’ve transferred enough to give me the right level of guidelines!
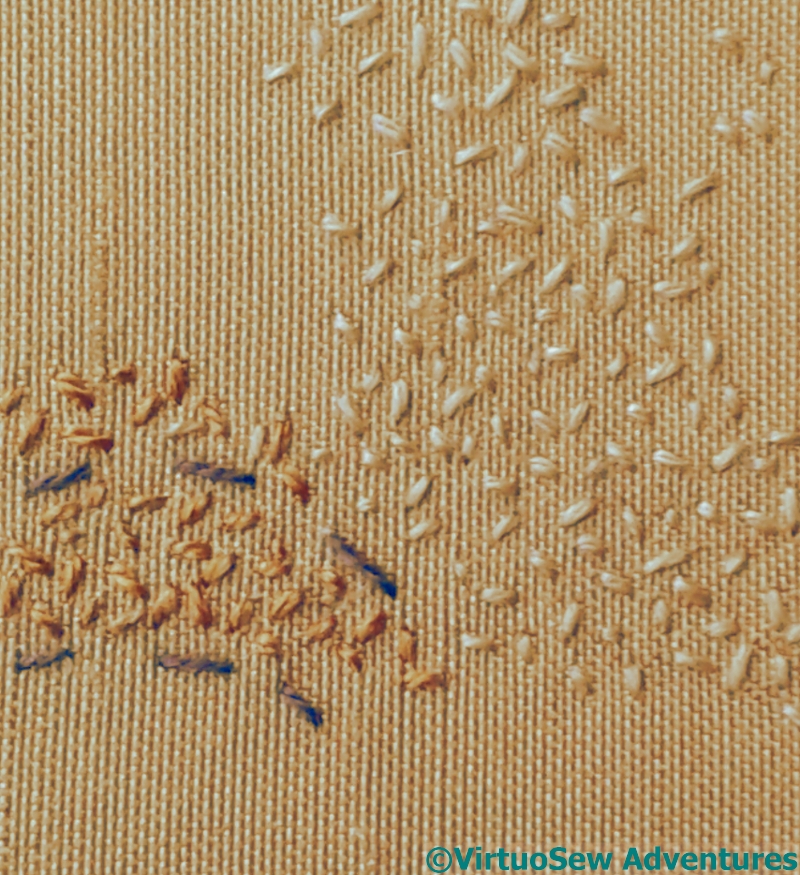
Seed Stitching for Ankhsenpaaten
I’m going to use seed stitches in several different shades of spun silk, hoping to end up with something of the granular effect that some stone has. I’m starting with one layer of seeding, staring hard at the source photo and stitching clouds of seed stitches to give the first level of dimensionality. It is going to take quite a while to do this, especially when you consider that it is a very simple technique.
Simple in principle, that is. In execution, not so much!