
Tag: apparel
Embellishing The Circles Skirt – Part Five

Blanket Stitch Wheel
I’ve recently bought myself an embellisher, and this is one of the circles I’ve used it on. The stitching is a simple blanket stitch wheel, which some small straight stitches between the spokes and French knots on the skirt fabric. The thread is wool, so I thought this one might be a good candidate. It has had the effect of making the stitches seem much more part of the tweed circle – almost drawn or painted on. In turn, that helps the French knots to seem a little more textural.

Change In Texture
Learning to use the embellisher – and in particular, how soon to stop! – is going to prove interesting. Here you can see that there is a less fuzzy texture at the centre of this tweed circle. That section has been more heavily treated with the embellisher. This was quite deliberate, because the very free ornamentation on this skirt allows me to experiment, and one thing I would like to know is – will this change in texture be permanent, or will this fabric become fuzzy again as the skirt is worn?

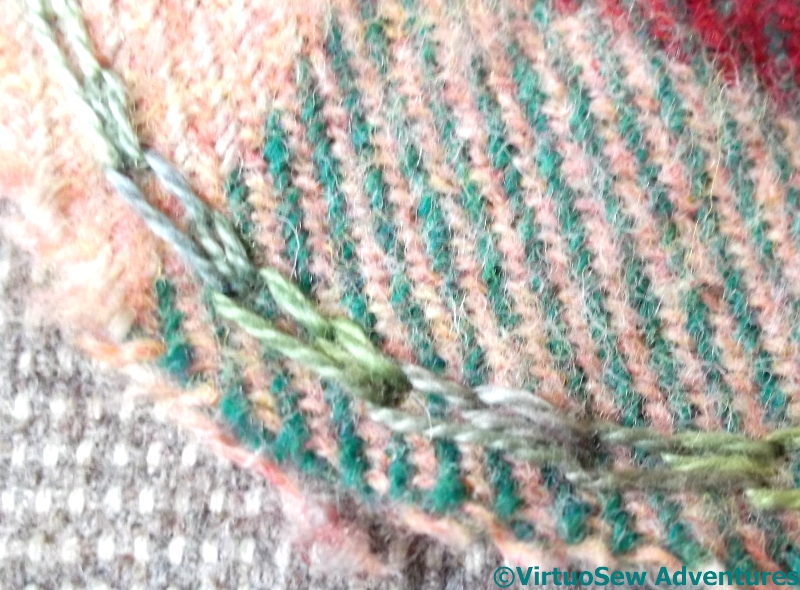
Couched Bouclé
In this case, I’m not sure I can even distinguish the effects of the embellisher! I couched a bouclé thread over the top of the tweed in this case, then ran the embellisher over the tweed and bouclé at random. There is extensive scope for investigation and experimentation here..
Incidentally, for those who’ve not heard of one before – an embellisher is something like a sewing machine, but it replaces the needle and thread with an assembly of barbed needle-felting needles. The barbs entangle the fibres of the fabric, creating new textures and joining the fabrics without stitching. So far I’ve only had a chance to experiment a little, but I think it might be a very useful tool when I start work on the Vision of Placidus!
Embellishing the Circles Skirt – Part Four

Shell Chain

Wavy Chain
Some of the suggested stitch variations in Edith John’s books have worked very well for the Circles Skirt, others rather less so. I think these two samples might help to show why.
Shell Chain Stitch worked beautifully. In the pearl cotton thread I used, there’s a nice, crisp sense of the stitch pattern, but the stitch is still flexible enough to curve around the circular shape I wanted it to, whereas Wavy Chain stitch, a variation upon it, is a very “stiff” stitch. It is wide, but each group of stitches stems from the same point, and even using a much finer thread and shortening the stitches really doesn’t make it any more flexible.
Shell Chain On Tweed
So here is Shell Chain on the skirt. It runs neatly around the edge of one of the checked circles, and although now I have worked the sample as well I might have preferred to shorten the stitches, it was fun to do, and easy to alter to match the curve.
I tried Wavy Chain several times in various places without managing to make it follow even the gentlest of curves, and eventually decided to give up until I’d thought it out some more, and maybe even done some practice.
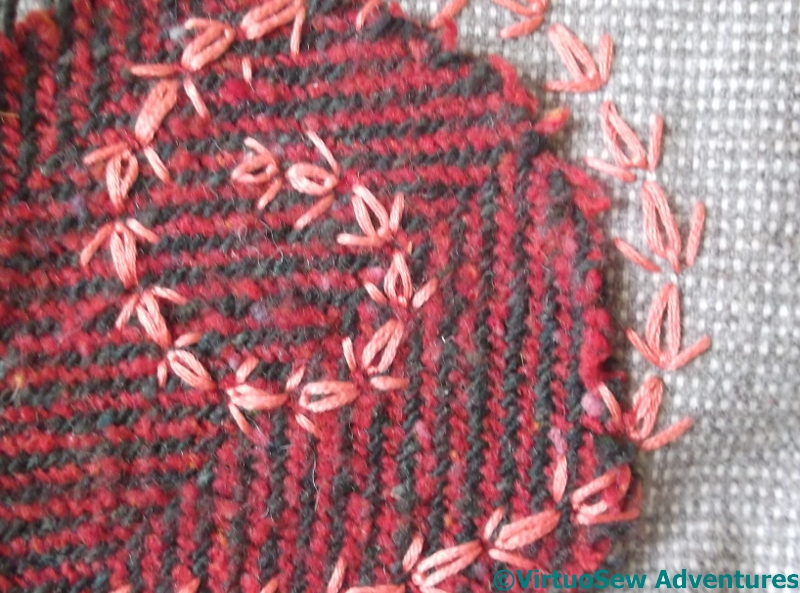
Wheatear Spiral
The Wheatear Spiral more than made up for my frustration.
It was a joy to do – the stitch itself is easy and effective, and the coral thread sings against the red and green tweed. Offsetting the spiral in comparison with the tweed also makes the whole thing more interesting, helping to connect the ground fabric and the embellishment. Maybe I should have swung the spiral further out over the base fabric, but this is what my needle wanted to do!
Embellishing The Circles Skirt – Part Three

Spanish Knotted Feather Stitch
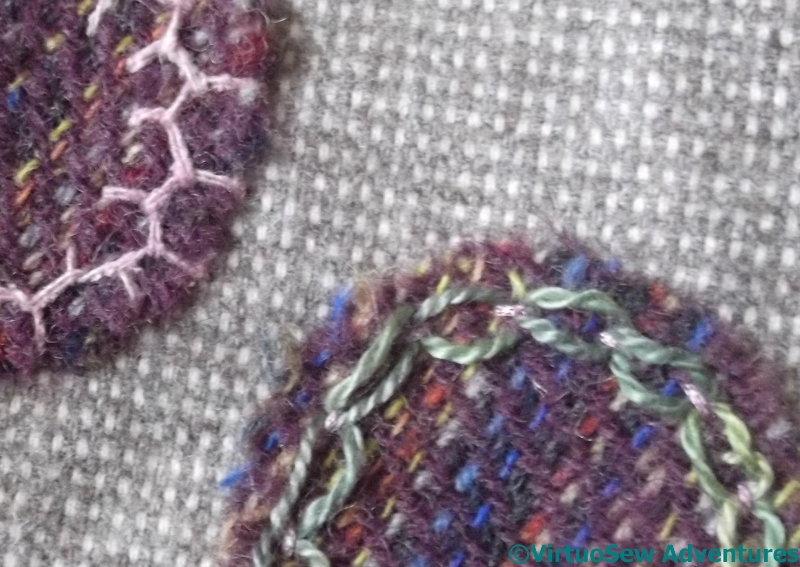
Naturally some of the threads I chose to use were from my extensive stash of variegated and over-dyed yarns. The Spanish knotted feather stitch running around the edge here is stitched using one of Stef Francis’s pearl cotton type yarns. This one has very little sheen, unlike the more standard pearl cottons, but the colour change brings up the texture of the stitch beautifully. I think this is the first time I’ve ever used that stitch, and I really enjoyed it.
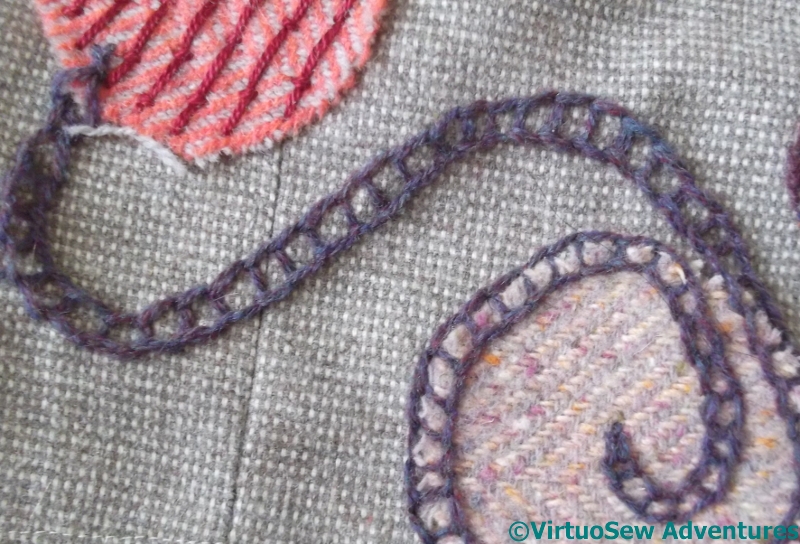
Spiral Of Ladder Chain
I realised that I had fallen somewhat into the trap of stitching around the edges of the circles, and wanted to create some sort of variation, so when it came to the pinky circle, I added a layer of widely-spaced burden stitch to alter the colour and effect a little. Then I used ladder chain stitch to join that circle to another.
I continued the Ladder Chain across the skirt fabric and around the rim of another circle, spiralling around it and then into the centre.
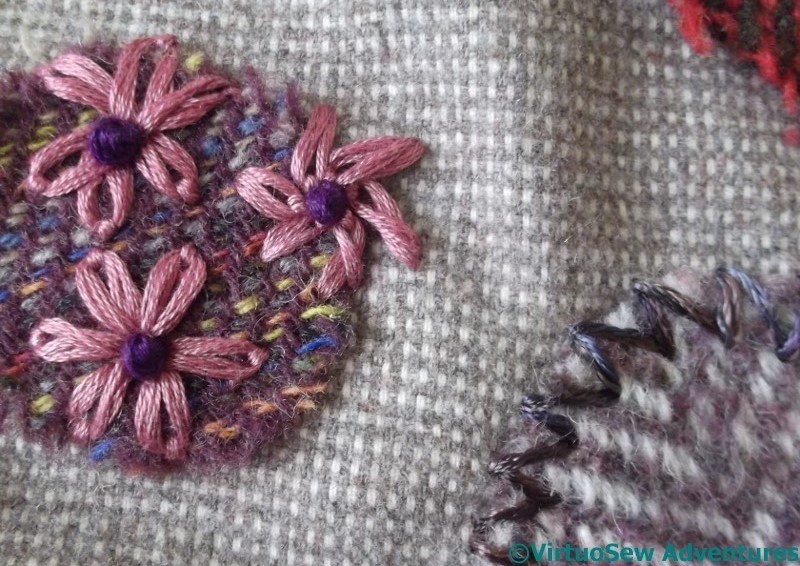
Glove Stitch And Daisies
More daisies, this time on one of the smallest circles. I may add to the grouping in due course, but for now, there are just the three pinkish ones with dark centres, one of them falling off the edge of the circle.
The shiny rayon in stormy colours around the edge of the other circle is glove stitch. It was surprisingly hard to bend the stitch around the circle. I expected it would be easier, since with a name like “Glove Stitch” you would expect the stitch to be intended to run around fingertips, which are much more tightly curved than this circle!
Embellishing the Circles Skirt – Part Two
There are a lot of circles to embroider, and since even though I’ve done a lot, I’m not sure I’ve finished, it will be some time before I show you the skirt complete. In the meantime, though, I’ll continue to describe some of the circles and the embroidered embellishment as it has developed.
Three More Circles
The light chain stitch around the edge of the darkest tweed circle looks a little stark, and I may have to do something else to break it up a little. Edith John’s various suggestions may help there!
The stranded cotton I used for the blocks of straight stitch on the pinkish tweed is actually too close in weight to the threads in the tweed, and at some angles in relation to the weave, it sinks in a little too much. I like the effect of the sheen of the cotton against the matte wool, but another time I might choose to separate and recombine the strands.
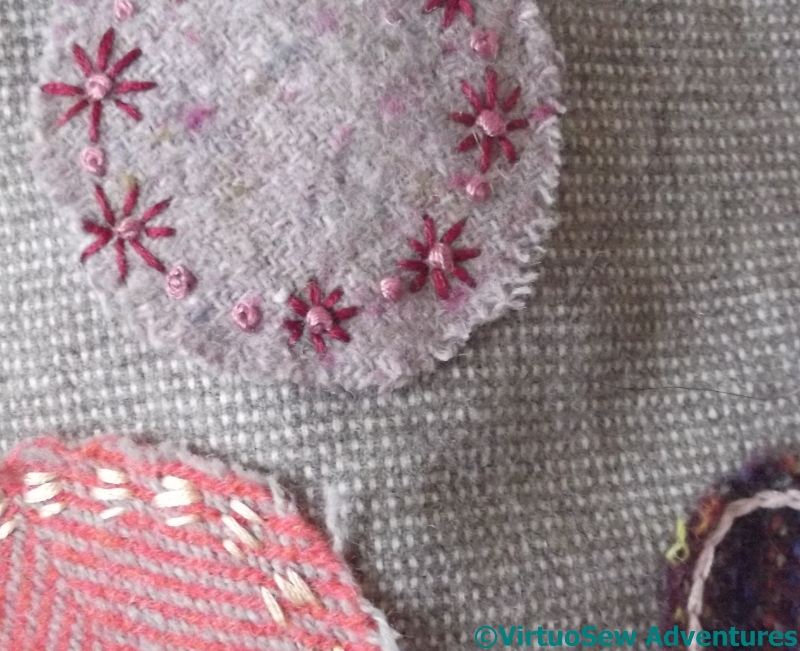
The lilac tweed shows what happens when you improvise. I started with a ring of French knots about half a centimetre in from the edge, decided it wasn’t enough, and turned alternate French knots into flowers with a ring of straight stitches. It turned out that I was one French knot short of a complete ring!
Cretan and Interlaced Running Stitch
The small, dark tweed circles are predominantly at the back of the skirt, on the sections that flare out slightly. By and large, I’ve not done anything too dramatic in embellishing them, either. I want the patterning to reach all around the skirt, but it doesn’t have to be equally heavy or equally detailed at every point.
The cretan stitch is worked in a fine but quite rough silk thread. I liked the combination before I stitched it, but the silk thread wasn’t easy to work through the tweed fabrics, so I was very glad it was only a small circle!
The second circle is ringed with double interlaced running stitch using a medium weight pearl cotton. The pearl cotton sits up above the tweed, and the shine contrasts nicely with the matte silk thread on the other circle.
Embellishing the Circles Skirt – Part One
I have two books by Edith John, “Creative Stitches” and “New Stitches for Needlecraft”, and in the latter, she in turn quotes from another book “Needlework through the Ages” by Mary Symonds and Louisa Preece, who say
“It should be remembered that it is not the stitch itself, but the manner of its use which constitutes the art of embroidery”.
I’m going to have to think about that. I think – I would like to think – that in my embroidery the “manner of use” of a stitch is an important element of my approach, but I want to think a little bit more about the How and the Why of some of my stitch choices. It might involve a little more practice stitching, but since it’s the process of stitching that appeals to me as much as the finished result, that probably won’t be a problem!
Much of Edith John’s introductory text is concerned with encouraging experimentation – not something I need much encouragement in! – but one thing she does emphasize is the delight that can be gained purely from stitchery. The whole idea of this skirt is that it should look as though I had fun with it. This is probably not a project in which the answer to Why is likely to be anything other than Because.
Ghost Circles
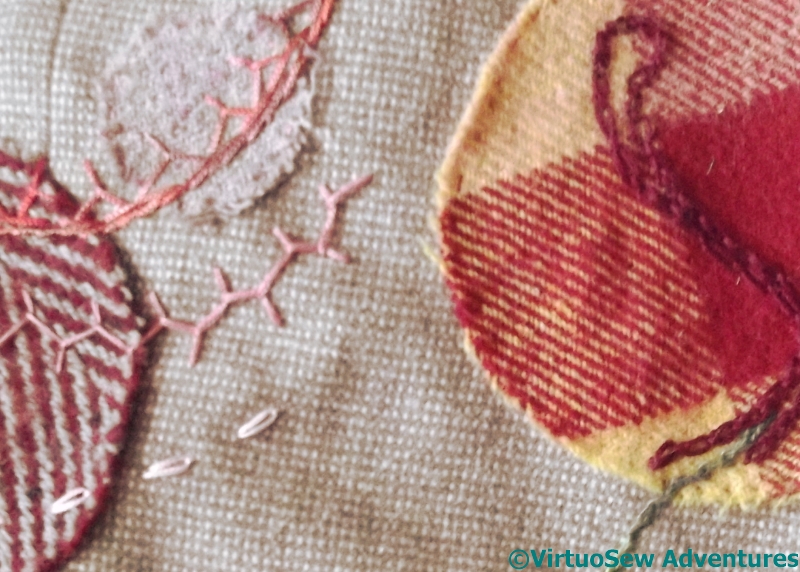
Some of the circles will be embroidered within their edges, some will have embroidered elements that extend beyond there edges, and some are ghost circles, linking several of the tweed circles together. In the top left corner of this first picture, you can see part of a series of concentric ghost circles, using solitary chain stitches, cretan stitch, stem stitch and half-chevron stitch.
The large checked circle is joined to a nearby one using some cable chain and twisted chain stitches, set out to suggest that the stitching is itself a stitch, running underneath the main fabric and onto the tweed.
Feather And Lazy Daisy
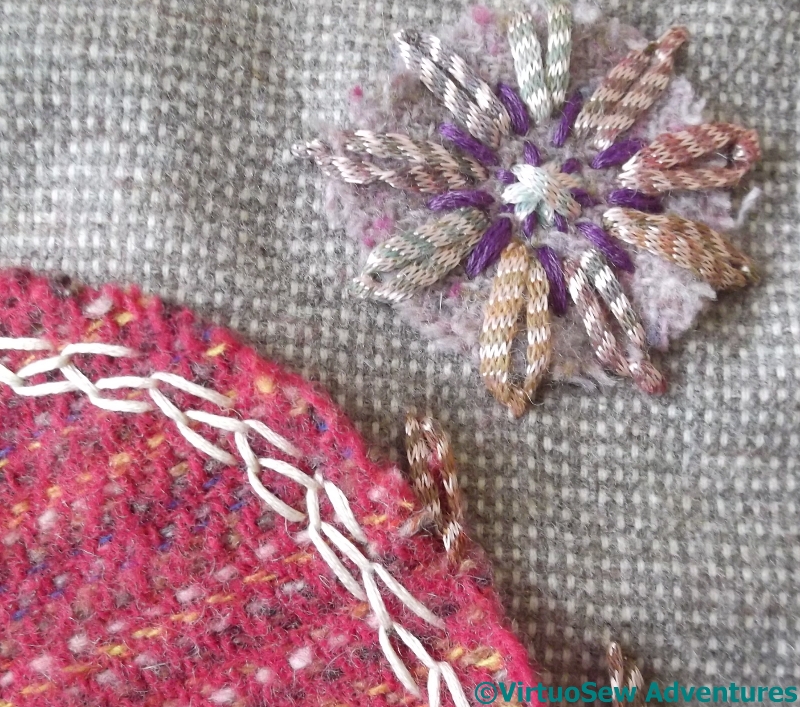
One of the smaller circles acquired a Lazy Daisy in chainette ribbon, with a couple of falling petals on the main fabric. I’ve emphasized the centre – a circular boss using the same chainette in star stitch – using a darker stranded cotton.
I’ve learnt over the past few years that sometimes a design is best created using layers of detail. The darker stranded cotton was added after I’d done a few other circles. I came back to it, and wanted to point up the petals a little. Since the tones are all very similar, the darker thread helps. I may yet come back and add some more.
The large crimson circle is very simple at present, with a single row of closed feather stitch around the edge. That may yet change…
The Circles Skirt

Layout For The Skirt
You may recall that I bought some rather gorgeous Donegal tweed at the Harrogate Knitting And Stitching Show, with the intention of embellishing a skirt. I decided that this time I would use simple circles, and cut some paper patterns in circles of different sizes, to decide on placement. Here is the result. Most of the drama is at the front, where the skirt is a simple A-line shape. The back of the skirt flares out a little in the centre, so the patterning tails out there, but the pattern is asymmetrical, which is why I’ve chosen to show you a sort of all-round view.

Skirt Partly Arranged
It seemed to me that the easiest way to decide what went where was to sneak up on it. I stared at the layout for a while, picked a fabric for a particular placement, cut it out, pinned it on in place of the paper circle, and then stared again. Repeat…

Skirt Layout completed
I’ve needlefelted the circles to the fabric – that seemed the best way to attach them more or less permanently so I won’t be stabbed with pins when I’m adding the embroidery. Now there will be a lot more cycles of staring at it and doing something, staring at it and doing some more.
And since the circles are firmly attached, I can in fact wear it now if I decide to!
A Needlelace Embellished Blouse
I must have worked the Needlelace Embellished Blouse when I was sixteen or seventeen – probably it was about the third or fourth project that I did, ever. Once I’d got hooked on embroidery – which happened over a piece that I’ve yet to show you, partly because I’m not sure where it’s hidden itself – I went from technique to technique and project to project almost without drawing breath!
I wanted something “Floral-inspired but modern”, I remember, so my mother suggested a pentagon for a flower and triangles for leaves. Thus:

The Geometric Floral we designed for my Needlelace Embellished Blouse
We divided the pentagon into triangles, because I wanted to use three different needlelace stitches (and also because it would be more interesting that way), and transferred it to a boat-necked summer top with a V at the back.
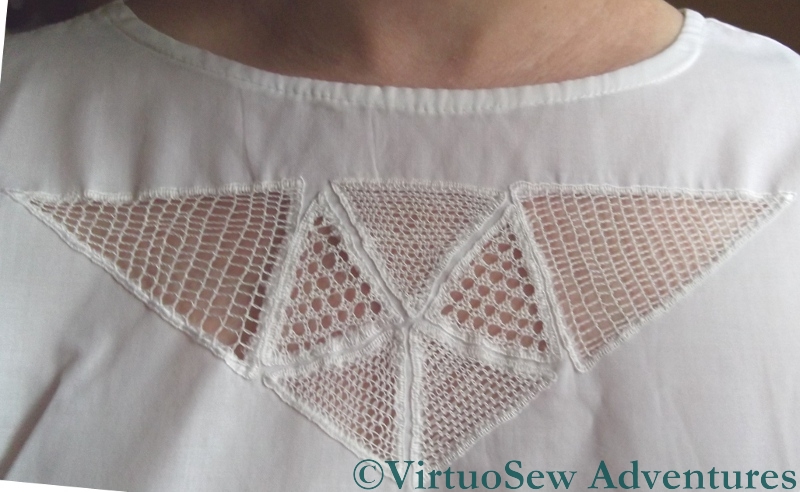
Needlelace Blouse
It’s hardly surprising I gave needlelace a try – both Grandmama and my mother had worked needlelace embellished table cloths, so it was in the air, so to speak. It’s also not surprising that I didn’t attempt another tablecloth. Even then I knew that I didn’t have the patience for that size of project!
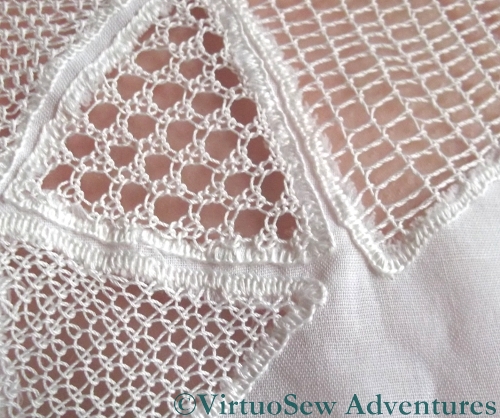
Needlelace Close Up
The triangles forming the flower I worked either in Pea Stitch or Corded Single Brussels Stitch, and the “leaves” were Corded Point d’Espagne. There’s a Needlelace Tutorial starting here on a lacemakers’ website for those who are interested. Then I buttonholed the edges (the wrong way round, I think, now I look at the photo again!) and, with much trepidation, cut away the fabric at the back.
And it worked! I wore the blouse quite a lot for a few years, and now I’ve found it again I suspect I’ll be wearing it some more – although not this year <shiver>!
Close Ups on the Flowered Blouse – Part Two
Flower 6 - Close Up
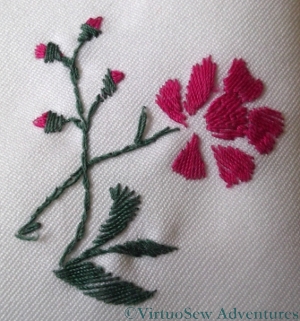
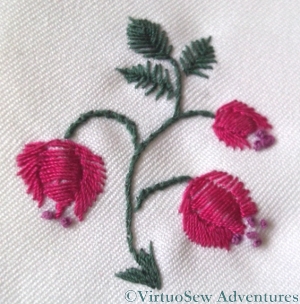
Here is the second installment of close-ups of the Flowered Blouse embroidery. I’ve noticed in picking out the Needlewoman magazine that the transfers came in that the colours I have used bear absolutely no resemblance to those suggested. For instance, flower 6, here on the left, is named as “Lobelia”, and a quick search suggests that real lobelias are bluey-purple!

Flower 7 - Close up
Flower 7, here on the right, is the same as Flower 2, but in different colours, and in fact stitched more openly. It is described as a Convolvulus in the the magazine.
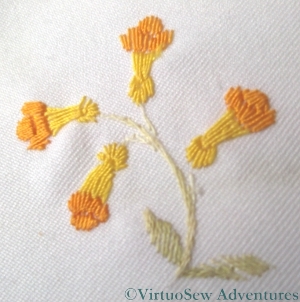
Flower 8 - Close up
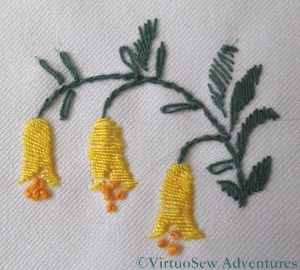
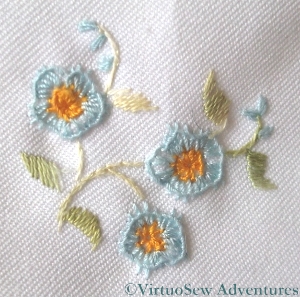
The Flower 8 is the same as Flower 3. This time I used the same stem colours, again to help maintain a certain unity. They are supposed to be Globe flowers.
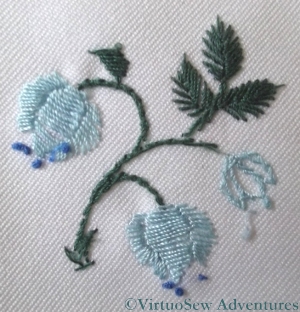
Flower 9 - Close up
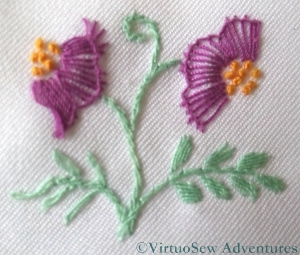
Flower 9 is the same pattern as flower 5, and I think is supposed to be a Peony. I distinctly remember finding this one troublesome to stitch – partly, I think, because of the size of some of the stitches, and partly because I couldn’t make sense of the flower as depicted in the transfer. Nowadays, of course, I would go and find a peony, and stare at it until it made sense, but that method had not occurred to me at the time!
Flower 10 - Close up
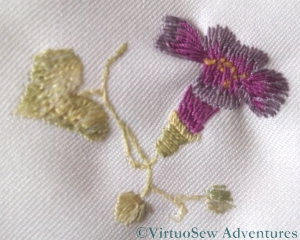
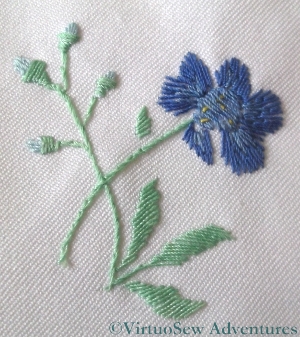
Flower 10 is described as a Wood Anenome. Like Flower 4 (Forget-me-nots) it shows the edge of the blanket stitch curling in, rather than staying flat, but I am glad to see that at least the French knots loook better than I expected. I have always had trouble with French knots…
The magazine suggests a variety of uses for these transfers, including a “delightful party frock” for a little girl, a “dainty bed jacket”, and embellishment on a “puff handkerchief” which is an accessory I’ve never heard of before. For once the internet has not been my friend, although the drawing suggests some sort of combination of a powder-puff and a handkerchief that I strongly suspect would be nothing like as practical as the “two-tools-in-one” brigade would have us believe!
Close-ups on the Flowered Blouse – Part One
Flower 1 - Close up
You may recall, not so long ago, a post that I wrote about a blouse embroidered some years ago, during a particularly impoverished period in my life. Here are the promised close-ups of the floral motifs.
Or at least some of them. When the connection started slowing when I put all ten in one post (before I even started to add any text!), I decided to split them up. I’m hoping to put five per post and just write two posts…
Flower 2 - Close Up
I’m no botanist, and if I am honest, I suspect the original designer wasn’t either. The various pictures and descriptions in the magazine did not suggest a slavish adherence to the natural colours of the flowers – even supposing one could be sure of their likely species!
Flower 3 - Close Up
The polyester was not an easy fabric to embroider, and frankly the blouse wasn’t worth the effort I put into it, being a lot like a cheap school or office uniform blouse, but as I said in the original post, I didn’t really have a choice at the time. That said, I do still wear it, not without pleasure, so there is something to be said for all that effort, perhaps.
Flower 4 - Close Up
The stitches used were very simple ones, for the most part – satin stitch, fishbone stitch, stem stitch, blanket stitch, and the occasional French knot. The close ups show that the blanket stitch refused to settle properly and the spine of the stitch has rolled inwards from the edge, but that may simply be the result of years of wear and tear. The blouse goes in the washing machine when it needs a wash – inside a pillow case or lingerie bag, admittedly, but I don’t hand wash it.
Flower 5 - Close Up
When I was choosing the colours and the stitches was more concerned to balance the colours across the front of the blouse than to create accurate depictions of plants, but for all that, there are some motifs more reminiscent of the real thing than others!
A flowered blouse
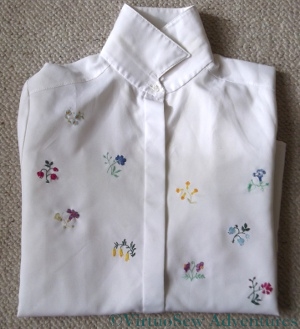
Blouse embroidered with flower sprigs
As Spring shows her head after the chill of Winter, I am beginning to fish out clothes other than bulky winter woollies. This is a simple polyester blouse I embroidered some years ago when I had time, an itch to embroider, but absolutely no money to buy fabric.
I used a Free Transfer from The Needlewoman of January 1934 (from the boxful that Grandmama gave me), showing sprigs of flowers which they suggested might be used for lavender bags, traycloths, handkerchiefs, or underwear (if only I had the time and skill to make lovely silk embroidered undies!). The silk threads came from my stash (even fifteen years ago my stash was extensive and varied!), and in fact I think the whole idea of the project was that I wanted to use those threads in particular.
I’m not really a “floral”-type person, or at least the florals I stitch tend to be quite heavily stylised, and I’m also not someone who likes perfect symmetry. So I snipped out some elements from the transfer and arranged them irregularly on the front of the blouse. Once they were transferred, I arranged the threads, so each colour appears on each side of the button placket, but not on the same flower sprig.
I will provide close ups in another post, when I have worked out how to format them!