
Tag: experiments
Crock of Gold Hoard – Those Wretched Shadows!

All Unpicked
When you last saw the Crock of Gold Hoard (here), it included some highly unsatisfactory shadows, and my mother and myself had pounding headaches and crossed eyes from deciphering the original photograph.
It took several hours of frustrating, painstaking unpicking, aided by tweezers, but I managed, and then started on the ground while I pondered the shadows. There are some sticks or something on the ground, and I want the ground to look sandy and speckled so I’m going to use seed stitches to create the sandy, gravelly look.
Simplified Shadows
There followed still more headscratching, sketching and puzzling (including experiments with photo-editing and watermarking on my tablet computer – that’s why there are two different copyright notices in this post!),
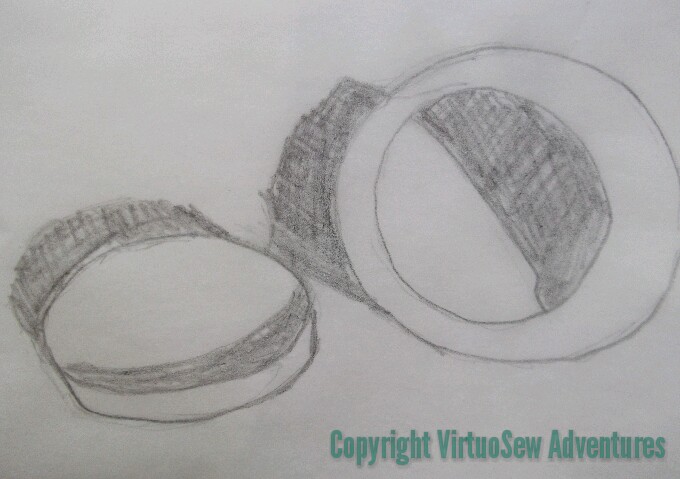
This example isn’t quite right – the shadow of the pot isn’t long enough, but it does demonstrate quite clearly that I’ve decided to simplify the shadows very considerably.
Shadows drawn in chalk
Since I’m removing the archaelogist and his hands, as well as the confusing shadow of the post which is out of the picture, I’ve decided I might as well simplify as many of the other shapes as I can. As I’ve said before, I’m not a needlepainter, and I’m not aiming for complete realism. Still, getting the shadows right will do much to make the design seem realistic enough.
I’m sure the detail of the shadows will change, but I’ve now drawn in an outline of those simplified shadows in chalk. I’ve even remembered that the pot has shoulders and a raised rim.
Crock of Gold Hoard – Problems with Shadows
Trialling Shadows
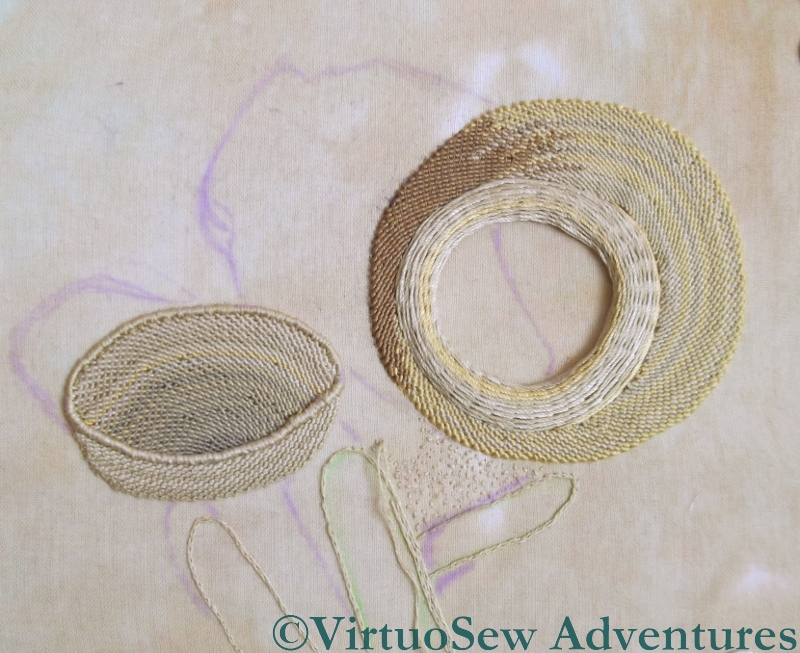
I mentioned in my last post that I was somewhat troubled by the question of the shadows that I need to have in this picture to “anchor” the Crock and its lid in space. Since the silk I used for the Crock has a sheen, my original idea was to try to find a matte thread to help keep the shadows in the background.
Another Trial
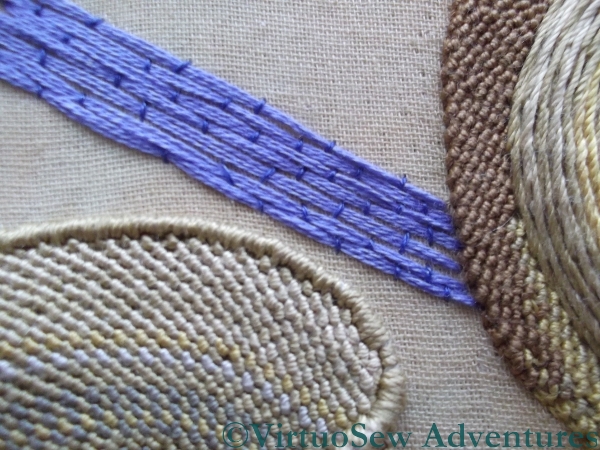
I had three dark, “shadowy” colours in a linen thread, and tried those first. I wasn’t happy either with the colours (too dull and drab for shadows cast by an Egyptian sun) or the texture (rough and scratchy), so I tried a soft lilac-y blue stranded cotton, couched down with a darker blue. That was better, but not really dark enough.
Wrong Shadows In Stitch
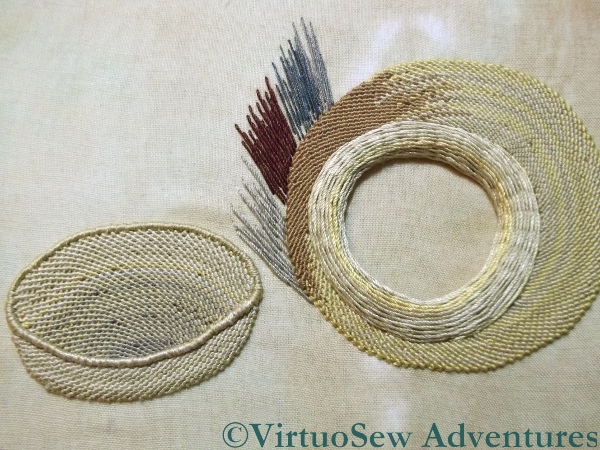
So this on the left was my next attempt. I like the shading effect and depth of colour that I’ve managed to achieve, but I can already tell that the shape of the shadow is absolutely wrong.
So I packed it up, and took my problems to my mother, who is an artist, and has a much more practised analytical eye than I have.
At which point, we realised that the shadows were rather more difficult even than I’d thought.
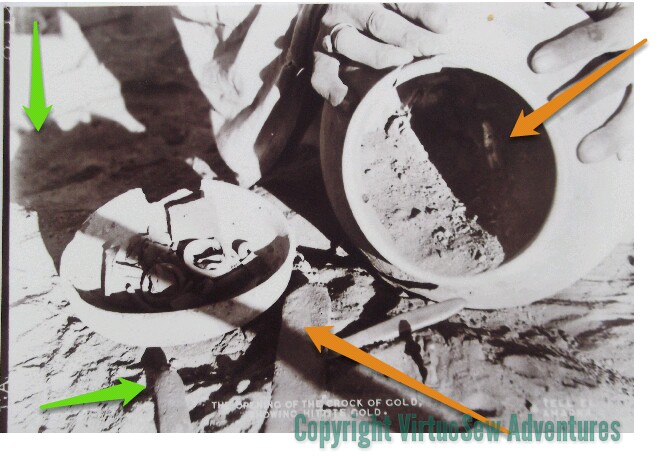
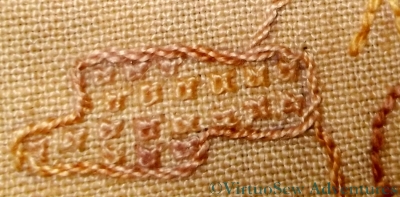
Difficult Shadows
A lot more difficult! The amber arrows indicate (approximately) what appear to be two conflicting light sources. Since the ground appears to be uneven, this must be a photo taken on site during the excavation. The vertical green arrow in the top left corner is pointing at a shadow which is clearly of something on top of a pole somewhere out of the picture. The other green arrow points to shadows show that the ground underneath the lid isn’t as even as a careless glance would at first suggest.
I’ve got a lot of unpicking to do!
Something I didn’t quite think through

Not quite thought through...
I’m really not at all sure what to do with this. It’s an abandoned experiment that I recently rediscovered, and which is nagging me more than somewhat! I really should finish it, or do something with it. It was originally intended to be a traycloth, and I’ve also run out of the thread I was using to hem the piece. So, since I can’t remember what that was I have some unpicking to look forward to, whatever I decide to do with it.
I wanted to play with the idea of stitching the background, rather than the design. I also wanted to take advantage of the fact that Caron Collection colourways are dyed onto different threads (in this case, a fairly fine single-strand thread, and the heavy three-stranded type).
As it stands, I’m not happy with it. Maybe I chose to make the pulled work too large (it goes over four stitches in each direction), maybe it is too dark. Maybe I just haven’t done enough stitching yet?
I still think that doing most of the stitching in the background – a little like Assisi work – would be an interesting variation. Back to the drawing-board!
A Needlelace Embellished Blouse
I must have worked the Needlelace Embellished Blouse when I was sixteen or seventeen – probably it was about the third or fourth project that I did, ever. Once I’d got hooked on embroidery – which happened over a piece that I’ve yet to show you, partly because I’m not sure where it’s hidden itself – I went from technique to technique and project to project almost without drawing breath!
I wanted something “Floral-inspired but modern”, I remember, so my mother suggested a pentagon for a flower and triangles for leaves. Thus:

The Geometric Floral we designed for my Needlelace Embellished Blouse
We divided the pentagon into triangles, because I wanted to use three different needlelace stitches (and also because it would be more interesting that way), and transferred it to a boat-necked summer top with a V at the back.
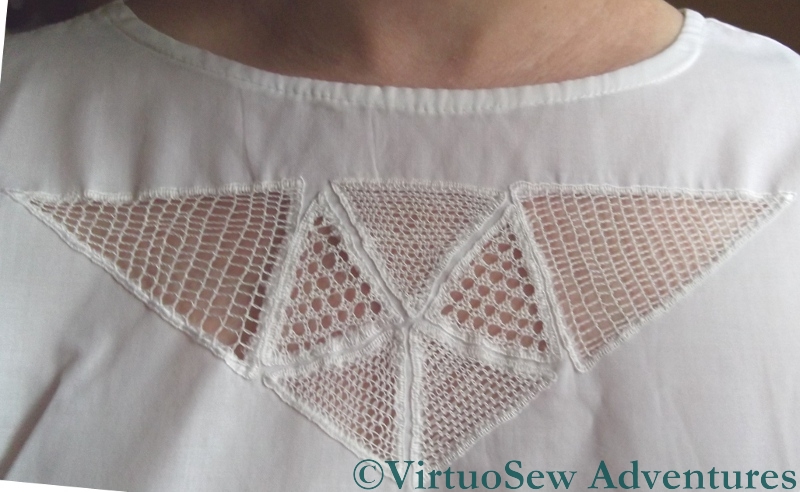
Needlelace Blouse
It’s hardly surprising I gave needlelace a try – both Grandmama and my mother had worked needlelace embellished table cloths, so it was in the air, so to speak. It’s also not surprising that I didn’t attempt another tablecloth. Even then I knew that I didn’t have the patience for that size of project!
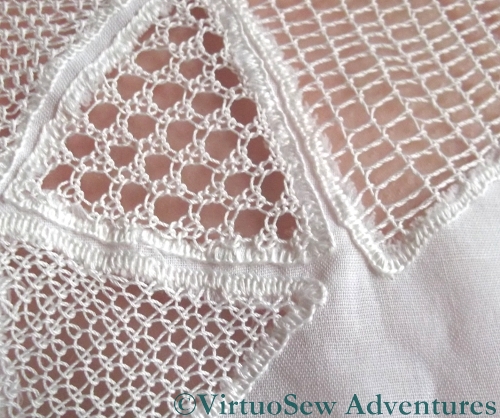
Needlelace Close Up
The triangles forming the flower I worked either in Pea Stitch or Corded Single Brussels Stitch, and the “leaves” were Corded Point d’Espagne. There’s a Needlelace Tutorial starting here on a lacemakers’ website for those who are interested. Then I buttonholed the edges (the wrong way round, I think, now I look at the photo again!) and, with much trepidation, cut away the fabric at the back.
And it worked! I wore the blouse quite a lot for a few years, and now I’ve found it again I suspect I’ll be wearing it some more – although not this year <shiver>!
A Very Open Weave
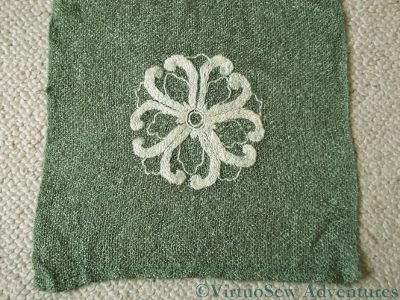
Scarf End
This is a long rectangular scarf in a very open weave, woven using a textured yarn. I bought it on the high street, but decided to embellish it somewhat. At the time I was fed up with embroidered pictures and wanted to embroider something useful. Life no longer being leisurely enough to require a huge stack of teacloths or placemats, clothes seemed an obvious choice.
I also wanted to play with a soluble fabric. Soluble fabrics are usually used for machine embroidery, but naturally I had other plans!
The embroidery thread was one of the Caron Collection three-stranded cottons – from the Watercolours range, I think, and the design is based upon a Chinese heraldic badge depicted on one of the designs in “Traditional Chinese Designs: Iron-on Transfer Patterns”, produced by Dover books. Of course I didn’t iron it on…!
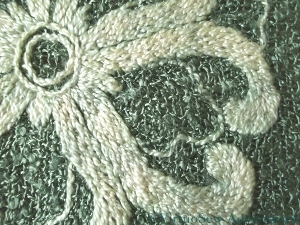
Scarf Motif - CloseUp
As you can see, most of the design is worked using closely packed long and short stitch, with the thin lines worked in double running stitch. This makes the design close enough to reversible to cope with the odd gust of wind when I’m wearing it!
You might be wondering what use the soluble fabric was. It was very useful in fact, because it allowed me to put stitches in the middle of holes in the weave of the scarf without them pulling to the edge of the hole before I’d locked them in place with the next row of stitching. The stitch length is pretty constant throughout the piece, and that’s because my stitch placement wasn’t undermined by the base material.
You could argue that a backing fabric would have done that job without messing around with soluble fabric, and you would be right. But such a backing fabric would have permanently altered the appearance and drape of the scarf, and I liked it the way it was.
I still do!
A Canvaswork Koala
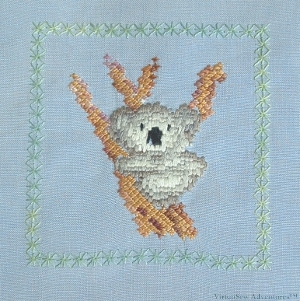
Canvaswork Koala
In fact this is worked on linen, but using canvaswork stitches. I was playing with some needlepoint charting software, in particular to find out how the stitches appeared on the chart and how easy it was to follow. I can’t remember where the Koala came from, whether he was originally in counted cross stitch or whether he was imported from a drawing. It is quite a simple design with relatively little modelling, and I’ve always been rather fond of it.
I used waste canvas to give me the stitch placement, and then simply worked the design according to the chart. The Koala himself is worked in straight stitches using stranded cotton, all six strands separated and made to lie side by side; the tree branch he is clinging to is worked in two shades of pearl cotton, using upright cross stitch (one of my favourites, as you know by now!), and the green frame of Algerian Eye stitches is worked in one of the Wildflowers threads from Caron Collection.
The embroidery has survived much better than the fabric it was stitched on. Originally I made a cushion cover, but the linen was already old before I started and now has holes in it. I’m going to do something with the Koala (suggestions please!) and then the rest will probably go into a rag rug…
Experiments in Woolwork
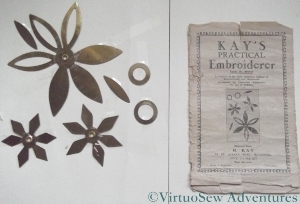
Kays Practical Embroiderer
EBay is a very dangerous place…
I bought several more copies of The Needlewoman magazine on eBay when I first discovered it (eBay, that is!), and some of those magazines mentioned “a new style of embroidery” using metal templates. It was called Kay’s Practical Embroiderer. Some time later, a set of the templates came up for sale. Furthermore, I won the auction, so I can now experiment!
Getting Started with Kay's Practical Embroiderer
The templates are mentioned in passing in the book Stitching For Victory (mentioned in my post about the teacloth that took three generations to complete), as a quick and easy method to create stylish embellishments using what was most readily available – darning wool.
Of course, darning wool is almost impossible to find nowadays, but I have plenty of Paterna Persian yarn, so I am using that for this first experiment. It’s much fluffier and more springy than darning wool, so it won’t be exactly like the original, but I’m hoping it will give me some more ideas. It’s certainly making a huge change from the fine work I’ve been doing on the Spot Sampler!
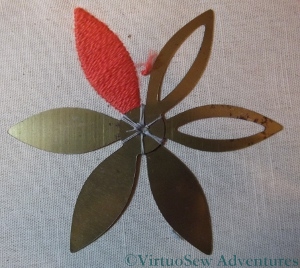
Snipping Away From the Template
So here is the beginning of my experiment. The idea is that there are several layers of surface satin stitch worked over the metal template. I have to say that I would tend to quarrel with the idea of this being a quick technique. As I made progress and added each of the layers on to the petals, it became more and more difficult to to make the stitches. In fact, I made copious use of a needlgrabber (which did help, very much indeed), and frequently broke the thread. I wonder whether that might have been partly because darning wool would have been stronger and more tightly spun than the Persian yarn, and also, perhaps, because the darning wool would have been finer. The instructions say to use two strands of wool in each layer, and I’ve done so. I’m still wondering whether that was right, although I am rather afraid that if I were to use a single strand it might look a bit half-hearted.
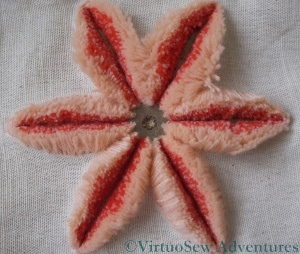
Once the stitching is complete, you snip down the centreline of the shape (not easy, even with my very special sharp embroidery scissors), and end up with a raised, furry shape. Finish it off with a few lines of ordinary stitching, and you have a very textured, striking piece of work. The leaflet has a selection of suggested designs and ideas, and it will be interesting to see whether I can manage to devise ways to use the ideas in new ways.
A flowered blouse
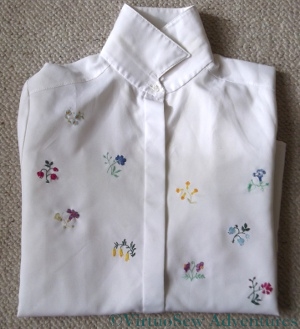
Blouse embroidered with flower sprigs
As Spring shows her head after the chill of Winter, I am beginning to fish out clothes other than bulky winter woollies. This is a simple polyester blouse I embroidered some years ago when I had time, an itch to embroider, but absolutely no money to buy fabric.
I used a Free Transfer from The Needlewoman of January 1934 (from the boxful that Grandmama gave me), showing sprigs of flowers which they suggested might be used for lavender bags, traycloths, handkerchiefs, or underwear (if only I had the time and skill to make lovely silk embroidered undies!). The silk threads came from my stash (even fifteen years ago my stash was extensive and varied!), and in fact I think the whole idea of the project was that I wanted to use those threads in particular.
I’m not really a “floral”-type person, or at least the florals I stitch tend to be quite heavily stylised, and I’m also not someone who likes perfect symmetry. So I snipped out some elements from the transfer and arranged them irregularly on the front of the blouse. Once they were transferred, I arranged the threads, so each colour appears on each side of the button placket, but not on the same flower sprig.
I will provide close ups in another post, when I have worked out how to format them!
Dreams of Amarna – The Patches on The Map
After finishing the text and the villages on the Map, I need to decide what to use for the cultivation… You may recall from my earlier post that I have decided on the stitch I’m going to use – tête de boeuf stitch – but that I’ve not quite worked out what thread to use.
Trial Patches On The Map
I’ve stitched a variety of trial patches, using stranded cotton, flower thread, pearl cotton, and several different silks, and now all (all!) I have to do is make a decision. I’ve propped up the fabric in the living room and stand staring at it every chance I get!
So far, I feel sure I won’t be using the pearl cotton (too chunky) or the flower thread (also too chunky), but that leaves me two variegated silks (one pale green shading to pinkish purple and one brighter green shading to terracotta) and two plain silks (one slightly darker than the colour of the fabric, and one the same colour as the stranded cottons I used for the contour lines. I’ve tried very hard to get a photo that does reasonable justice to the various threads and colours, but I don’t think that the one I’ve got here helps very much…
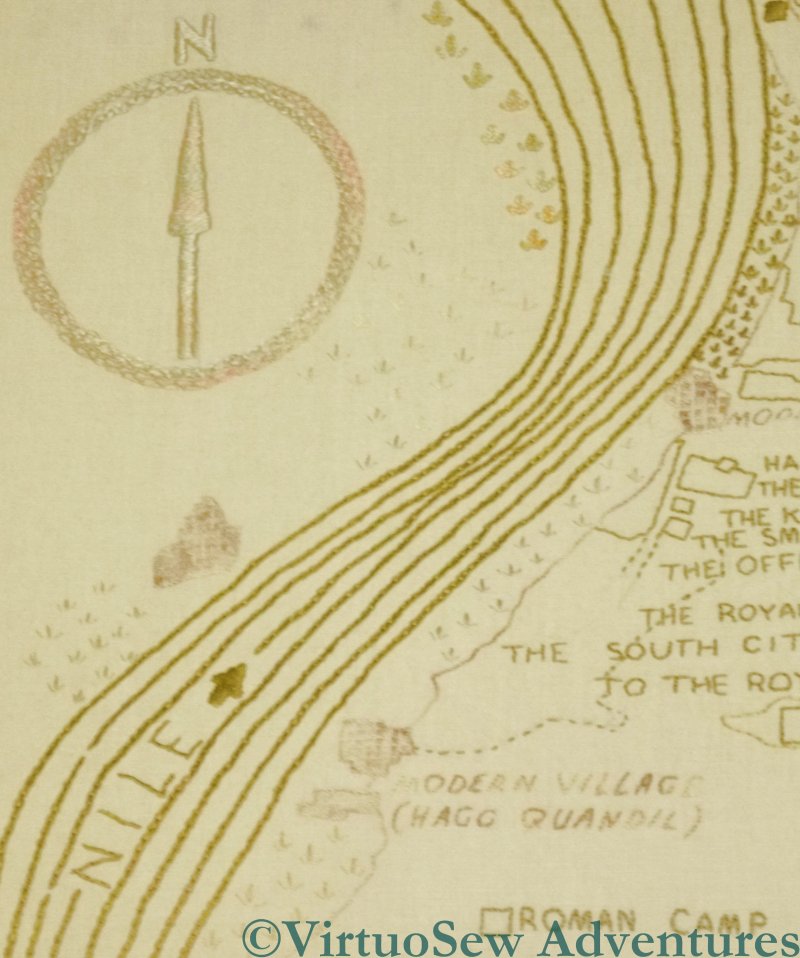
Sorbello Stitch Village
I chose Sorbello stitches to represent the modern villages. These are worked at a very small scale, as you can see from the thread count. Again, had I followed the cartographer’s symbols, I would have used something like Jacobean Couching, but I felt that this stitch in fact reflects the idea of buildings rather better. I’ve used the same gold-shading-to-purple thread for all the modern villages, both the names and the associated areas. It doesn’t draw the eye, in real life, quite as much as you might expect.
An Experimental Seahorse
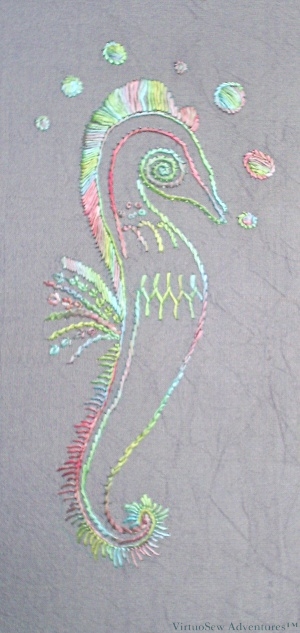
Small Seahorse in overdyed filament silk
Sometimes I play with threads for no other reason than to play with them. In this case Stef Francis gave me a skein of overdyed filament silk to play with. She tends to create a much more “freeform” style of embroidery than I do and she wanted to know what I thought of the thread.
I found a simple transfer that offered scope for several different stitches, and started playing. I had been concerned that it might twist up when I didn’t want it to, but it stayed fairly flat most of the time, and it is noticeable that the stitches look and feel different in a flat thread, as compared with a round one.
For example, in a round thread, the stem stitch line tends to be more textured, and the direction of slant is more obvious. Here, the slight flatness creates a smoother line. That same flatness makes the satin stitch smoother and cleaner looking. It also helps to mask any slight imperfections in the stitching!
On the other hand, that same slight “spread” of the filaments clouds the distinctiveness of the Wheatear Stitch in the fin on his back, so not an unalloyed success, but interesting and worth trying all the same.
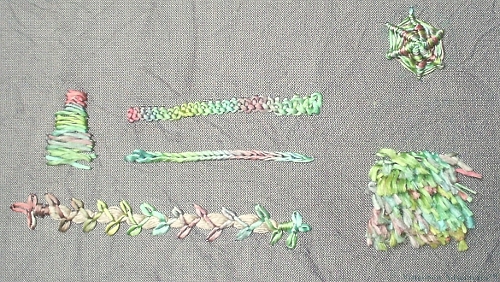
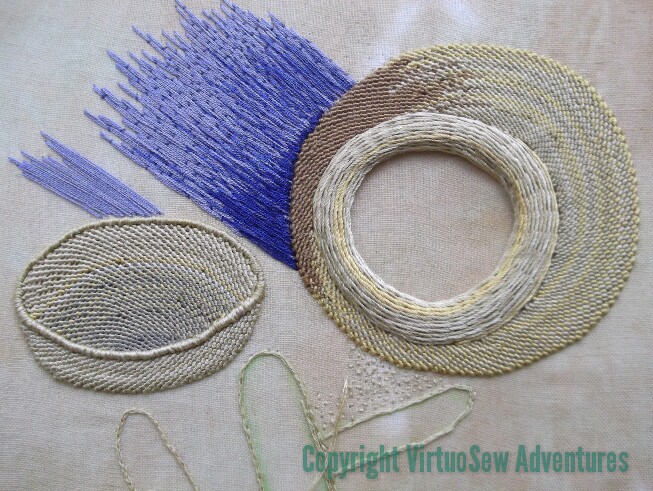
Silk Filament Experiments
Then I started just to play with stitches in a spare corner of fabric. The Braid Stitch (top row) works quite nicely, I think, and the Turkey work (bottom right hand corner) is better than I hoped, especially considering that I’ve not done it before. I can’t imagine what I would use that texture for in these colours, but Stef has a fabulous range of overdyed shades and I am sure that something would spring to mind for one of them. The little triangle of Closed Herringbone Stitch is hardly a success, but that may be a problem of scale. I don’t think the Braid Stitch would have worked if it had been any wider than it is here.
I don’t think this thread adds anything to the Reverse Chain Stitch, or to the Spider’s Web Wheel, but I do like the Chained Feather Stitch couching. In fact, that might have been better had I had the courage of my convictions and made the base that’s being couched about twice the width.
All in all, I had a lot of fun playing with this thread. I’ve now got a much better idea of What To Do and more importantly What Not To Do with it. One important thing to remember – make sure hands are smooth! Silk catches on everything and filament silk does so even more!