
Tag: experiments
A Closer Look at Modern Goldwork – Three
Sequins
We used a wide range of different materials and techniques, so the course provided exactly what I wanted – an guided overview of both.
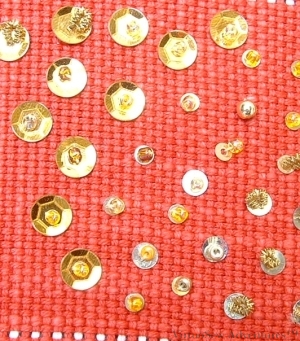
Tracy pointed out that you don’t need to use beads to sew sequins down. These two panels therefore show some of the variants she suggested.
The first panel shows sequins caught with beads and with short lengths of purl used as beads, with both sequins and beads differing in size and colour.
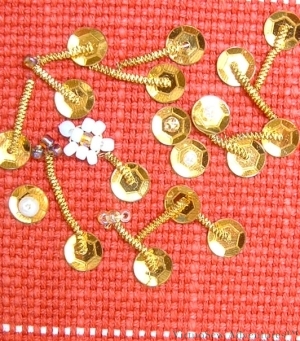
The second panel shows sequins couched down with sections of check purl, irregularly spaced and grouped. There are additional beads and sequins added to increase the range of textures that appear.
Tied Down With Check Purl
It’s probably very easy to tell from looking at these that, for all my embroidery has a somewhat improvisatory quality, I’m not entirely comfortable in situations where the work has to be completely freeform. I like to have a structure underlying my improvisations.
Also, at present, neither of these techniques is asking to be used in the Amarna panels or anything else I have in mind. I’ll think of something, no doubt, but in the meantime this is simply one for the notebook.
A Closer Look at Modern Goldwork – Two
The difference between this course and a Traditional Goldwork course was that Tracy was less concerned with the techniques of padding and or nue which are familiar from looking at badges or heraldic or ceremonial work. In the Modern Goldwork course, the techniques were more informal and more expressive in an obvious sort of way. It is easy to portray exuberance with threads curling all over the place than when using the design rather than the technique to reflect the emotion.
Multistrand Couching
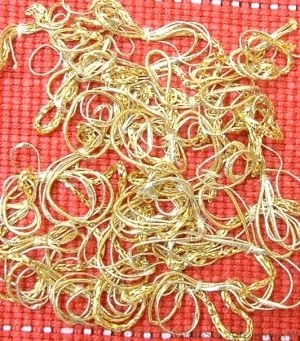
I have chosen this particular sequence to give you some idea of the range of variations available when using essentially the same technique of couched bundles.
For this first panel, we gathered a bundle of several different threads which were then couched down as one, in loose, freestanding loops. This creates an open texture with a high surface. Choosing the types of thread carefully will create a change in the texture.
You can just see in the photograph that the bundle I chose included flat and textured threads. There is even one which looks somewhat like chainette, which changes the reflectance of the whole bundle.
Multistrand Snakes
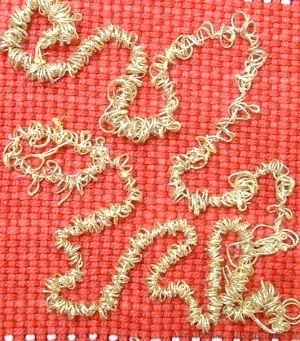
In this second case, Tracy gave us a specific, four-strand thread to use. Three of the four strands of this thread were gathered on the fourth and the resulting coil couched down as a sort of snake.
The trick here is to use a stranded metallic thread of the right stiffness and springiness to create the neat, regular coils.
You can see that this creates a rough but rather more controlled texture, because the coils are small and neat, rather than loose and floppy like the ones in the first photograph.
The Canvaswork Knot Garden
The Canvaswork Knot Garden
This piece arose from my fascination with the knot gardens and parterres of early formal garden design.
It began with the octagonal Rhodes Stitch at the centre. I wanted to use the stitch, but not as part of a repeating pattern. In fact it proved much more difficult to get right than I was prepared for. I now can’t remember how many times I unpicked that wretched octagon!
From that central point a variety of little paths and beds radiate out, using slightly subdued colours again inspired in particular by the colours of herbs. The variegated threads are all from Stef Francis, pearl and soft cottons, and a chainette (in the corners). The stitches include Hungarian Stitch, cashmere stitch, and upright cross stitch (which for some reason turns up a lot in my canvaswork).
I realised that the interesting stitches I was using weren’t producing complete coverage of the canvas, but I decided not to worry about that, as I felt it might lead to something interesting.
As you can tell, what it has not yet lead to is a sensible finishing decision. I cannot for the life of me decide what to do with this. It would be a pity to put it under glass, as that wonderful raised boss of the octagon would lose all of its impact. At the same time, because the coverage is so varied, and because the octagon is such a vulnerable point, turning it into a cushion seems positively half-witted.
Take heed, and design your pieces with their end-use in mind!
A closer look at Modern Goldwork – One
As it was such an interesting and useful two days, I thought I would write a bit more about my course with Tracy Franklin on Modern Goldwork. We worked samples of various techniques, each demonstrated by Tracy before we began. I don’t want to make the posts too long, so I will only put two techniques in each post.
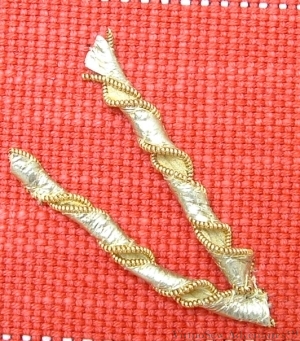
Kid Leather Twists
The base for our Modern Goldwork sampler was a sturdy but loosely-woven cotton upholstery fabric. We began by pulling out evenly spaced threads to mark the fabric into squares. Then in each square we worked a different technique.
The first square had Kid leather strips edged with unstretched pearl purl and then twisted. The twists were then couched in place. It was surprisingly difficult to attach the pearl purl to the edge of the leather, but creates an interesting variation as by twisting the strips, a glimpse of the back of the leather is provided, matte in contrast to the shiny metallised surface that is intended to be seen.
This technique might provide me with the gold in some jewellery for the Amarna panels as a change from simply using gold embroidery thread.
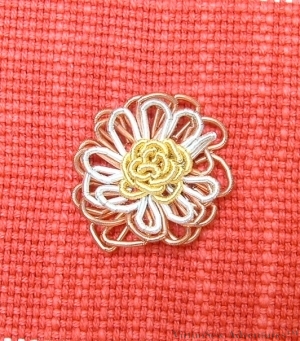
Purl Rose
The second square shows a flower shape made of loops of purl which are threaded onto the needle like beads. There are three different colours of purl, using gradually longer lengths to make larger, slightly floppier petals. The small, closely packed loops in the centre show that this technique could be used to create a very solid, shiny, “curly” texture.
I find myself thinking maybe when I’ve got the Amarna panels done, I could work on a panel about the legend of the Golden Fleece. Just imagine a whole fleece shape covered in that dense, looped surface!
Dreams of Amarna – Researching Techniques
I know that an embroidery which is “about” ancient Egypt – even if only indirectly – will have to include some gold and silver – not least, that same Crock of Gold hoard that caused so much consternation to the excavators when it was found (artefacts have a fairly limited and specialised market, while gold bars are much easier to sell, so there was some concern about security that would never have troubled the dig under ordinary circumstances).
All our own work!
So the next step was a trip to Durham, for a two day course in Modern Goldwork, given by Tracy Franklin. I had a fascinating time. Tracy is an excellent teacher, and it was a real treat to be able to concentrate on learning something entirely new to me. The class had the bonus that Tracy had plenty of goldwork materials available for purchase, and my local embroidery shops don’t have any. Some of what I bought for my coursework was in fact for “Dreams of Amarna” instead!
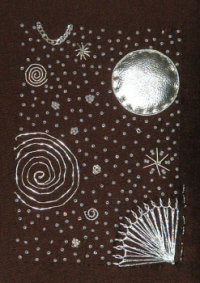
"Starbright", completed November 2008
When I returned, I worked a small panel as an attempt to consolidate my grasp on the techniques and the materials. I even included some padded silver kid leather, and the background is starred with beads.
I’m quite pleased with the panel, as I managed to use almost every technique we were taught. The base fabric was a tightly woven brown synthetic, which was rather trying to work with, but I wanted something very firm for this first solo attempt at goldwork.
I will need to use very different fabrics for Amarna, and I expect that trial and error will be much employed!
You might be able to see a line of stitching, running up the edge. That’s my “signature,” in Morse code. It’s much easier to do small and neatly than letters, and sometimes I manage to hide the signature in the design.
When I am creating an embroidered piece for someone else, I try to make sure that I also provide something about the design and the making of the work. Not just care instructions, but a description of the design choices and why I made them, or if I was working to a brief, a description of the influence of the brief on my approach to the work. Given my interest in history and archaeology, it’s perhaps not surprising that the idea of providing Something For The Archive rather appeals to me.
And on that score, and on behalf of those in the future who will be interested in embroidery – please, sign your work, date it, write about it. Just think how thrilled we always are to gain an insight into the work of designers and artisans of the past!
Extending the Persian Fantasy – More Cacti
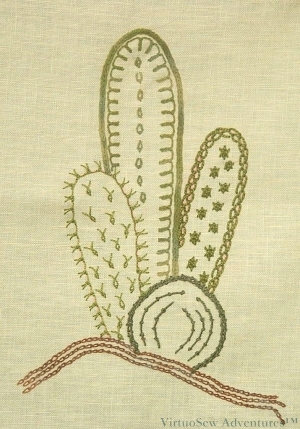
Cactus Extension Design 1
By this time I had run out of the fabric I used for the screen, and I was beginning to realize that if I wanted to continue to embroider in this sort of style I would need to find another suitable fabric. I’d enjoyed the Persian Fantasy so much that I didn’t want to do that…
So I designed two clusters of cacti, to use in experiments. The designs were inspired by the cacti in the Persian Fantasy, but not actually like them, and I worked them on a plain 28count linen intended for counted cross stitch.
I used chain and feather stitches, ornamental blanket stitches, and some isolated stitches as well, all to create variety and and texture. The designs themselves are very minimal, so all the interest in them lies in the combinations of the threads and the stitches.
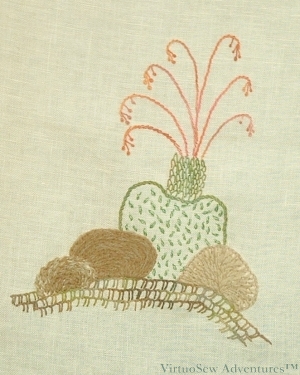
Cactus Extension Design 2
It wasn’t easy – I wanted to use some of the ornamental stitches I had used in the original piece, but the fabric/thread combinations were very frustrating to work with. The linen threads were too closely set and rigidly finished to respond forgivingly to some of the heavier threads, but they did at least provide me with more opportunity for experimentation. Even if my conclusion had to be that I had to find another sort of fabric for this sort of embroidery!
The rocks in the second design were worked using wool as that provides a different quality of matte effect to the effect of a matte cotton.
Trying Stumpwork
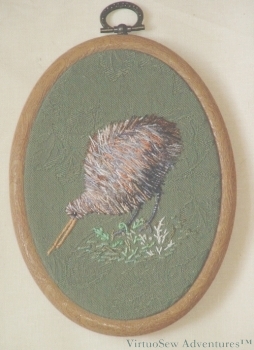
Kiwi In Stumpwork
As I’ve already mentioned, almost every embroidery technique I have done has been learnt from a book, or just developed by guesswork based upon something I have read.
In this case, I had been reading about 17th Century stumpwork, and had just returned from a half-business trip, half-holiday in New Zealand. And I had some rather gorgeous overdyed silk threads and wanted to experiment with them!
The body is worked in layers of straight stitches, using several different colours of the overdyed silks. I worked a slip, slightly smaller than the body, on a separate piece of fabric, then applied that piece over some padding, and used more straight stitches to cover the join – very thoroughly!
The legs and the beak are both worked by stitching very closely over a trailing thread of soft cotton. The background fabric is a sturdy cotton damask upholstery fabric, so the close stitchery did no harm. The ground is worked using still more straight stitches, with scroll stitch, coral stitch and fern stitch to create the fragmentary undergrowth.
This was intended just as a piece of fun, but I was happy enough with the outcome to mount it in a flexihoop frame. I’ve bought a couple of books on Stumpwork since I stitched this, but I don’t know that I would have thought of doing the Kiwi this way if I had read the books first.