
Tag: Goldwork
Tudor and Stuart Goldwork Masterclass – Bonus Instructions
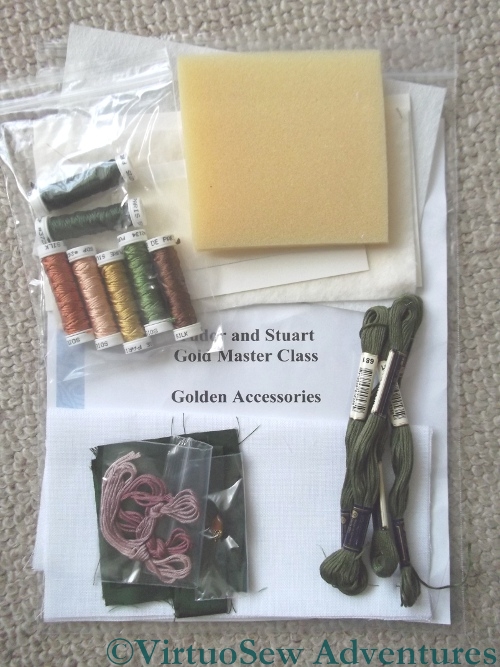
Golden Accessories Kit
There was a set of Bonus Instructions in the instructions for Month Fifteen, from a teaching project that Tricia had retired from use. She was asked whether she’d produce kits of the materials for those of us who don’t have easy (or even difficult!) access to a really good needlework shop. Yet again, apparently, demand outstripped her expectations (a good problem to have!), and here is my kit.
It includes finishing materials for the various accessories, as well as the fabric and the silk thread, but not the metal thread, since all of us already have large spools of that from doing the main Spot Sampler.
My intention is to finish these to add to that planned “winter decoration corner” I’ve mentioned a couple of times. I’ve found some masks which I’m going to decorate in silver and gold, and I will use some metallic gauze or something similar for the background. Already the two Needlework Nibbles, the Floral Glove Needlecase and the Tudor Pincushion look like they will create some wonderful reflective textures for a dark corner…
Tudor and Stuart Masterclass – Beginning the Petite Pincushion
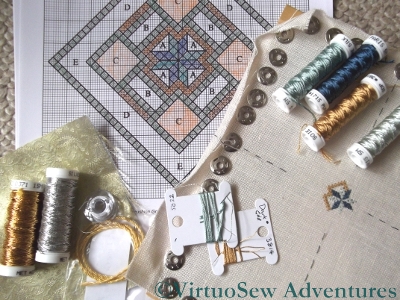
Starting The Petite Pincushion
There were two additional projects included in the Tudor and Stuart Goldwork Masterclass, to provide further opportunities to use some of the stitches we are learning. The Tudor Pincushion was one, and this “Petite Pincushion” is the second. The materials include a piece of silk brocade for the backing, some gold cord to provide an ornamental edge, and more spools of assorted metal threads for the goldwork stitches.
Whereas the silk stitchery for the Tudor Pincushion was in primarily in Tent Stitch, most of the silk work on the Petite Pincushion is in Queen Stitches. I’ve not done any since I finished the silkwork on the sampler, and I am finding that I am having to remind myself to pull them tight to create the openwork effect. I will have to remember to line the embroidered side of the pincushion or the stuffing will poke out through the gaps!
I stitched centre lines on the fabric, but as you can see, once I had the first stitch placed I snipped out the middle stitches and pulled them back out of the way.
I’ve already finished with two of the silk colours, which appear only in the central starburst. Now I just have to do rows of strapwork in the other two colours, as well as the four blocks of tent stitches that provide a basis for a rather intriguing-looking interwoven stitch which will probably be nearly the last element I add.
Christus Natus Est is Finished! (I think..)

Back view of the finished panel
After considerable effort, and not a few significant struggles that I rather doubted I would win, I think I have finally finished the Christus Natus Est panel.
This back view shows a tangle of ends of the gold thread, caught down occasionally where the silk work has carried on over the top. If you look at the full size picture (click on the one on the left) you will see that in fact the central section is reasonably neat. What has made it untidy is that there were elements that I added to it – the halos that were done after the heads, the rust colour that I added into St Joseph’s robe, the additional light blue added to the Virgin’s robe. And of course there are all those wild gold threads which have a mind of their own!
The full size picture also gives you some idea how tiny all the coloured silk stitches are (we think on the order of 80 to 100 stitches per linear inch) – which will explain why I really didn’t want to have to unpick anything..
I’m going to put it away for a week and then look at it again to be sure it’s as finished as I can make it, before I mount it over padded acid-free card in preparation for framing.
Tudor Pincushion Finished
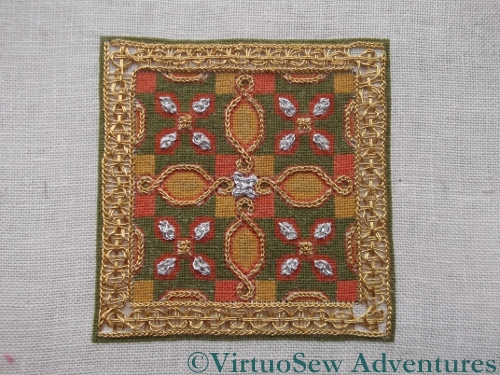
Tudor Pincushion Final Stitch In Place
The final stitch in the Tudor Pincushion was the central boss in Four Sided Interlacing Stitch, which slotted nicely into place after I received the instructions for Month 16.
I decided – after staring at it intermittently while I’ve waited for the stitch to turn up – that I was happy enough with the border and did not need to unpick it. So the next phase was to attach the silk backing and stuff the pincushion.
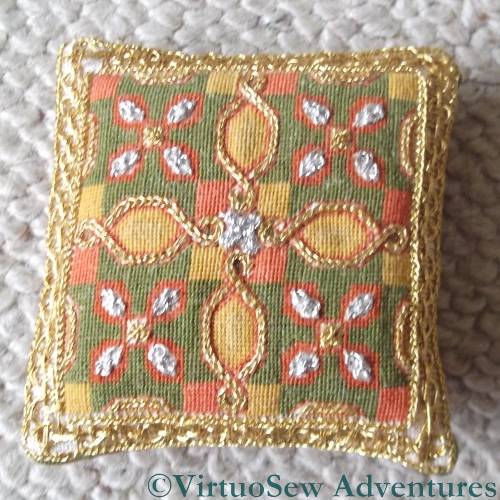
Finished Tudor Pincushion
I’ve tried not to over-stuff it, since I intend to use it as a decoration and not as a pincushion, but I still found myself pushing more stuffing in than I expected. Unlike the Tulip Slip Pincushion, where the velvet was so tough that I used a sewing machine, this one is finished entirely by hand, and stuffed enough to look plump and fat, but not so much that the fabric is strained.
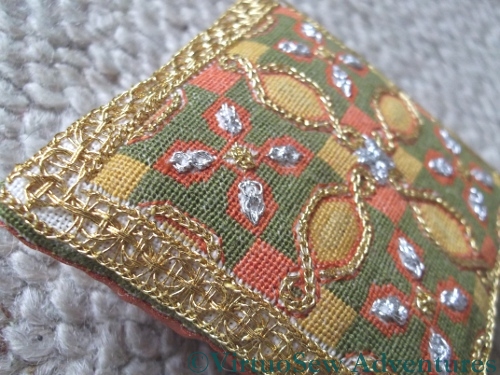
Close Up Of Pincushion
I’m finding with Tricia’s various pieces that photographing them from an angle sometimes produces a much clearer view of the stitching. There is certainly less likelihood of “glare” from the metal threads. Besides, after all that effort, I’m more than happy to show off a little…!
Cause for Alarm
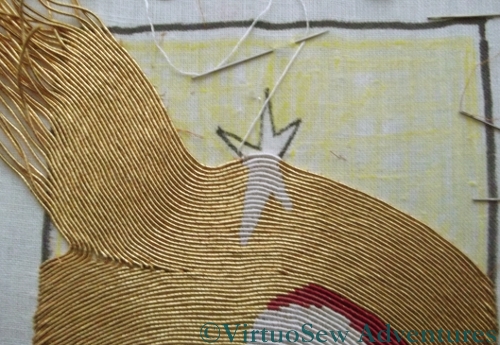
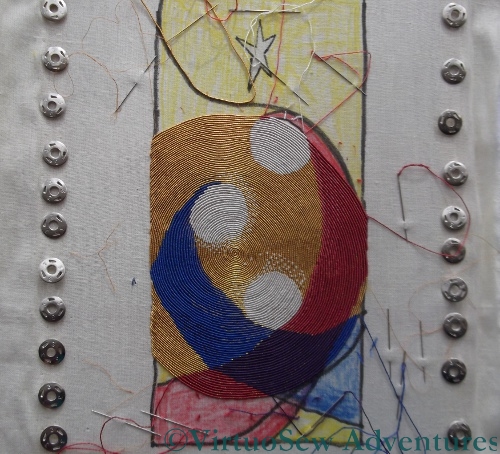
The Star That Rose In The East
I’m pleased with the progress I’m making on the panel now, but I’m becoming slightly anxious that I might run out of the gold thread before I finish the panel. I don’t know how thick the core is at the centre of the spool, and I’ve noticed that the kinks in the gold thread are getting tighter and more stubborn. If I do run out, that will put paid to the idea of photographing the finished piece for this year’s Christmas card.
You can see from this shot that the extra thickness of the silk thread forming the star is creating an extra curve in the lines of gold. If I were working a classical piece of or nué, with straight lines of gold, I would be trying to space the lines to reduce the effect, or I would have chosen a finer silk thread, with the same aim. In this case, however, I am quite happy to add an extra couple of curves to the gold lines, because it will add life and movement to the background.
If I have enough gold thread, I will rework the corner that is infilling that triangle on the left-hand side. I don’t think that the bends in the thread work as well as they might, and they are revealing the core more than I like. I need to finish the rest of the panel first, though.
Progress on Christus Natus Est
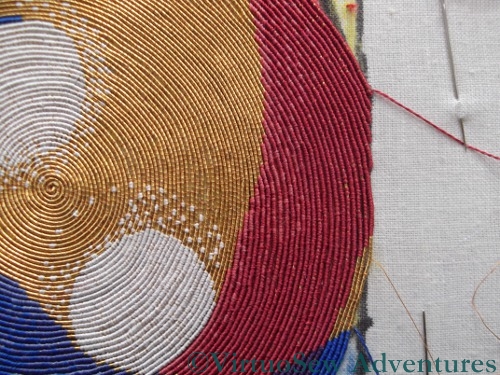
Two Bottom Corners Completed
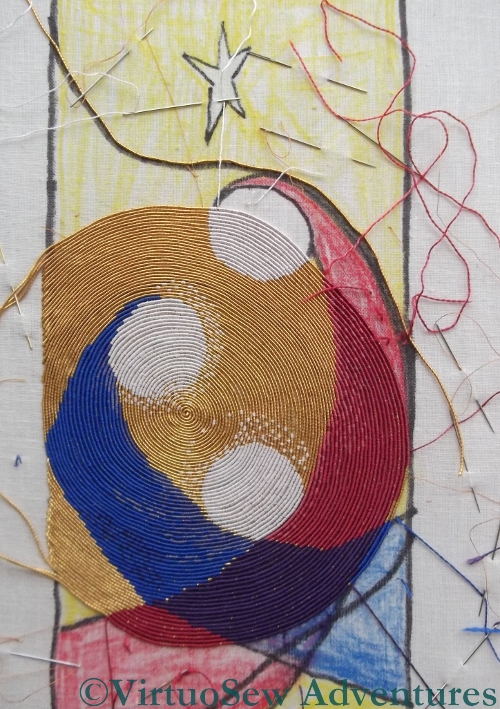
As you can see, my recent obsession with this panel is paying off. I’ve finished the two bottom corners of the panel, and sunk all the loose ends. The red of St Joseph’s robe is enlivened with the rust sprinkled through it. Under normal lighting it barely shows, but it does make a slight difference, and with a strong side light, it warms up the red and increases the contrast with the blue of the Virgin’s robe. Good. I’d hate to have to unpick it!
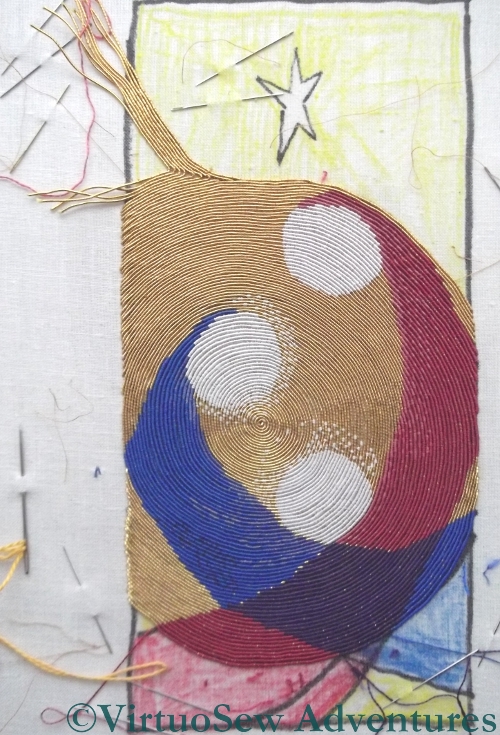
Progress So Far
The view of the whole thing shows that I have now only got the star to do in silk – all the other design elements are in. I still have to add St Joseph’s halo, but I’m running slightly short on the cream silk thread and I want to get the star in before I start going back to the haloes.
I’ve also begun to correct the curve of the Virgin’s robe. At the moment it is much too straight, so I am trying to curve it some more.
In fact it is the tidying up of small details such as this which might interfere with my ambition to have this finished by mid-November. I’ll have to continue to tweak until it looks right, and who knows how much I will need to do?
Tudor and Stuart Goldwork Masterclass – Month Sixteen
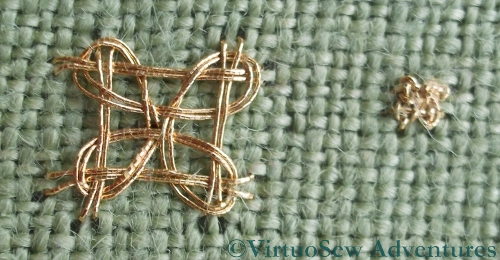
Four Sided Interlacing Stitch
The stitches for Month Sixteen are stitches that create prominent large “spots” of intricate pattern. They are simple enough in concept – there is a foundation of straight stitches, and an interlaced pattern worked around the foundation. Naturally, the actual working of the stitch proves to be less than entirely straightforward. I try to vary the scale of the stitches I work on my practice cloth, but in the case of Four Sided Interlacing Stitch when I was trying to work it as a counted stitch, the only variations I could create successfully were “Huge” and “Tiny”. At the smaller scale shown there is really little point in using an interlacing stitch like this, and one might more sensibly choose something a little simpler to work. At the large size, the effect of the metal thread is diluted by the background fabric.
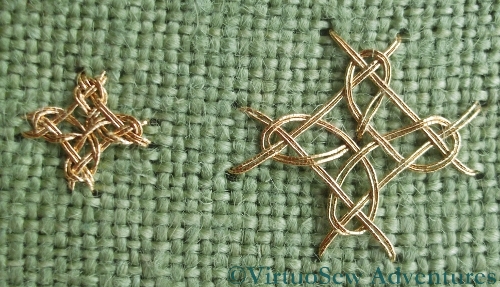
Diagonal Four Sided Interlacing Stitch
In the case of Diagonal Four Sided Interlacing Stitch my two different scales worked slightly better.
I know, by the way, that in the case of one of these stitches, I made a mistake in the foundation layer which lead to a further mistake in the interlacing. I can’t find it now, and I’m going to be intrigued to see how often I get these stitches right, when I start working them on the sampler itself!
Both Edges Reached, and beginning to fill in a gap…
Both Edges Reached
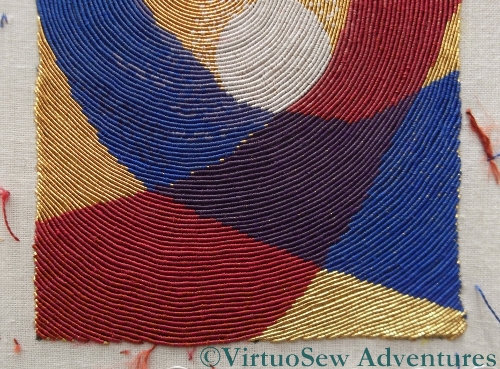
I’ve become rather obsessed with making progress on the Christus Natus Est panel. Now that the spiral is finished, and the gold couching only stretches from edge to edge, that progress becomes easier to see.
In particular, not only have I managed to finish the top of St Joseph’s head, and run two or three more rows across the bottom of the panel, but I’ve started to fill in the gap between the spiral and the breakaway line. In fact I’m not sure that I am entirely happy with it – I may have begun to use single threads on both sides of the triangular shape a little early, which leaves some gaps in the coverage.
I will have a lot of tidying up and corrective stitching to do, even when the whole fabric is covered with gold. I need to finish the Christ Child’s halo, and put St Joseph’s in place. I also need to correct the curve of the Virgin’s gown, which is a little flat and straight.
I don’t yet know whether I will stitch rays coming from the star. I think that decision will be made only when the rest of the piece is finished.
I’m beginning to think about the mounting and framing of this piece. I think it will need a wide mount, because such a vibrant piece will need plenty of air between itself and the frame. One possiblity involves a mount covered in cloth of gold or gauze, and trimmed with braid or crystals. If I can’t find a suitable fabric, I will have to hope for a mount card in the right shade of gold. A cream mount would look insipid, and a mount in one of the colours would contend for attention with the panel itself. It’s just as well we have a good framing shop nearby!
Still More Progress
Close-up of the right-hand edge
I’ve been making more progress, and in fact passed another milestone this past week.
I’ve reached the right-hand edge and started to stitch just on the top section for a while. Suddenly it feels quicker, because although I’m making progress at the same rate as before (the stitching itself hasn’t speeded up!) I sometimes manage two or more rows in a session, and the sections of design that are covered are side-by-side, and thus more noticeable.
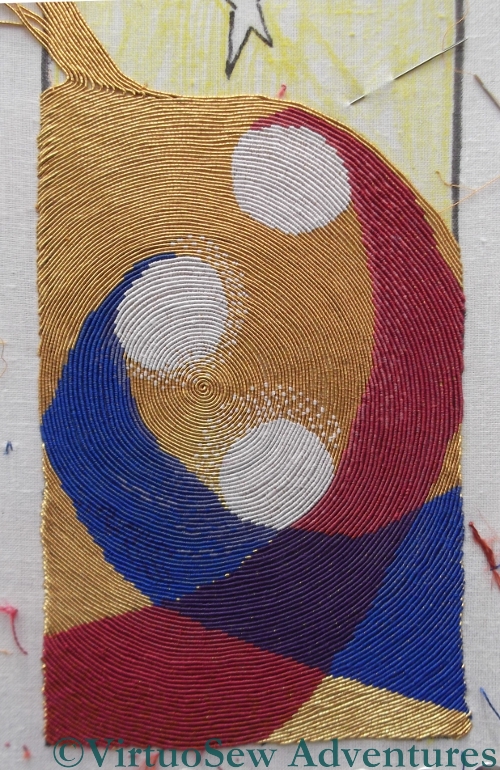
A View Of The Whole
So here is the whole thing to show the progress that I’ve made. I’ve unpicked and removed the line of gold I put in following the black line, because in fact it isn’t running exactly where I want it to, even if it is running along the line I drew.
I sink the threads in batches at the end of a session, which means they don’t slow me down when I’m nicely “in flow”, but it looks neat and easy to understand when I get back to it. When I’ve reached the black line (the correct one!) I shall stop working on the top section and work on the bottom section until that is done, then I will have the last section to work which should go more speedily as there will only be one colour to stitch.
I’m beginning to have hopes of finishing this in time to use it as a Christmas card. Now I just need to work out how to frame it…!
Another Landmark on Christus Natus Est
Another Landmark on Christus Natus Est
I’ve got to the point where the lower ends of the robes of Mary and Joseph have both been started, which also brings me very close to the other edge of the panel.
It’s been a little slow of late, partly because the weather has been frightful – grey and overcast. Stitching goldwork in bright sunshine is a recipe for eye fatigue (learn from my mistakes, Gentle Reader!) but at the same time the rich red of Joseph’s robe and the purple of the Christ Child both become quite difficult as the day turns darker. I’m finding that if I want to make progress, everything else has to come second to doing a row or two when the light is good. Sometimes I’m so busy doing other things that I only realise quite late that I’ve missed the best of the light. Very frustrating!
The other reason it has been slow is that I have so many needles in operation – ten of them! Every change of colour means putting one needle aside and picking up another, and while this is a tangible demonstration of progress, and therefore welcome, it does rather slow me down!
I’ve been talking recently with a friend who has been trained in icon painting, and it’s fascinating to hear about the layers of meaning and symbolism in the materials, preparations and even in the process. I’m working so hard on developing a technique here, that I’m not necessarily managing to turn my version into a spiritual exercise as well, although I do sometimes feel that I’m not a million miles away from stitching-as-meditation.
Well, St Benedict said “Laborare est orare” (“To work is to pray”). So maybe I’m onto something, after all.