Tag: Goldwork
Progress on Christus Natus Est
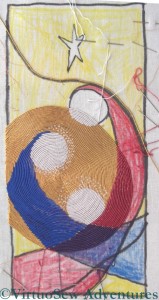
Since the Christus Natus Est panel seemed to be so popular, I thought I’d provide another update.
As you can see, the curves that indicate the Virgin’s robes aren’t right at all. I can correct that later, rather as I will correct the Christ Child’s halo – and indeed, put in St Joseph’s halo, which I decided not to attempt to include in the first stitching, because the other two haloes presented such challenges!
You can see that I have loads of needles working with all the different colours of silk and several sections of gold. It’s always more difficult working from the far end of a colour section (relative to the direction of the spiral) and using more than one colour on the robes has helped me there, because I’ve usually managed to have at least one of the colours placed in such a way as to help by catching the gold thread in place. Otherwise, because it is so springy, it’s hard to keep the curve smooth, and in a couple of places the thread is longer than it should have been and creates a slight gap with the line before.
Don’t those rows and rows of gold create a gorgeous background, though!
Tudor and Stuart Goldwork Masterclass – Month Fifteen
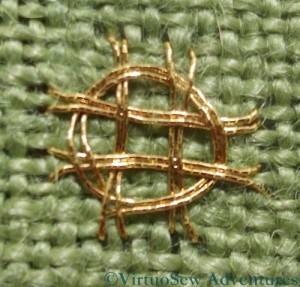
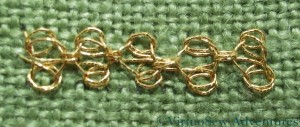
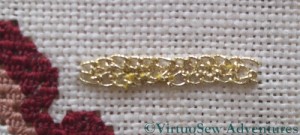
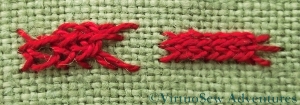
There were two more interlacing stitches this month, Circular Interlacing Stitch and Figure Eight Interlacing Stitch.
I know I’m always talking about scale on these stitches, but I’m pretty sure that at a reasonable scale of thread to fabric, the Circular Interlacing Stitch will create a lovely neat boss which would have all sorts of wonderful uses in representing jewellery and embellishment. Instead, on my loosely-woven practise cloth it looks rather leggy and a bit thin. I’m glad to see that I got the interlacing right, and don’t have any twists or tangles in it, though!
The most difficult part of the stitch, I found, was laying the foundation interlaced crosses using the correct proportions and directions. Sometimes a larger thread count makes life harder rather than easier!
By contrast, it isn’t at all obvious that I even got the Figure Eight Interlacing Stitch right, although I am pretty sure that I did. It might have been better to pull all the wraps tighter to create a neater effect, rather than allowing the loops to create the uncontrolled springy appearance that they have at present. This is partly a result of the fact that I’m still reluctant to pull metal threads into tight loops because I don’t want them to strip their surfaces.
I do like the rich, textured braid effect that this stitch creates in the photographs in Tricia’s instructions, so I think it will be worth playing with it using different threads – not all of them metal, either – and seeing where it takes me.
More Goldwork On The Spot Sampler
I have been working more on the Spot Sampler of late, slowly catching up with the metal thread stitchery. If you are confused by my posts on this, you aren’t alone – I spend a few minutes every time I sit down trying to work out where I’d got up to!
Some of the stitches are familiar – Ceylon Stitch, for example, I have used before. In this case I have used the lighter and floppier of the metal threads supplied. It creates a more lacy effect than Tricia intended, but I thought the thread might “strip” less dramatically (I was right, too!). When I finish the main body of the sampler I may go back and work new versions of some of the stitches around the edge, so in this case, for instance, I would choose to use the heavier, thicker thread. This will make the sampler even more useful by giving me some sense of the variation of appearance available through different threads..
As you can see, I still haven’t entirely got to grips with Guilloche Stitch, although using the stiffer thread did make the whole thing slightly easier. I was becoming slightly anxious about finishing the panel without starting a new length for the last course of interlacing!
I’ve already used the Reverse Chain Stitch with Buttonhole Edging since I learnt it on this course, when I was working the Title of the Map for the Amarna Panels. Now I look at the photograph I see that my tension wasn’t entirely consistent across the whole width of this spot, and the thread stripped and clogged in a couple of places. But then, samplers are for practising on… I may choose to re-work this later, using the finer thread, since I think that if worked fine and delicately this stitch could find a host of new uses.
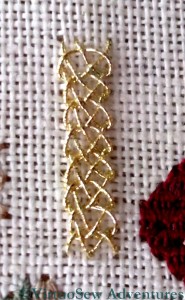
I felt when I finished my practising for Month Fourteen that the real test of my grasp of Plaited Braid Stitch would come when I came back to the stitch after a week or so. As you can see, I’ve worked it as a counted stitch here, in the larger size and using the heavier thread, and it seems as though I got it right. I kept the instructions to hand all the time, of course, but I’m very pleased with this. It is a real testimony to the clarity of the instructions, and the way they gave me some grip on the structure of the stitch, that I didn’t feel at all anxious when I was working this.
Can you hear me purring?
Progress on the Tulip Slip
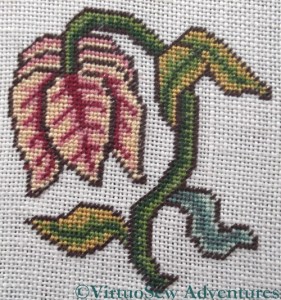
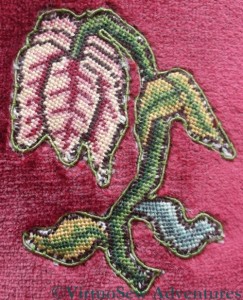
I’ve now finished the tent stitch on the Tulip Slip Needlework Nibble.
I had a minor epiphany about halfway through, when I realised that in this particular case, absolute accuracy in colour placement isn’t really necessary. I’m not trying to create a picture which will look all wrong if every stitch isn’t exactly as charted. Tricia has created a stylised design which we are then going to use to learn the technique of working with tent stitch slips. So in minor details, the Tulip is not exactly as charted, but I doubt anyone will notice!
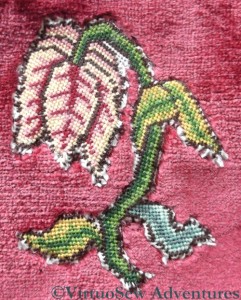
The next stage was to cut out the slip, and attach it to the velvet, turning the edges under as far as possible. I didn’t think this would be easy, and it wasn’t. Since linen for counted work is quite widely-sett (that is, the set up of the warp and weft allows a little air between the threads), it’s also rather prone to fray, and rolling the threads under with a needle turned out to be a slightly hairy experience.
On top of that – we all know that velvet “creeps”, don’t we? I unpicked and re-positioned the slip twice, and ended up pinning it firmly in place, regardless of the risk to my stitchery. I’m pleased to report that there seems to be no lasting damage…
The final stage before assembling the pincushion (that will be another post!) was to edge the slip with silk gimp. The green gimp matched one of the green silk threads, so I used a single strand to couch it down. Except that the various fabrics were sturdy enough to make it quite an effort to stitch through them, this enterprise proceeded as planned. The instructions showed the slip simply outlined as a single piece, rather than having any details of outlining each separate section.
In real life, the slip doesn’t look as ragged around the edges as it does in close up!
Tudor and Stuart Goldwork Masterclass – More Gold!
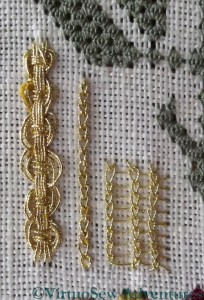
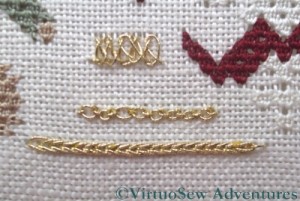
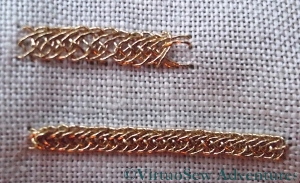
I’ve been doing more work on the metal thread embroidery on the Spot Sampler. The photograph shows (top to bottom) Braid Stitch, Cable Chain Stitch, and Heavy Chain Stitch.
I’ve used the real metal thread and the Japanese needle for all of them, which may have been a mistake. At the very least, the Japanese needle is a tool that I’ve not got to grips with, and which has had unanticipated side-effects on my technique!
As you can see, Heavy Chain Stitch worked beautifully. There are only a couple of places where the thread has broken and shows the core, and it has created a beautifully smooth and glimmering line.
With the Cable Chain Stitch, I think I need more practice in keeping the tension correct when using a “stab-stitch” technique, which is necessary because Japanese needles are short. This stitch is one of my favourites, but it was actually quite a struggle here, precisely because I couldn’t take up a piece of fabric on the needle as I usually do.
This was even more the case with the Braid Stitch. In fact it is worse than that. It wasn’t clear when I was stitching it, but now I see this section enlarged in the photo, it’s pretty clear that I’ve actually got myself into a dreadful tangle with a couple of my braid stitches. I need to pick up my practice cloth, fish out all my books, and try again. And yet I know I can work this stitch beautifully – I worked it on the logo for the Teddy Bear Cot Blanket, and for the Prince’s Bow on the Persian Fantasy!
Tudor and Stuart Goldwork Masterclass – Beginning the Gold on the Spot Sampler
I finished the silkwork on the Spot Sampler some time ago, but then ran into a problem, largely one of priorities. There have been so many other things I fancied trying, and so I’ve been working on the Amarna Map, the Christus Natus Est Panel, and a whole host of others. I’ve also been feeling just a bit jumpy about the real metal threads, and wanted to wait until I was feeling settled enough to read the instructions and make sense of them.
I have at last made a start, though. I even managed to thread my Japanese needle with thread from the Real Metal Thread Pack that arrived in the post a few weeks ago. Perhaps the practice thread I was using was quite simply fractionally too thick for the eye of the needle.
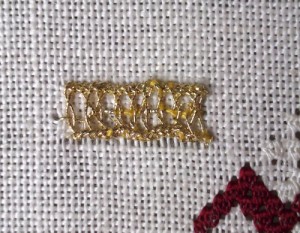
I started with Interlaced Ladder Stitch – which wasn’t necessarily the best or easiest starting point, but it is area number one on the chart! I’m a little disheartened that the gold thread has broken up quite as much as it has, here, but I’m leaving it there for now to act as a basis for comparison as I do other stitches. I’m going to try using even shorter lengths, and maybe even use a stiletto or similar tool to keep loops open while I pull the thread through.
Tudor and Stuart Goldwork Masterclass – Update on the Tudor Pincushion
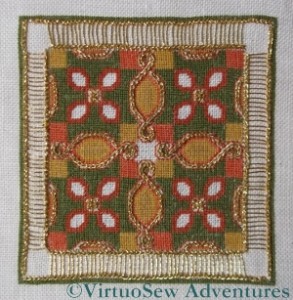
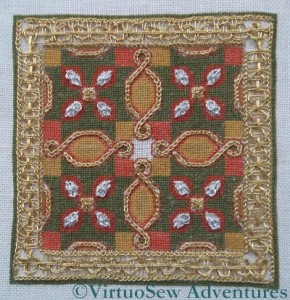
I’m making reasonably good progress with the Tudor Pincushion which is part of the Tudor and Stuart Goldwork Masterclass. The silkwork was finished a while ago, and now there are several different isolated stitches, and a continuous border.
I’m not using the real metal thread for this. I rather like the rich, vibrant colour of this thread, wrapped around a cotton core, and as I am planning to create a sort of winter “corner decoration” using all of my historical embroidery pieces, there is something positive to be said for the idea of using as many different shades of gold and silver as I can to create a really rich, varied impression.
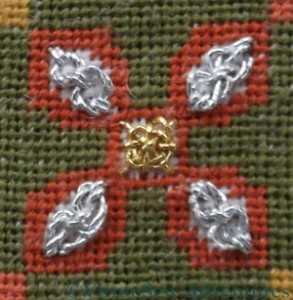
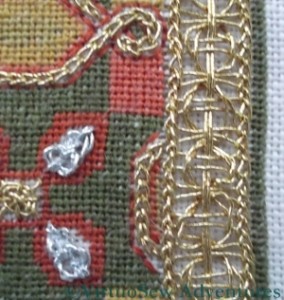
The small sections of silver Guilloche Stitch have worked well, although I still have reservations about my gold Spider’s Web stitches, especially when I look at close-up photos of them!
The border is a Guilloche Stitch variation worked on a Ladder Stitch base. As it turned out, I didn’t get quite the right number of rungs on the ladders, so rather than being a neat continuation of the Guilloche Stitch, the corner elements are rather improvisatory.
This doesn’t worry me. At the moment, I am still waiting for the instructions for the central ornamental stitch, and if, by the time I have that stitch, I’ve decided that I really must redo it, I will do so then. By that time I will be still more practised at working with metal threads, and it should go more swiftly and easily.
In the meantime, I can go on to play with more new stitches, and even, perhaps, start work on the real metal threads to add them to the Spot Sampler!
More on Christus Natus Est
Recently I was sent a link to a page discussing Russian embroidered icons. It seems that for all we think of icons as purely painted pieces, embroidered icons aren’t new – it is simply that their relative fragility and the length of time it takes to create one have made them very much rarer.
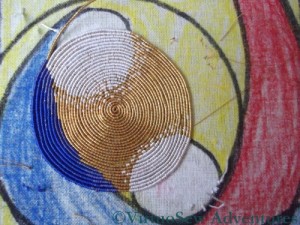
As I can testify. There have been many hours already that have gone into this piece, and I’m not sure that the progress made is really all that clear. Still, the spiral is nearly touching the side (I’m going to cover all the black lines, because I’m not entirely sure how this will be mounted or framed), and in fact it won’t be long before I have to consider how the non-spiral lines will flow. If you go back and look at the design as I showed it in this earlier post, you will see there is an extra black line flowing from St. Joseph’s head towards the top left corner, and another in the bottom right. These lines are to change the direction of the lines of the gold in order to bring more life into the design, but now I have done some of the work I wonder whether the lines are in the right place.
There is also the section of the Virgin’s cape running up over her head where I have for now followed the line as drawn, but wonder whether I should perhaps in this one instance follow the line of the gold to maintain the clarity of the abstract shape. If I do that, it will provide some justification for using a line along the back of St Joseph’s head and cloak as one of the new lines for the gold.
In other words, more thinking needed!
Tudor And Stuart Goldwork Masterclass – Month Fourteen
The Plaited Braid Stitch was one of the reasons I wanted to do this course. There are instructions in at least half of my books on embroidery, and I’ve watched Tracy Franklin demonstrate the stitch. I even spent a whole day practising it at one of her courses. Sometimes it worked, sometimes it didn’t, and frustratingly, I never felt I knew what I was getting wrong.
Consequently, when I sat down to tackle this month’s Stitch, I was expecting frustration and fury to reign. I started with Pearl Cotton, thinking that I would be less fretful about errors if I was not conscious of using an expensive thread. I watched the animation first, and although you can see that the first inch of my practising got very tangled up, I’m sure that it helped.
As I’ve repeatedly mentioned in my posts about this course, I’ve become acutely aware that the question of scale is critical to the success of some of these stitches. My first effort in pearl cotton was at too large a scale, and the thread floats were too floppy. In the case of the second trial, I reduced the size of the stitch, and suddenly found it coming together, which gave me some confidence that I was beginning to understand the structure of the stitch. The tension was still a little slack, but all in all, it was beginning to make sense.
So then I found a piece of scrap linen, and started playing with gold thread. Again the two rows are at slightly different scales, but now I really feel that I am going to master this stitch.
I also think I’ve cracked the problem of why the vast number of books I have on the subject don’t help. With the honourable exception of The Right Handed Embroiderer’s Companion, by Yvette Stanton of White Threads, they all use the same inadequate set of diagrams, presumably copied from an earlier publication. Furthermore, judging by the (slightly differing) diagrams in Tricia’s notes and Yvette’s book, they diagram the left-handed technique. Since all their other diagrams are for right-handers, these books provoke considerable confusion! Still, I now know where to go when I need to be reminded how to do the stitch, and I feel confident that with a bit of practise I will be able to pick it up any time I need to.
And I will need to. I have a few ideas buzzing around in my head, and Plaited Braid Stitch will take its’ place in them!
Spiralling Onward
Since I’ve received so many comments – and additional e-mails! – asking me to post more about Christus Natus Est, I’ve decided to post about it more frequently than I originally intended.
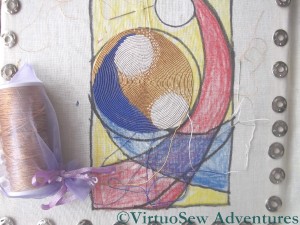
Progress has slowed somewhat as the spiral gets larger, with ever-longer sections of the close silken stitching. Since I’m using two shades of blue at present, the blue of the Madonna’s robe involves three different threads, which means that every time I feel I’ve settled into a rhythm, I have to stop and change to another thread.
I’ve already had to reposition the fabric on the frame, since the constant close stitching had stretched it slightly. It’s much easier to work this style when the fabric is absolutely taut, so I expect that this will become a regular activity!
You’ve probably noticed that the Christ Child’s halo has a somewhat sawn-off look, and that I’ve not continued the Madonna’s halo over her robe. In both cases, this is because I have taken note of what one of the books I’ve been reading has told me – it is not difficult to add stitches to an or nué piece, but it is near-impossible to take them out. I’m not certain that I want the halos to spread over the robes, so until I’ve decided that, they won’t. I’m happy to go back over the piece tidying up when I’ve finished, so that is how it will be done.

