
Tag: Goldwork
Sampler Silkwork Finished!

Sampler Silkwork Finished!
At last I have finished the silkwork on the sampler for the Tudor and Stuart Goldwork Masterclass. I don’t have much patience with counted work – I just keep doing it occasionally, as a salutary discipline! – so I am really very pleased with myself. After all, I began stitching it – according to my post on the subject – in June last year!
I’m pleased that I persevered. It’s fascinating to see the Queen Stitches create an entirely different fabric, with a totally different surface and reflectance to the surface of the fabric itself, and the other stitches (Rice Stitch, Roman Stitch and the Bargello section) all reveal different aspects of the silk thread and provided different challenges in working them.
In fact, in the end I have enjoyed the silkwork on the sampler rather more than I expected to. It has taken me much longer than some of the other members of the course, but I’ve been working on the Piano Shawl and the Dreams of Amarna at the same time, so I think I have a good excuse!
Now I need to work out how I am going to keep track of which goldwork stitches to do where. I’ve been printing out the instructions as I go along (thank heavens!) but I now have a large folder full of the historical essays Tricia has written for each month, and another one full of the stitches. It isn’t difficult to have a single chart by my workstand as I stitch, but I think I may need to create an annotated chart for the goldwork. So far, many of the stitches have been familiar enough for me to do some of them with only the name and placement to guide me, but in other cases I know I will need to have the folder open at the instructions as well. One of these days we will have to find a house with a studio for me to work in!
Starting the Christus Natus Est Or Nué Panel

Christus Natus Est - Materials
I know I should try to limit the number of projects I work on at once, but my fingers have been itching to start the Christus Natus Est Panel, and I finally decided to have a go.
I bought the silk thread (Pearsall’s Filoselle) and the gold passing thread, at the Knitting and Stitching Show in Harrogate last year. The Filoselle is a beautiful stranded thread, and I’m using a single strand to couch down the colours of the thread, and a different, very fine thread to couch down the bare gold sections.
I was somewhat afraid that choosing to work my or nué panel in the circular and curving fashion would create considerable headaches, especially in starting the spiral at the centre of the circle, but actually it was fairly straightforward. I’ve put the gold thread into a little gauze bag, which keeps it from unwinding- mostly- and means I don’t have to worry about it snagging or catching as I work
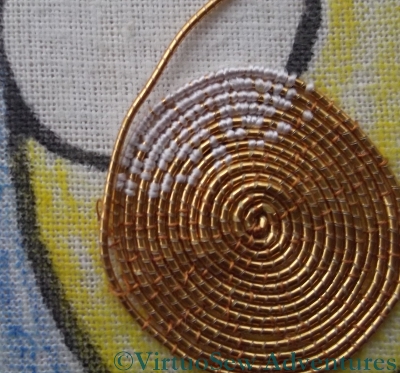
Close-up of Starting The Or Nué panel
As my spiral becomes larger, and the number of colours I am using in each circuit increases, the work will become slower, and more confusing, but so far, I am enjoying it very much. It would be much easier if I had a proper slate frame and trestles to stand it on, as I can see that the pins holding the calico to the frame will need to be moved occasionally as the fabric stretches. However, the silk thread covers the gold reasonably easily, and since I was aware from reading about the technique that the silk would distort the rows slightly, I’ve not been unduly disturbed by the way the spiral isn’t quite circular anymore. It won’t be that obvious when the piece is finished, after all!
In fact I’ve been enjoying myself so much that I just have to be a little careful not to get so wound up in it that I stitch for too long and end up with fuzzy eyes!
Tudor and Stuart Goldwork Masterclass – Month Thirteen
I’ve not really been making as much progress with the silkwork on the Masterclass Sampler and Tudor Pincushion as I would like. The weather has been cold and overcast, making my best stitching spot for natural light a chilly and uninviting place. Artificial light produces a confusing glimmer on metal threads, so unless it is a particularly easy stitch, I tend not to use metal threads in the evening.
I’ve been more or less keeping up with my practice stitching, however, and this month’s stitches are Cable Chain Stitch, and Knot Stitch (also known as Braid Stitch). I enjoyed these very much, as I already know them both, and it was good to be able to add them to the practice cloth and remind myself of my repertoire.
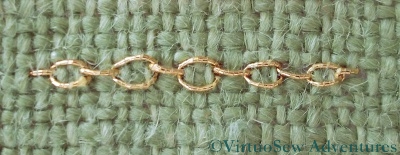
Cable Chain Stitch
Cable chain is my absolute favourite of the chain stitches, and pops up in all sorts of projects. I used it in the Jacobean Firescreen that I’ve used as my header picture, and the Jacobean Work panel that I’ve yet to find a use for, and on the dorsal fin of the Experimental Seahorse. I’ve even used it on the Map of Amarna, in the Compass Rose. I think that it looks its best using a fairly heavy round thread, so on my practice cloth the gold is somewhat out of scale with the fabric
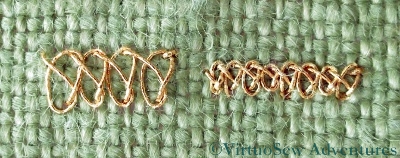
Braid Or Knot Stitch
Braid or Knot Stitch (not the terrifying Plaited Braid Stitch that I haven’t got to grips with yet!) is another favourite. I used it to create the Prince’s bow in the first of the Persian Fantasy Panels. I also used it for the ice cream cone part of the logo on the Frolicking Teddies Cot Blanket. I worked the stitch at two different scales, so you can see it looks a little loopy and untidy over four threads, but neatly ornate over two.
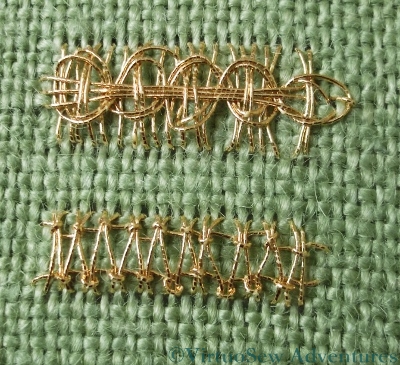
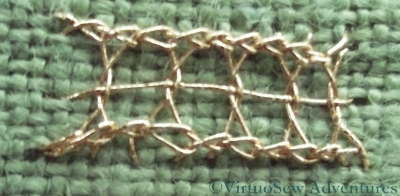
Tudor and Stuart Goldwork Masterclass – Month Twelve Goldwork Stitches
The two stitches this month are stitches I think I have seen used as needle-lace stitches, but whereas I’m most used to seeing variants of Blanket Stitch used in needle-lace, these are worked using Up-and-Down Blanket Stitch.
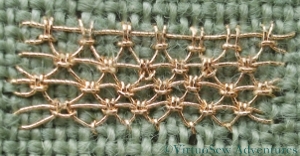
Up And Down Blanket Stitch - Alternating
As it happens, the Up-and-Down variant is one of my favourite stitches, so I sat down rather gleefully to have a go. This is the first of the variations, Alternating Up-and-Down Blanket Stitch, which produce a rather open, netlike appearance on my practice cloth, not much resembling the example in the instructions.
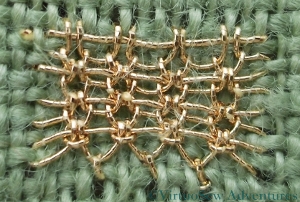
Up And Down Blanket Stitch With Return
The second stitch was Up And Down Blanket Stitch With Return. In this case the seconfd row of stitches goes into the tie of the Up And Down Blanket Stitch, creating a ribbed effect something like the welts on a sweater. It also rather conceals that same distinctive tie stitch, rather camouflaging the stitch that forms its basis. I’m very impressed that Tricia managed to “reverse-engineer” these stitches, as some of them are rather less than clear to work out!
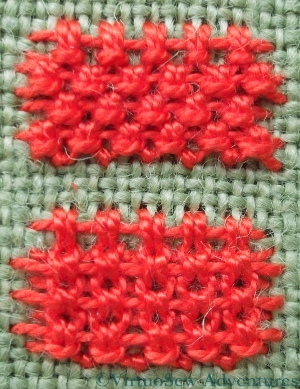
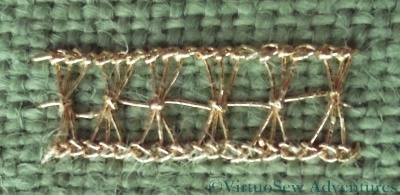
Both Stitches In Pearl Cotton
Naturally, my practise cloth version in the gold thread suffers from the problems of scale I’ve already discussed, but as well as that I find when I look at the photographs that in a couple of cases I have done a pair of buttonhole stitches instead of an Up-and-Down Blanket Stitch. I defy anyone to work that out at the normal scale of these stitches, but I’m actually quite surprised that I didn’t notice at the time, since the short loop at the base of up-and-down buttonhole stitch does tend to twist when worked as a needle-lace stitch instead of a fabric stitch!
These versions worked in pearl cotton show much more clearly the heavily textured fabric that these stitches form when worked at the correct scale.
Tudor Pincushion Progress
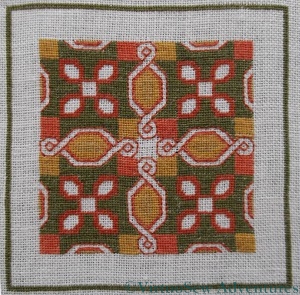
Tudor Pincushion Silkwork Finished!
Finally, I have finished the silkwork on the Tudor Pincushion, which is part of the Tudor and Stuart Goldwork Masterclass course I am following.
I think I need to find something that is less fine stitching than this, to give me a rest from all these tiny stitches!
Still, you can see that the final pattern is simple enough in concept, and there is just enough subtle variation in the colours to make the design interesting. The final effect is almost one of a woven fabric, as though the goldwork were embellishing a genuine tapestry. Remember that a real tapestry is woven (the Gobelins ateliers in France are the best known, historically, although a lot of tapestries I’ve seen have been from the Netherlands). A real tapestry is not worked in tent stitch on canvas, whatever the kit manufacturer says, and the Bayeux Tapestry is in fact an embroidery!
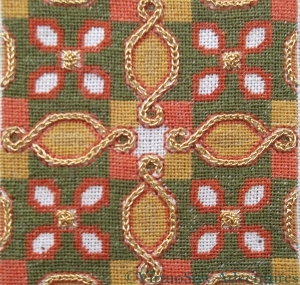
First Stage of Goldwork
I’ve also begun to work on the goldwork stitches. The small gold spots are worked in Eight Legged Spider’s Web Stitch which I first encountered in Month Four, and which is a great trial at the size it needs to be on the pincushion. I’ve not quite persuaded myself that I need to restitch them, as they didn’t markedly improve over the four I’ve done, but I am certainly considering the possibility.
The channels between the back stitches are filled with Reverse Chain Stitch, which I first encountered at the very beginning of the goldwork section of the course. This is an easy stitch to do, and very satisfying to see it build.
The course materials have included two Japanese hand made needles, which I was hoping to experiment with at this point, but I can’t even thread them! The eyes are much too fine for the thread, which is awkward, since I may be wasting quite a bit of gold thread unnecessarily because my ordinary needles strip the gold from its core.
There has to be a better way…
Tudor and Stuart Master Class – Month Eleven
Month 11 Goldwork Stitches
So while I continue with the silkwork for the Spot Sampler and the Tudor Pincushion, here are the two new stitches for Month 11 of the course.
The two stitches are Guilloche on Ladder Stitch, and Hemstitch on Ladder Stitch. In both cases I have cheated and just worked a panel of straight stitch bars as the foundation. This is because I wanted to get a firm grip on the structure of the stitch, rather than spending my time on working the foundation.
As the stitches become more multi-phase and more complex, the green doodle cloth is becoming a less suitable foundation. While it makes things easier by making the stitches larger when using the counted diagrams for them, it also makes things more difficult by making the stitches larger! I find that I am having difficulty in getting tension and stitch length neat and correct – in fact, you can probably see that from the rather floppy loops on the Guilloche Stitch Of course when I come to work on the real fabric using the real gold and silver threads, this problem should be much reduced, but I think I will find myself using a stiletto or a laying tool to try to keep the thread under rather closer control, even so.
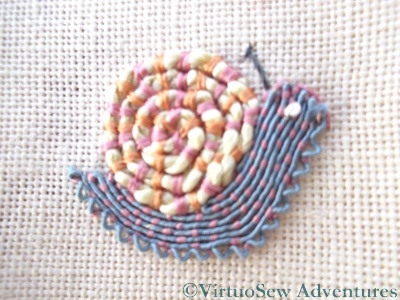
The Glittering Snail Finished!

Glittering Snail Ornament
The Glittering Snail Ornament from Stitching A Snail For Storage is Finished!
He was a lot of fun to stitch. I was introduced to silk gimp and silk purl (as I’ve already said, I don’t know what I will use them for, but I’m sure I’ll find something!). I don’t think I’ve ever stitched anything quite so small, either.
Tricia provided the blue silk thread to make the cord, and a silk fabric to back the ornament, although I think I need more practice at making cord, since mine ended up a bit floppy! However, it has now ended up with the whole thing, from hanging loop to tassel, made from a single length of cord, and I am hanging it up in my living room to keep it from getting crushed.
My local art shop sells cutouts of mount-card, presumably for people to do papercrafts with, but I find they make perfect mounts for this sort of ornament. I used one card for the front and one for the back, lightly glued fine wadding to the card and then stretched the fabric over the top (using glue or thread to secure it, depending upon which seems most appropriate). Front and back are then held together and overstitched, and the stitching can be covered with cord.
I used almost exactly the same technique – on a larger scale – when I was mounting “Starbright” a couple of years ago.
Tudor and Stuart Masterclass – Month Ten
Interlaced On Ladder Stitch
The two stitches in Month Ten of the course are both based on Ladder Stitch foundations. You can see here that something went a little squiffy with the foundation for the Interlaced stitch. I ran out of thread in the needle and in bringing the new thread in, I didn’t keep the the tension quite right. It wasn’t clear until I took the photo with the macro lens, and cropped it to size. As it is only a practise, I shan’t lose any sleep over it – I’ll just make a mental note that Tension Matters.
The interlacing is just like the sort of interlacing I am familiar with from drawn thread work – I’ve not done it before, but it is a style I’m familiar with seeing and a construction I can understand. It would be quicker to practise the interlacing on a foundation of straight stitches, but I suspect (if only I had got the stitching right) the Ladder Stitch would create a more stable basis.
Wheatsheaf On Ladder Stitch
The second stitch worked on the Ladder Stitch foundation is another I recognise from drawn thread work. This is a wheatsheaf-style stitch. Other variants might include a knot instead of a mere wrap, or include two rows of interlacing in the same style. One of the advantages of this course is that it is pulling together many of the techniques I have seen before, but never had the opportunity to do.
It has also given me permission to “play”. I’m enjoying that!
The Glittering Snail – part two
The Snail In Silk
So, bright-eyed, bushy-tailed, and full of enthusiasm, I sat down with my Glittering Snail Kit and got started. And, in fact, the silk gimp and silk-wrapped purl are not the only threads new to me, so it was great fun.
The pink and orange threads are both silk floss rather than spun silk. Occasionally I snagged the floss on the screw on the hoop, or a fingernail, or even on another bit of thread (how? don’t ask!), but I really enjoyed it, all the same.
The snail’s body is worked using the silk gimp and stretched silk-wrapped purl, couched with the pink floss. They were easy to work with – they felt gorgeous! – and I have a tiny bit left to play with a little while I think about how I might use them in my own embroidery. At the moment, nothing is really springing to mind, but I’m pretty sure that somewhere along the line some silk-wrapped purl will appear..
The Glittering Snail – part one
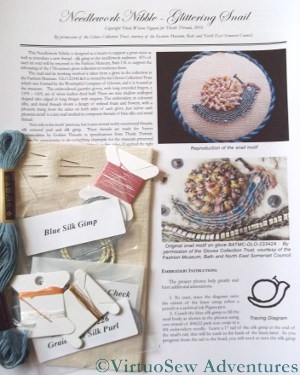
The Snail Kit Has Arrived In The Post
You may recall that in December I wrote about the Thistle Threads project to Stitch A Snail For Storage. We’ve been away for a while, but came back to find a huge pile of post which included a jiffy bag from Thistle Threads.
Since I’ve already printed out the instructions (as soon as I ordered the kit!), I can start just as soon as I’ve gathered my wits and drawn the design on the linen. Even though the basic concept of the design is simple, it will be complicated and probably a little tricky to do, because the snail is only about an inch from nose to tail!
Tricia had two reasons for developing the kit – one was to sell something in aid of the Fashion Museum in Bath, but the other was to introduce some new threads to us. So of course, the first thing I did was to rummage through to look at the the new threads, the silk gimp and silk wrapped purl. They look highly intriguing, and I am looking forward to playing with them…