
Tag: Goldwork
A Closer Look at Modern Goldwork – Five
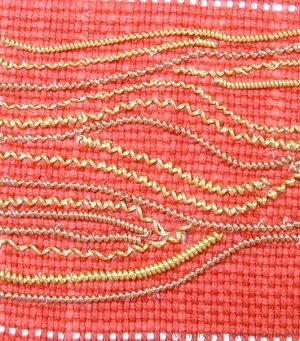
Bark Effect
For this panel, Tracy told us to think of tree bark and then to use stretched and unstretched pearl purl of different weights couched to create a bark pattern of light and heavy lines.
I really enjoyed this for some reason. The pearl purl is stiff and springy, and doesn’t feel as fragile as some of the other metallic materials.
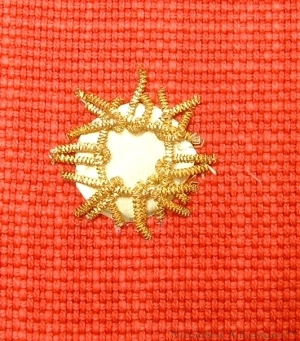
Shisha Variation
The second panel shows an adaptation of shisha work. The “mirror” is in fact a circle cut from a piece of metal foil, and the “stitches” holding it in place are made using check purl. This looks clumsier than I would have liked. Partly, no doubt, because it is not an easy technique even with the standard materials, and I leapt straight in with non-standard materials. Partly also, I think, because having decided to do this I should then have picked a finer purl to use for the “stitches”. It might have been easier to achieve the effect I want if I had thought through my choice of materials. I recall also that the metal foil was flexible and tricky to keep in place while I worked the “stitches” over it.
Note to self: Next time, try the standard technique using the classic materials before making life more difficult for yourself!
I think it is fair to say we all had a wonderful time on the course. Never having worked with metallic threads before, I think the Modern Goldwork course provided an entertaining introduction, whereas it is possible that going straight into classic goldwork might have proved a little scary!
A Closer Look at Modern Goldwork – Four
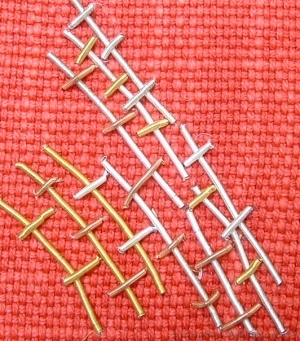
Burden Stitch
The next two panels show contrasting materials and techniques.
This first panel is using purl to create the pattern of “burden stitch“. This can be more or less closely spaced, and while I worked it as a very open, rough texture, it would be possible to use it to create the impression of basket weave. I’ve used Burden Stitch before, but only in thread.
I’ve used Smooth Purl here, threaded on the needle like a bead – which is fairly hair-raising when the bead in question is a floppy tube about three inches long which could easily be damaged and allow the needle through prematurely!
This next panel shows a classic, straightforward couching of imitation Jap gold, worked as a simple doodle.

Couched Gold
I rather like the effect of this – rather like the old idea of “taking a line for a walk” that is one way of creating the basis for an abstract painting.
It also provides a gentle introduction into the method of couching that can be extended and formalised to create or nue.
As such, I have plans for using this technique and its variants on the Amarna panels!
Tudor and Stuart Goldwork Masterclass – the first two Goldwork Stitches
I’ve not come near finishing the silk work on the Spot Sampler, so I am going to do some practising first. The fabric is a heavy plain weave, about 16 threads to the inch. Compared with the linen for the actual piece it is almost like binca! I chose it to give me some chance to see what I was doing and to count the threads if it proved necessary for the stitches. It wasn’t really for the first two, but I did so anyway!
Reverse Chain Stitch
Reverse Chain Stitches
This produces, to all appearances, simple chain stitch, but it doesn’t involve the “scooping” motion used when working in the hand and seems somewhat easier to control.
I’ve done it both over three and over two threads.
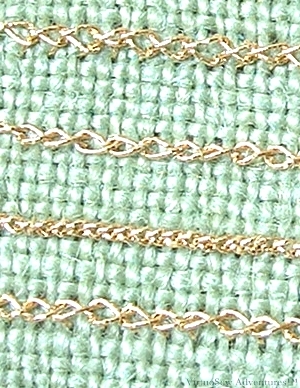
Reverse Twisted Chain Stitch
Reverse Twisted Chain Stitch
Again, the resulting appearance is of simple twisted chain but the stitch is worked backwards, I think this reduces the chances for the gold thread to snag on itself, which certainly helps.
As shown in the original diagram, it is worked over a grid in effect, of two threads by two. After doing that fairly easily I decided to play a bit.
So I worked several variants, over two by four, two by one, one by one, and two by two.
The one by one was quite a challenge, but I am pleased that I have an impression of the changes in appearance effected by the different stitches.
A Closer Look at Modern Goldwork – Three
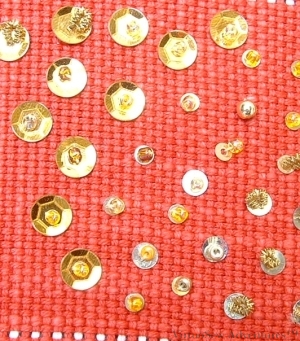
Sequins
We used a wide range of different materials and techniques, so the course provided exactly what I wanted – an guided overview of both.
Tracy pointed out that you don’t need to use beads to sew sequins down. These two panels therefore show some of the variants she suggested.
The first panel shows sequins caught with beads and with short lengths of purl used as beads, with both sequins and beads differing in size and colour.
The second panel shows sequins couched down with sections of check purl, irregularly spaced and grouped. There are additional beads and sequins added to increase the range of textures that appear.
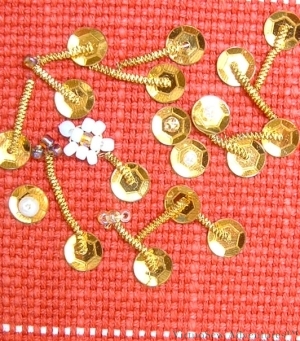
Tied Down With Check Purl
It’s probably very easy to tell from looking at these that, for all my embroidery has a somewhat improvisatory quality, I’m not entirely comfortable in situations where the work has to be completely freeform. I like to have a structure underlying my improvisations.
Also, at present, neither of these techniques is asking to be used in the Amarna panels or anything else I have in mind. I’ll think of something, no doubt, but in the meantime this is simply one for the notebook.
Floral Glove Needlecase Embroidery Finished!
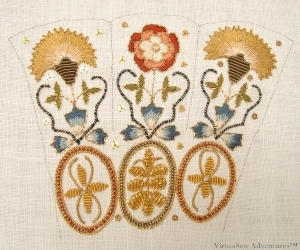
Floral Glove Needlecase - the embroidery finished (I think!)
At least I think it must be. I think the next two months involve the finishing process – adding trims and making the needlecase itself.
I’ve finally got the idea of how the purl should work. It needs to be cut fractionally longer than the distance it is to cover, so as to produce a very slight – a very slight! – curve. This results in a slightly less scrappy look, because the ends of the “beads” of purl aren’t so obvious. It’s not easy to cut accurately – at least, I didn’t find it so, but where I got it right, the sections look much better.
Adding the spangles makes a surprising difference to the final effect – they are so tiny and delicate you don’t expect them to make much difference, but the fragile sparkle really enhances the final effect.
I’m not going to go back and redo the bits that aren’t quite perfect. It will be useful to have the reminder of what I should be aiming for beside the reminder of what I should try to avoid! I’m pleased with what I’ve produced and – although it may not be obvious from the photo – I can see that I have improved over the course.
A Closer Look at Modern Goldwork – Two
The difference between this course and a Traditional Goldwork course was that Tracy was less concerned with the techniques of padding and or nue which are familiar from looking at badges or heraldic or ceremonial work. In the Modern Goldwork course, the techniques were more informal and more expressive in an obvious sort of way. It is easy to portray exuberance with threads curling all over the place than when using the design rather than the technique to reflect the emotion.
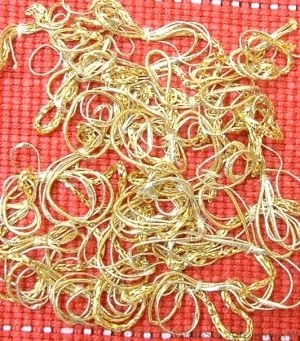
Multistrand Couching
I have chosen this particular sequence to give you some idea of the range of variations available when using essentially the same technique of couched bundles.
For this first panel, we gathered a bundle of several different threads which were then couched down as one, in loose, freestanding loops. This creates an open texture with a high surface. Choosing the types of thread carefully will create a change in the texture.
You can just see in the photograph that the bundle I chose included flat and textured threads. There is even one which looks somewhat like chainette, which changes the reflectance of the whole bundle.
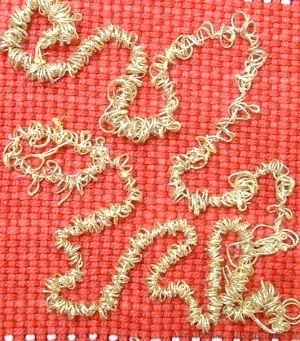
Multistrand Snakes
In this second case, Tracy gave us a specific, four-strand thread to use. Three of the four strands of this thread were gathered on the fourth and the resulting coil couched down as a sort of snake.
The trick here is to use a stranded metallic thread of the right stiffness and springiness to create the neat, regular coils.
You can see that this creates a rough but rather more controlled texture, because the coils are small and neat, rather than loose and floppy like the ones in the first photograph.
A closer look at Modern Goldwork – One
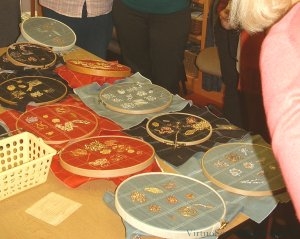
As it was such an interesting and useful two days, I thought I would write a bit more about my course with Tracy Franklin on Modern Goldwork. We worked samples of various techniques, each demonstrated by Tracy before we began. I don’t want to make the posts too long, so I will only put two techniques in each post.
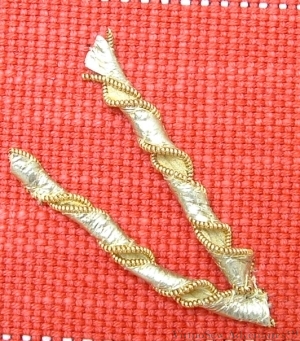
Kid Leather Twists
The base for our Modern Goldwork sampler was a sturdy but loosely-woven cotton upholstery fabric. We began by pulling out evenly spaced threads to mark the fabric into squares. Then in each square we worked a different technique.
The first square had Kid leather strips edged with unstretched pearl purl and then twisted. The twists were then couched in place. It was surprisingly difficult to attach the pearl purl to the edge of the leather, but creates an interesting variation as by twisting the strips, a glimpse of the back of the leather is provided, matte in contrast to the shiny metallised surface that is intended to be seen.
This technique might provide me with the gold in some jewellery for the Amarna panels as a change from simply using gold embroidery thread.
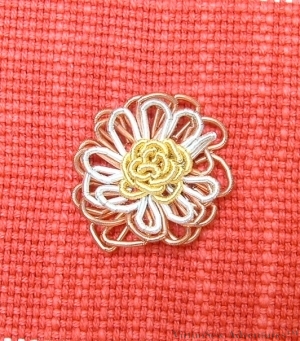
Purl Rose
The second square shows a flower shape made of loops of purl which are threaded onto the needle like beads. There are three different colours of purl, using gradually longer lengths to make larger, slightly floppier petals. The small, closely packed loops in the centre show that this technique could be used to create a very solid, shiny, “curly” texture.
I find myself thinking maybe when I’ve got the Amarna panels done, I could work on a panel about the legend of the Golden Fleece. Just imagine a whole fleece shape covered in that dense, looped surface!
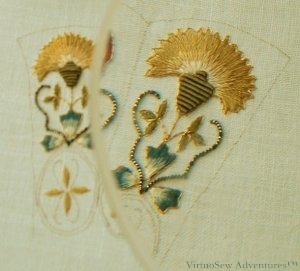
Floral Glove Needlecase – Month Three Finished!
Month Three Finished
So, making progress here. All the silkwork is outlined in Elizabethan Twist, carefully following the suggested paths so as to have the smallest possible number of ends to sink.
Then the calyxs of the two carnations are covered with Olive smooth purl, cut to size and treated like a bead. This was fairly tricky because it was easy for the end of the purl (which is a very fine wire, coiled up) to catch on the silk thread being used to sew it down. In fact for the second calyx, I waxed the thread, which made the whole experience less fraught! I notice I didn’t quite get all the lengths or maybe spacings right for the first calyx, but for now I shall leave it as it stands.
Then I couched the striped thread curlicues. Again it was tricky to place the black couching thread where it would disappear into the thread being couched, but I think a few tweaks with a needle will fix that!
Through A Glass Clearly
Finally, I thought I would show what a difference a magnifier makes. As I think I have said before, it is the change in size that terrifies. I began by stitching without a magnifier and was reasonably happy doing so. I just felt that it would be a useful additional tool, especially given some of the other projects I have in mind.
My eyes become accustomed to regarding the magnified view as normal, then when I stop for a cup of tea, I push the magnifier to one side to have a “proper” view. At which point there’s a small squawk and my husband asks what’s wrong. “It’s gone all tiny”, I say, “Don’t tell me I stitched that!”. After the said cup of tea, ordinary views reassert themselves and it doesn’t seem quite so astonishing.
Which is really just as well. We don’t embroider to scare ourselves, after all!
Dreams of Amarna – Researching Techniques
I know that an embroidery which is “about” ancient Egypt – even if only indirectly – will have to include some gold and silver – not least, that same Crock of Gold hoard that caused so much consternation to the excavators when it was found (artefacts have a fairly limited and specialised market, while gold bars are much easier to sell, so there was some concern about security that would never have troubled the dig under ordinary circumstances).
All our own work!
So the next step was a trip to Durham, for a two day course in Modern Goldwork, given by Tracy Franklin. I had a fascinating time. Tracy is an excellent teacher, and it was a real treat to be able to concentrate on learning something entirely new to me. The class had the bonus that Tracy had plenty of goldwork materials available for purchase, and my local embroidery shops don’t have any. Some of what I bought for my coursework was in fact for “Dreams of Amarna” instead!
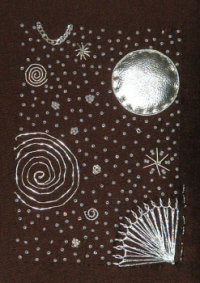
"Starbright", completed November 2008
When I returned, I worked a small panel as an attempt to consolidate my grasp on the techniques and the materials. I even included some padded silver kid leather, and the background is starred with beads.
I’m quite pleased with the panel, as I managed to use almost every technique we were taught. The base fabric was a tightly woven brown synthetic, which was rather trying to work with, but I wanted something very firm for this first solo attempt at goldwork.
I will need to use very different fabrics for Amarna, and I expect that trial and error will be much employed!
You might be able to see a line of stitching, running up the edge. That’s my “signature,” in Morse code. It’s much easier to do small and neatly than letters, and sometimes I manage to hide the signature in the design.
When I am creating an embroidered piece for someone else, I try to make sure that I also provide something about the design and the making of the work. Not just care instructions, but a description of the design choices and why I made them, or if I was working to a brief, a description of the influence of the brief on my approach to the work. Given my interest in history and archaeology, it’s perhaps not surprising that the idea of providing Something For The Archive rather appeals to me.
And on that score, and on behalf of those in the future who will be interested in embroidery – please, sign your work, date it, write about it. Just think how thrilled we always are to gain an insight into the work of designers and artisans of the past!
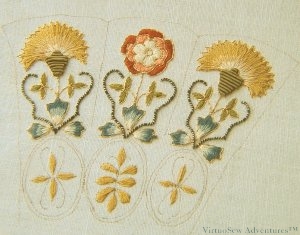
Floral Glove Needlecase Course – Starting the Goldwork
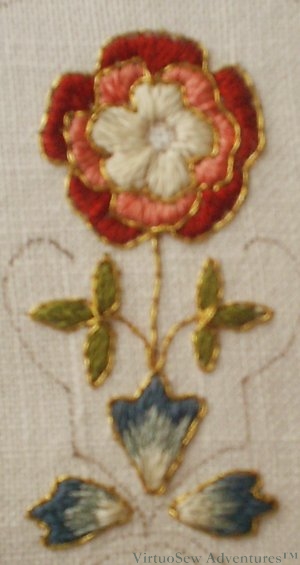
The Rose Outlined
The embroidery on the Floral Glove Needlecase is based around the tabbed cuffs of gloves which were often presented as gifts during the Elizabethan era. We’re only doing one side of one cuff, of course, but the additional historical material we get each month, with high-resolution pictures of some of the original gloves which remain in existence, give us a very fair idea of what Thistle Threads were aiming for!
There are several useful diagrams in the instructions showing where to start and end the gold thread, which is couched down with silk. Furthermore – brave lady indeed! – Tricia has even provided us with a view of the back of the embroidery. Miss Hunter would have looked at the back to check that it met her high standards – as students we are studying that photograph to try to garner more clues to how the work fits together. It gives a better idea of stitch lengths, for instance, because the eye isn’t dazzled by the goldwork and can study the couching.
It is very detailed, rather tiring work, so even with a good light (by the way – bright sunlight is not, in this context, a good light – it bounces off the gold thread and the magnifier and tires the eyes even more quickly) and a magnifier, I can’t do much at once. What you see here is two or three sessions’ work.
I’m pleased, though. There are several new techniques and materials still to try in this month’s session, and I think I am learning a great deal – not least, working at this scale turns out to be less hair-raising than I feared!