Tag: Miss Hunter
Look What I’ve Found!
A little while ago, Yvette at White Threads blog interviewed me for her blog. In the interview, we talked about how I started to embroider, and I described – and provided a picture of – a piece that I worked on with Grandmama when I was about eight or nine.
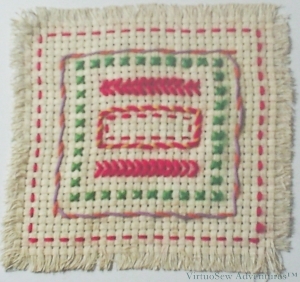
I went to visit my parents a few days ago and they fished this mat out of the archives. I made it at school, when I was about six – you can tell my family has a bit of a thing about making things, from the fact it was still in existence.
I remember almost nothing about making it, except that I got bored of running stitch very quickly, and I must have mentioned that to Grandmama; maybe she suggested the arrowhead stitches and the whipped running stitch. I am fairly sure that I was the only one in the class who did anything but running stitch in a square. Embroidery wasn’t fashionable at the time, so I suspect most of the other children’s parents and grandparents wouldn’t have taken much interest in what we were doing.
The back looks hair-raising – Miss Hunter would have had a fit! – but how many of us have our very first piece of stitching to bring us back to earth?
Anyone?
Floral Glove Needlecase Course – Starting the Goldwork
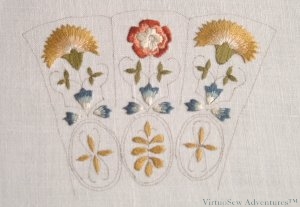
The embroidery on the Floral Glove Needlecase is based around the tabbed cuffs of gloves which were often presented as gifts during the Elizabethan era. We’re only doing one side of one cuff, of course, but the additional historical material we get each month, with high-resolution pictures of some of the original gloves which remain in existence, give us a very fair idea of what Thistle Threads were aiming for!
There are several useful diagrams in the instructions showing where to start and end the gold thread, which is couched down with silk. Furthermore – brave lady indeed! – Tricia has even provided us with a view of the back of the embroidery. Miss Hunter would have looked at the back to check that it met her high standards – as students we are studying that photograph to try to garner more clues to how the work fits together. It gives a better idea of stitch lengths, for instance, because the eye isn’t dazzled by the goldwork and can study the couching.
It is very detailed, rather tiring work, so even with a good light (by the way – bright sunlight is not, in this context, a good light – it bounces off the gold thread and the magnifier and tires the eyes even more quickly) and a magnifier, I can’t do much at once. What you see here is two or three sessions’ work.
I’m pleased, though. There are several new techniques and materials still to try in this month’s session, and I think I am learning a great deal – not least, working at this scale turns out to be less hair-raising than I feared!
Floral Glove Needlecase Kit – Silk Work Finished!
I’ve finished the silk work on the Needlecase Kit!
The new stand has been working well – it is very adjustable, so I can make it suit wherever I am sitting, and the magnifying glass has been very helpful too. The only slight hitch with the magnifier is that stitching away at magnification becomes normal and then when finishing off threads at normal vision, I get slightly spooked to realise how small the stitching is!
As I have said, I am not really a fan of satin stitch and long and short stitch, perhaps because I am self-taught. Both of these stitches look simple, but are difficult to execute well, and so are very dispiriting for someone learning from books, with no-one to give hints and tips for excellence. How I long to have had a Miss Hunter to help me!
Actually, the instructions that Tricia Wilson prepared for the course are very nearly as good as having her beside you. They are copiously illustrated with very high resolution photos, so that it becomes a matter of seeking to make the view through the magnifier match the printout.
I’m even coming to think I may enjoy satin and long and short stitch, in small doses!
The kit included whole spools of the silk thread, so I have plenty left to play with. I’m not expecting to go so quickly with the goldwork, but the instructions come nicely spaced out so there will be time to take stock and work on other projects as well.
How It All Began
My grandmother first taught me to embroider (there must be thousands for whom that is true! ). She was an extremely skilled embroideress, who learnt when she was living in Westmorland during the war with her own two children, her sister and her sister’s children. Her teacher, Miss Hunter, has even passed in to family legend – a little, dumpy lady in black crepe (old fashioned even then) with very sharp scissors hanging from a silver chain at her waist, and quite scarifyingly high standards. If her students’ work failed to meet those standards, snip, snip, snip, and out it all came. To this day, unless we pay close attention, we sometimes put tablecloths embroidered by Grandmama on the table the wrong way up, and we always pay as much attention to the back as the front.
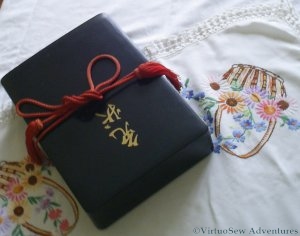
Once Grandmama realised I was well and truly hooked, she allowed me to look inside a black lacquer box that had always fascinated me. Inside I found some rather tatty, but utterly enchanting, copies of The Needlewoman Magazine of the nineteen-thirties. Some of them even still had the free transfers still with them.
In short order, I’d turned a design for a photograph album cover into a teacloth (I still have it somewhere), made a runner for my dressing table using a repeating pattern (now in use in another room), and embroidered a dragon on the back of a linen dress. My history teacher complained that that dress took her mind right off her prayers in Assembly when I wore it for school one day!
Unfortunately, Grandmama died a couple of years later, but she’d taken great delight in what she had seen, and left me the magazines and her worktable. I still think of her when I am embroidering, and I still want to show her any piece of embroidery that I’m particularly pleased with.


