
Tag: Silk thread
One Collared Elephant
You can tell that the Elephant’s inspiration was the right one – suddenly he’s taken off!
The Elephant Collared
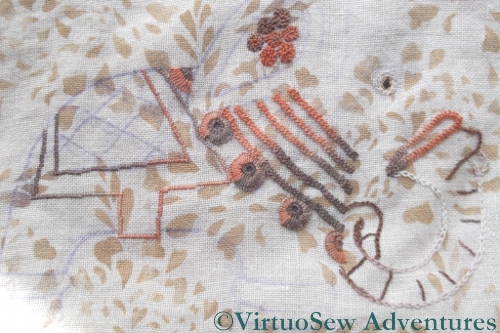
I’m using one set of variegated silk thread (shading from orange to brown) for the harness and headcloth and saddlecloth, and another (shading from cream to brown) for any small bits of the Elephant that show through all his finery. I shall have to redraw his head and headcloth – the transfer has rubbed off – but I’m pretty pleased with progress.
The collar is worked in six rows of braid stitch, which is a stitch that always looks better in a round yarn like this silk perlé. The roundels hanging from the collar are two rows of buttonhole stitch, and the roundels on the ear-covering are spiral trellis stitch – at the moment. I’m not quite sure that they are right. I first used Spiral Trellis on the Jacobean Work Panel, and really enjoyed stitching it, but I think these look too fussy. One big one might be better, and it would allow the colour change in the thread to show a little more.
I’m glad that I have worked out something to do next, as his anklets are giving me trouble.They are smooth and domed in the original model, but I think satin stitch might look a little ordinary.
I’ve used small satin stitches to outline the border of the saddlecloth, but only because I wanted something quiet to contain the excitement I intend to put inside it – I’m planning to use one of the complicated interlacings from the Tudor and Stuart Goldwork Masterclass for the saddlecloth, but extended to form an all-over pattern.
Watch this space…!
Rethinking The Elephant Doorstop
Needs More Thought
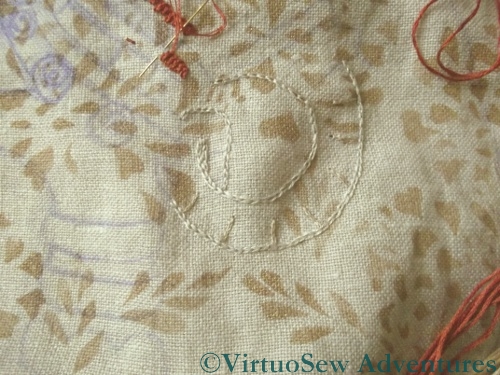
I originally decided to use plain stranded cotton for the Elephant Doorstop, in colours chosen to match the curtains in the living room as closely as possible.
However, once I started stitching I rapidly came to the conclusion that that just wasn’t going to work. We don’t want the Elephant to cover all my careful stencilling, but at the same time, he needs to show up. And he looks pretty hidden, here, as you can see. What’s more, I wasn’t enjoying it, and picking stitches was proving troublesome. I knew I wanted to stitch him – revisiting the original inspiration has been in the back of my mind for a while – but somehow, not like this.
There are two things I need to think about – the colours, and the weight of the thread. The creamy colours we chose are too light to show up well against the rather busy stencilled background, and although two threads of stranded cotton would be fine on this fabric, if it were a plain fabric, it is rather fine. Furthermore, one of the stitches I want to use is braid stitch, which is always a bit tricky in stranded cotton.
I’d already unpicked this section twice before I came to this conclusion, and I was beginning to feel rather anxious in case inspiration flagged completely. Then out of the blue, I was deafened by some triumphant trumpetings.
“I know what to do, I do!”, said he.
“What, then?” said I.
“Use some of those variegated silk perlés you’re always looking at. You can do any stitch that takes your fancy, the colours shading in and out will give you the lightness of effect you want, and – Ta-DA!”.
So now I’ve been told….!
Tudor and Stuart Goldwork Masterclass – Update on the Tudor Pincushion
First Stage Of Border
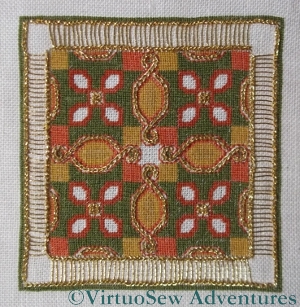
I’m making reasonably good progress with the Tudor Pincushion which is part of the Tudor and Stuart Goldwork Masterclass. The silkwork was finished a while ago, and now there are several different isolated stitches, and a continuous border.
Silver Guilloche Close Up
I’m not using the real metal thread for this. I rather like the rich, vibrant colour of this thread, wrapped around a cotton core, and as I am planning to create a sort of winter “corner decoration” using all of my historical embroidery pieces, there is something positive to be said for the idea of using as many different shades of gold and silver as I can to create a really rich, varied impression.
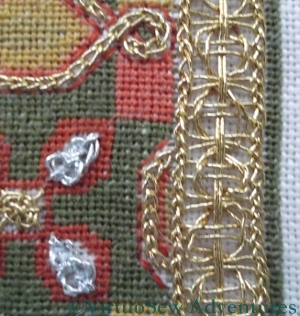
Border Close Up
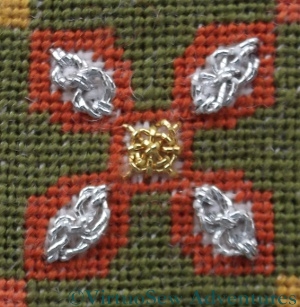
The small sections of silver Guilloche Stitch have worked well, although I still have reservations about my gold Spider’s Web stitches, especially when I look at close-up photos of them!
The border is a Guilloche Stitch variation worked on a Ladder Stitch base. As it turned out, I didn’t get quite the right number of rungs on the ladders, so rather than being a neat continuation of the Guilloche Stitch, the corner elements are rather improvisatory.
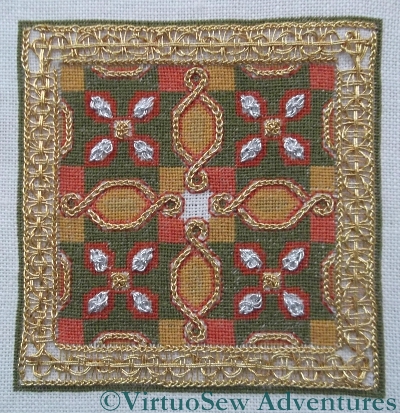
Tudor Pincushion - Almost Finished
This doesn’t worry me. At the moment, I am still waiting for the instructions for the central ornamental stitch, and if, by the time I have that stitch, I’ve decided that I really must redo it, I will do so then. By that time I will be still more practised at working with metal threads, and it should go more swiftly and easily.
In the meantime, I can go on to play with more new stitches, and even, perhaps, start work on the real metal threads to add them to the Spot Sampler!
Tudor And Stuart Goldwork Masterclass – Month Fourteen
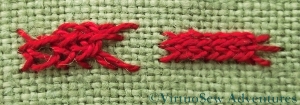
Plaited Braid Stitch In Pearl Cotton
The Plaited Braid Stitch was one of the reasons I wanted to do this course. There are instructions in at least half of my books on embroidery, and I’ve watched Tracy Franklin demonstrate the stitch. I even spent a whole day practising it at one of her courses. Sometimes it worked, sometimes it didn’t, and frustratingly, I never felt I knew what I was getting wrong.
Consequently, when I sat down to tackle this month’s Stitch, I was expecting frustration and fury to reign. I started with Pearl Cotton, thinking that I would be less fretful about errors if I was not conscious of using an expensive thread. I watched the animation first, and although you can see that the first inch of my practising got very tangled up, I’m sure that it helped.
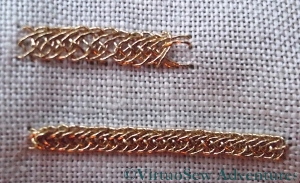
Plaited Braid Stitch In Gold
As I’ve repeatedly mentioned in my posts about this course, I’ve become acutely aware that the question of scale is critical to the success of some of these stitches. My first effort in pearl cotton was at too large a scale, and the thread floats were too floppy. In the case of the second trial, I reduced the size of the stitch, and suddenly found it coming together, which gave me some confidence that I was beginning to understand the structure of the stitch. The tension was still a little slack, but all in all, it was beginning to make sense.
So then I found a piece of scrap linen, and started playing with gold thread. Again the two rows are at slightly different scales, but now I really feel that I am going to master this stitch.
I also think I’ve cracked the problem of why the vast number of books I have on the subject don’t help. With the honourable exception of The Right Handed Embroiderer’s Companion, by Yvette Stanton of White Threads, they all use the same inadequate set of diagrams, presumably copied from an earlier publication. Furthermore, judging by the (slightly differing) diagrams in Tricia’s notes and Yvette’s book, they diagram the left-handed technique. Since all their other diagrams are for right-handers, these books provoke considerable confusion! Still, I now know where to go when I need to be reminded how to do the stitch, and I feel confident that with a bit of practise I will be able to pick it up any time I need to.
And I will need to. I have a few ideas buzzing around in my head, and Plaited Braid Stitch will take its’ place in them!
Tulip Needlework Nibble – Getting Started

Tulip Kit And Finishing Kit
My kit and finishing kit for the Tulip Slip Needlework Nibble arrived very promptly. They have obviously got all this down to a fine art, now, at Thistle Threads, because I was expecting it to be another week at least!
My Tulip Kit contains the linen and silk for the embroidery, while the finishing kit contains silk velvet for the pincushion, gimp to edge the slip, and Grecian Twist to trim the pincushion when it’s finished. The parcel also contained information about the Exhibition being supported.

Tulip Kit - Silks and Chart
I’ve said before that I colour in charts when I’m about to start on counted work. I should have explained that I don’t colour in the whole thing, or at least, not necessarily. The second photo shows the linen and silks lying on my printout of the instructions. You can see that in this case I’ve picked one colour in each section to colour in. Usually it’s best to pick one of the middle tones, because if a design is properly charted, as this one is, the dark colours will have dark symbols, and the light colours, light symbols. The coloured shade is to help make it clear which of the medium-to-light tone of symbols is which.
It is really simply there to help me find my place on the chart just at a glance, without having to take to long to check I’m still doing the right thing!
Sampler Silkwork Finished!

Sampler Silkwork Finished!
At last I have finished the silkwork on the sampler for the Tudor and Stuart Goldwork Masterclass. I don’t have much patience with counted work – I just keep doing it occasionally, as a salutary discipline! – so I am really very pleased with myself. After all, I began stitching it – according to my post on the subject – in June last year!
I’m pleased that I persevered. It’s fascinating to see the Queen Stitches create an entirely different fabric, with a totally different surface and reflectance to the surface of the fabric itself, and the other stitches (Rice Stitch, Roman Stitch and the Bargello section) all reveal different aspects of the silk thread and provided different challenges in working them.
In fact, in the end I have enjoyed the silkwork on the sampler rather more than I expected to. It has taken me much longer than some of the other members of the course, but I’ve been working on the Piano Shawl and the Dreams of Amarna at the same time, so I think I have a good excuse!
Now I need to work out how I am going to keep track of which goldwork stitches to do where. I’ve been printing out the instructions as I go along (thank heavens!) but I now have a large folder full of the historical essays Tricia has written for each month, and another one full of the stitches. It isn’t difficult to have a single chart by my workstand as I stitch, but I think I may need to create an annotated chart for the goldwork. So far, many of the stitches have been familiar enough for me to do some of them with only the name and placement to guide me, but in other cases I know I will need to have the folder open at the instructions as well. One of these days we will have to find a house with a studio for me to work in!
Starting the Christus Natus Est Or Nué Panel

Christus Natus Est - Materials
I know I should try to limit the number of projects I work on at once, but my fingers have been itching to start the Christus Natus Est Panel, and I finally decided to have a go.
I bought the silk thread (Pearsall’s Filoselle) and the gold passing thread, at the Knitting and Stitching Show in Harrogate last year. The Filoselle is a beautiful stranded thread, and I’m using a single strand to couch down the colours of the thread, and a different, very fine thread to couch down the bare gold sections.
I was somewhat afraid that choosing to work my or nué panel in the circular and curving fashion would create considerable headaches, especially in starting the spiral at the centre of the circle, but actually it was fairly straightforward. I’ve put the gold thread into a little gauze bag, which keeps it from unwinding- mostly- and means I don’t have to worry about it snagging or catching as I work
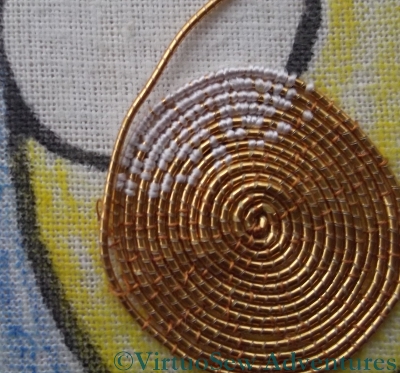
Close-up of Starting The Or Nué panel
As my spiral becomes larger, and the number of colours I am using in each circuit increases, the work will become slower, and more confusing, but so far, I am enjoying it very much. It would be much easier if I had a proper slate frame and trestles to stand it on, as I can see that the pins holding the calico to the frame will need to be moved occasionally as the fabric stretches. However, the silk thread covers the gold reasonably easily, and since I was aware from reading about the technique that the silk would distort the rows slightly, I’ve not been unduly disturbed by the way the spiral isn’t quite circular anymore. It won’t be that obvious when the piece is finished, after all!
In fact I’ve been enjoying myself so much that I just have to be a little careful not to get so wound up in it that I stitch for too long and end up with fuzzy eyes!
An Embroidered Jewel
Design And Inspiration
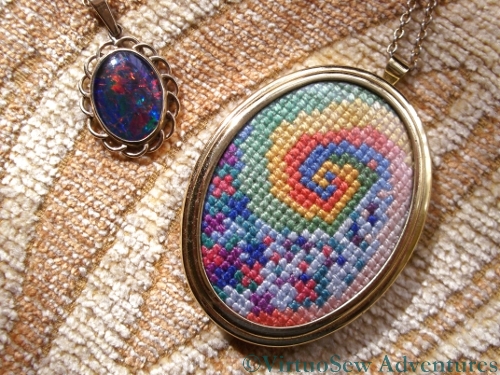
Some years ago (in fact long before we were married) my husband the Australian bought me an Australian Opal Triplet pendant. It’s really stunning, and when it catches the sunlight it takes people’s breath away.
At about the same time, I received a Framecraft pendant blank with a magazine I’d bought, and found myself thinking it might be fun to create a sort of Homage To The Opal.
I still have, somewhere, a whole sheet of coloured design ideas that never made it to a chart, but anyway, here is the final result. It combines a swirling spiral (inspired by the simple gold wire setting he designed for the stone) with some basic “flower” shapes intermingled to create the effect of the changing colours of the stone. The colours were picked to echo the colours in my opal triplet – naturally each opal is different.
The embroidered version is worked in counted cross stitch on 18hpi aida using variegated silk threads, and although I know I am not exactly an unbiased judge, I think it is lovely, and I very much enjoy wearing it!
Close Ups on the Flowered Blouse – Part Two
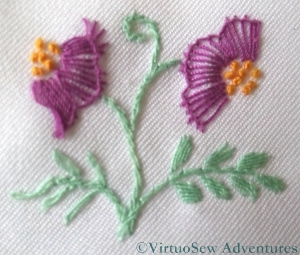
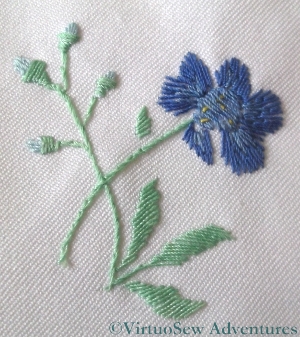
Flower 6 - Close Up
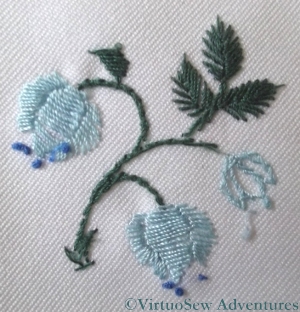
Here is the second installment of close-ups of the Flowered Blouse embroidery. I’ve noticed in picking out the Needlewoman magazine that the transfers came in that the colours I have used bear absolutely no resemblance to those suggested. For instance, flower 6, here on the left, is named as “Lobelia”, and a quick search suggests that real lobelias are bluey-purple!

Flower 7 - Close up
Flower 7, here on the right, is the same as Flower 2, but in different colours, and in fact stitched more openly. It is described as a Convolvulus in the the magazine.
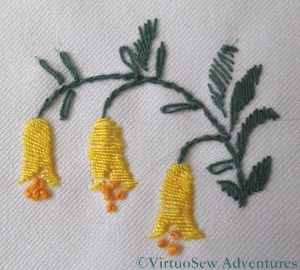
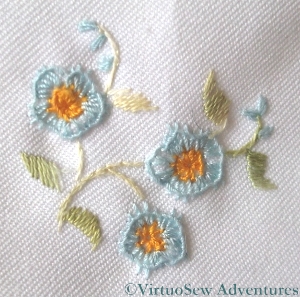
Flower 8 - Close up
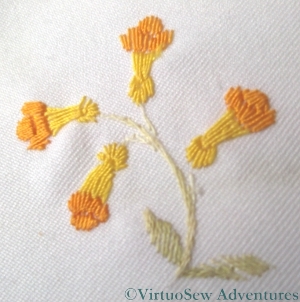
The Flower 8 is the same as Flower 3. This time I used the same stem colours, again to help maintain a certain unity. They are supposed to be Globe flowers.
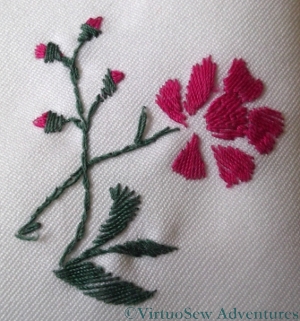
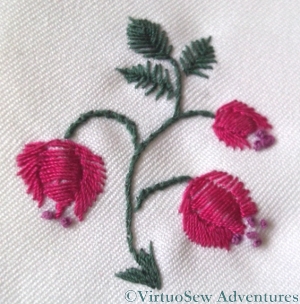
Flower 9 - Close up
Flower 9 is the same pattern as flower 5, and I think is supposed to be a Peony. I distinctly remember finding this one troublesome to stitch – partly, I think, because of the size of some of the stitches, and partly because I couldn’t make sense of the flower as depicted in the transfer. Nowadays, of course, I would go and find a peony, and stare at it until it made sense, but that method had not occurred to me at the time!
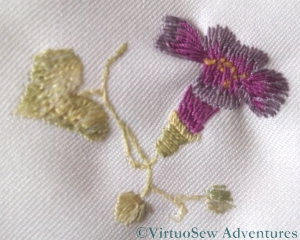
Flower 10 - Close up
Flower 10 is described as a Wood Anenome. Like Flower 4 (Forget-me-nots) it shows the edge of the blanket stitch curling in, rather than staying flat, but I am glad to see that at least the French knots loook better than I expected. I have always had trouble with French knots…
The magazine suggests a variety of uses for these transfers, including a “delightful party frock” for a little girl, a “dainty bed jacket”, and embellishment on a “puff handkerchief” which is an accessory I’ve never heard of before. For once the internet has not been my friend, although the drawing suggests some sort of combination of a powder-puff and a handkerchief that I strongly suspect would be nothing like as practical as the “two-tools-in-one” brigade would have us believe!
Close-ups on the Flowered Blouse – Part One
Flower 1 - Close up
You may recall, not so long ago, a post that I wrote about a blouse embroidered some years ago, during a particularly impoverished period in my life. Here are the promised close-ups of the floral motifs.
Or at least some of them. When the connection started slowing when I put all ten in one post (before I even started to add any text!), I decided to split them up. I’m hoping to put five per post and just write two posts…
Flower 2 - Close Up
I’m no botanist, and if I am honest, I suspect the original designer wasn’t either. The various pictures and descriptions in the magazine did not suggest a slavish adherence to the natural colours of the flowers – even supposing one could be sure of their likely species!
Flower 3 - Close Up
The polyester was not an easy fabric to embroider, and frankly the blouse wasn’t worth the effort I put into it, being a lot like a cheap school or office uniform blouse, but as I said in the original post, I didn’t really have a choice at the time. That said, I do still wear it, not without pleasure, so there is something to be said for all that effort, perhaps.
Flower 4 - Close Up
The stitches used were very simple ones, for the most part – satin stitch, fishbone stitch, stem stitch, blanket stitch, and the occasional French knot. The close ups show that the blanket stitch refused to settle properly and the spine of the stitch has rolled inwards from the edge, but that may simply be the result of years of wear and tear. The blouse goes in the washing machine when it needs a wash – inside a pillow case or lingerie bag, admittedly, but I don’t hand wash it.
Flower 5 - Close Up
When I was choosing the colours and the stitches was more concerned to balance the colours across the front of the blouse than to create accurate depictions of plants, but for all that, there are some motifs more reminiscent of the real thing than others!