
Tag: Silk thread
A rather belated start..
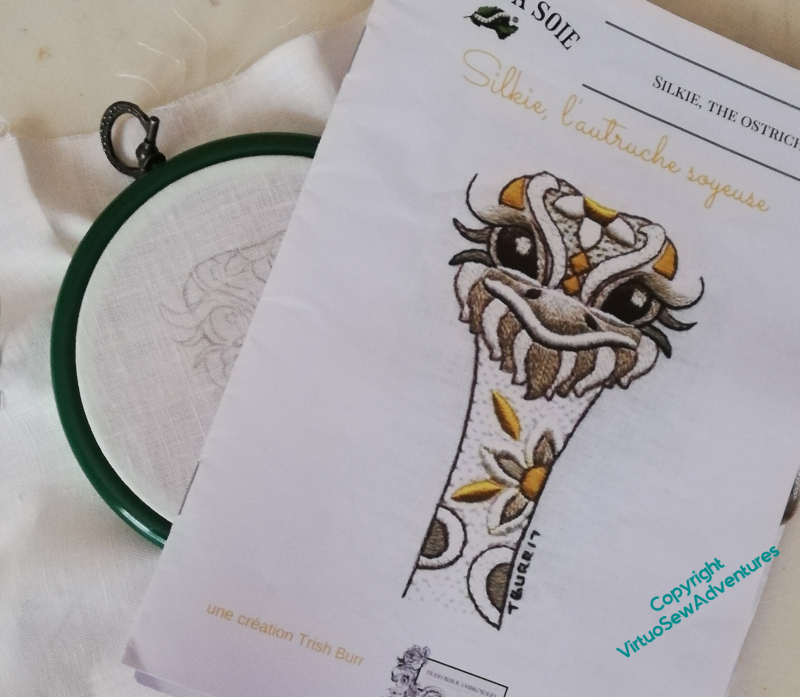
Some of you may recall that a year ago I worked Tanya Bentham‘s kit of the Hounds in the period between Christmas and New Year, as a change of scale, material, and subject while my bigger projects were tucked away to make space for decorations. You may also recall that I bought a Trish Burr design, “Silkie The Ostrich”, from Au Ver A Soie, to fill the same space in the turn of last year to this. And you may have been wondering why you hadn’t seen it yet…
Well, it took two goes to get the design transferred, for a start! When I tried at home, using the low-tech sunlight-through-the-window technique, there wasn’t enough sunlight! So I had to wash off the failed version and use my mother’s rather fabulous LED lightbox (we’re in a bubble, so no, it didn’t involve breaking lockdown rules).
The more I invent and develop my own designs, the stranger it feels to follow instructions. This is still stranger, because the instructions are in French. I do speak French, but I didn’t do any embroidery when I lived there, so I don’t have any embroidery vocabulary. Not the least of the oddities of advancing years is finding which weird thing you couldn’t possibly have second-guessed you wish past-you had done…
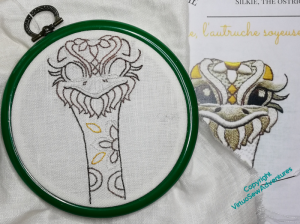
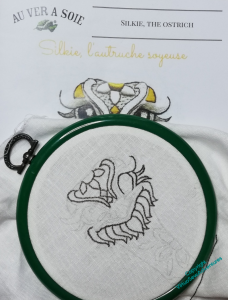
In this case, partly because I’m concerned about losing my design lines, I’m not following the order of working in the booklet of instructions. I’ve started by working all of the split stitch outlining. It’s all in a single strand of silk, so it’s questionable as to how much of a rest from my other projects this will give me, but I lost my heart to Silkie’s smile the moment I saw it, so I think it will be a rest in a different sense.
We have reached Episode 43 of SlowTVStitchery, a rather short episode, owing to some difficulties with camera focus. I was beginning to tackle the full width of the piece, while pondering the challenges posed by Brahms and Messien, and the lectures given for Gresham College by the late Christopher Hogwood.
Japanese Embroidery, 2
Once the padding was done, the next stage was the flower petals. These were fairly quickly done, in satin stitch. I tried to keep the stitches in the right orientation by starting in the middle of each petal and working the halves separately.
Have I mentioned before how much I love the effect you get with flat silk? The stitches almost glow, even in poor light!
The instructions for the other elements weren’t quite as clear as I expected them to be, although I can’t quite put my finger on why. That said, I could fill in the gaps with a bit of guesswork, so it’s all good.
French knots for the flower centres, using hand twisted thread. I found the needle harder to thread here, because the twisted thread was quite heavy, and it untwisted easily, too. This is a problem I’ve noticed with my hand twisted thread before, and I’d love to know whether there is anything to do to avoid it!
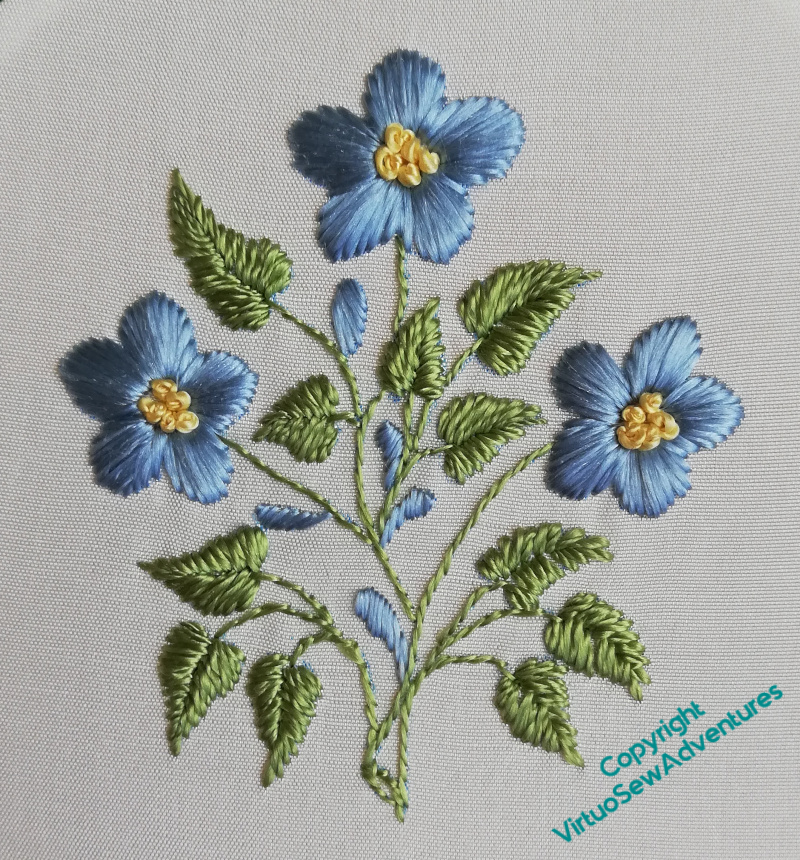
The leaves were satin stitch, again in twisted silk, while the stems were in stem stitch. The pattern didn’t specify, but I took absense of specification to indicate using the silk untwisted. It keeps the stems light and delicate, anyway.
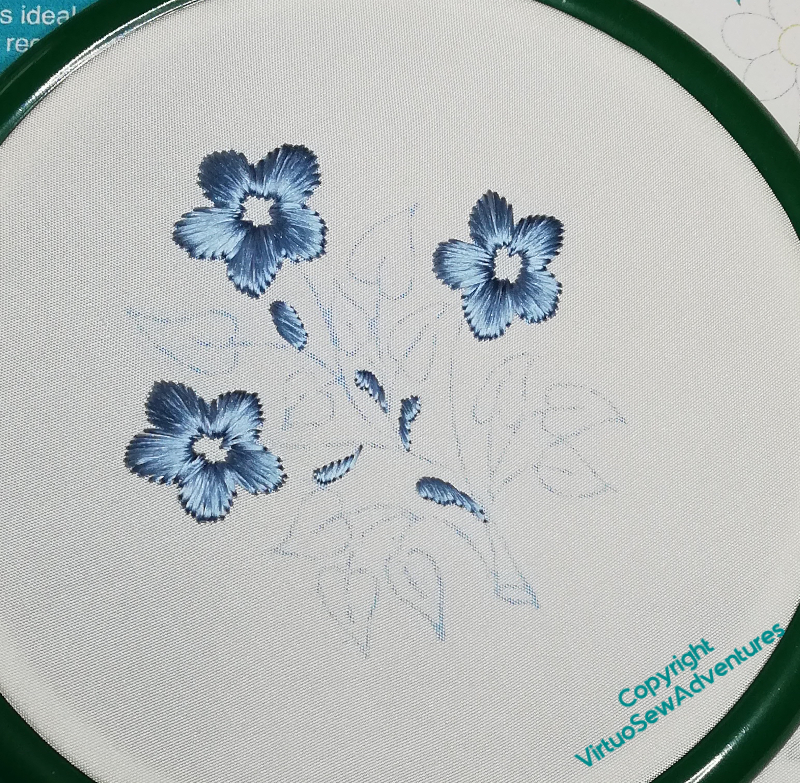
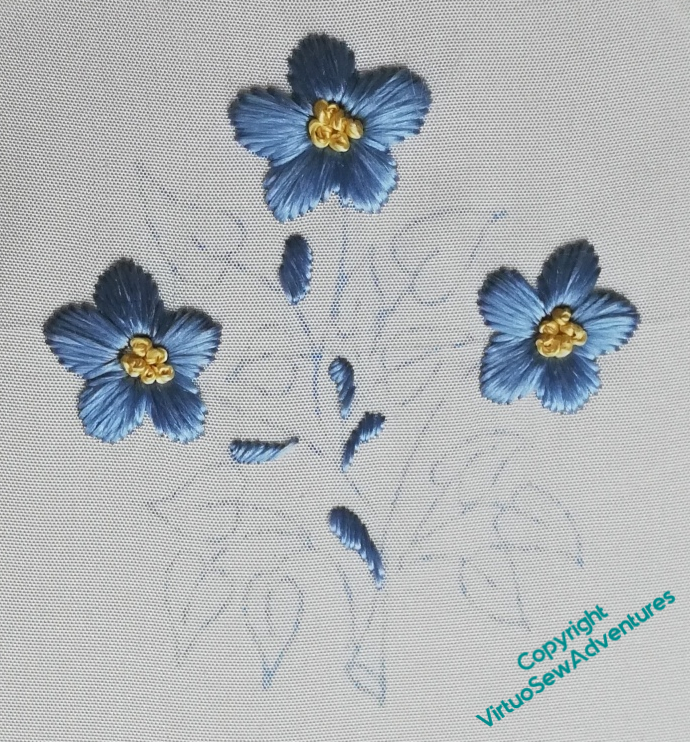
So, finally, after nearly thirty years, I’ve finished the forget-me-nots!
Now I just need a pot to put them in….
The next episode of Slow TV Stitchery is up – Episode 25 – on reaching the fourth border, and the pleasures of lute music. Do go and have a look!
I can’t call this a UFO…
… because I never got around to starting it!
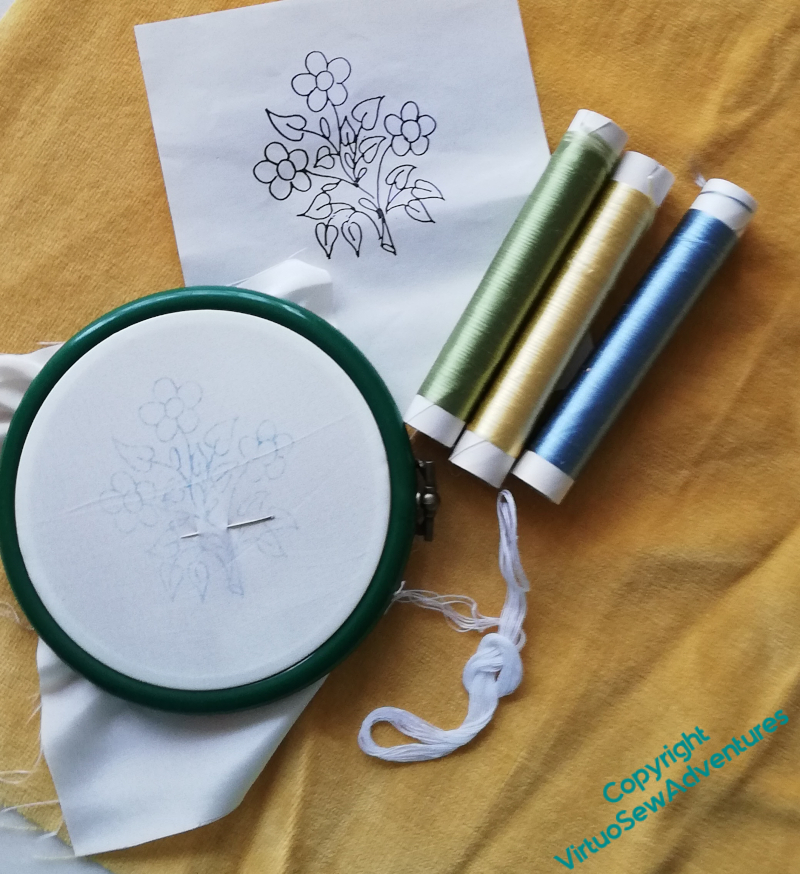
I found this, languishing in a box. It’s a kit for a Japanese embroidery design, complete with spools of flat silk and a handmade needle (which didn’t register with me as it should have done, I admit!)
What I didn’t have was the instructions, but I remembered that we bought two kits, one for my mother and one for me, so I asked…

And look what she came up with! As it turned out, her kit was safely packed up, together with the magazine that the instructions were in. So I’ve photocopied them, so as not to deprive her, and I intend to get along and finish it.
Then I’ll only have to decide what to do with it. Perhaps I’ll actually source a little box and put it in the lid, as suggested by the magazine! (Yes, I know, me, doing as suggested – the world has turned topsy-turvy!)
Still, onward, ever onward!
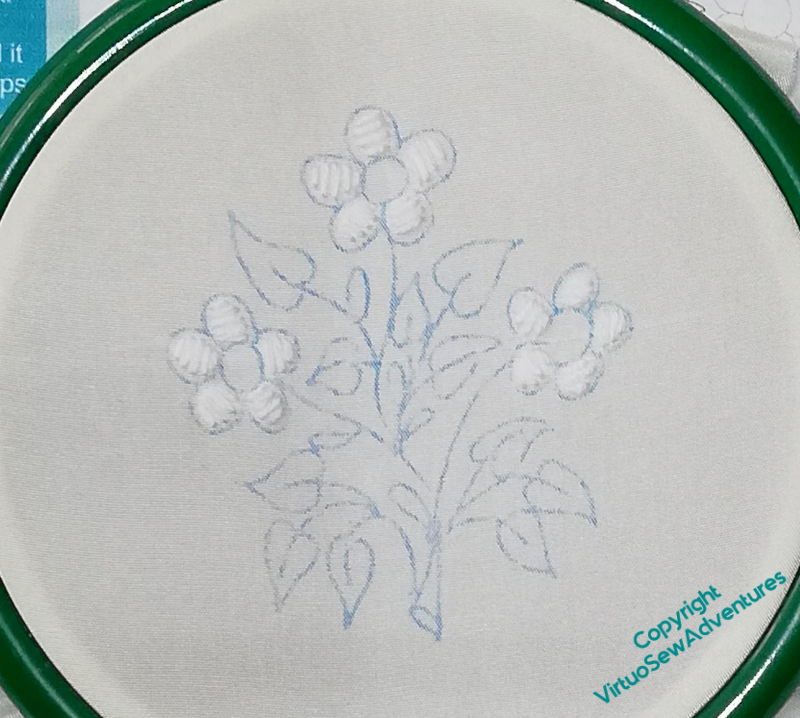
The first stage is to put in some padding stitches under the flower petals.
I’m always a bit reluctant to use my Japanese needles – I’ve found them tricky to thread, and I’m very conscious of their rarity, and don’t want to break them – but every time I’m reminded that they are really lovely to use. Although I’ll admit to finding them slightly disconcerting, because, being shorter than I’m used to, they balance differently!
Meanwhile, Amarna Family Group continues to make progress: Episode Twenty is now live, and chiefly concerns Nefertiti.
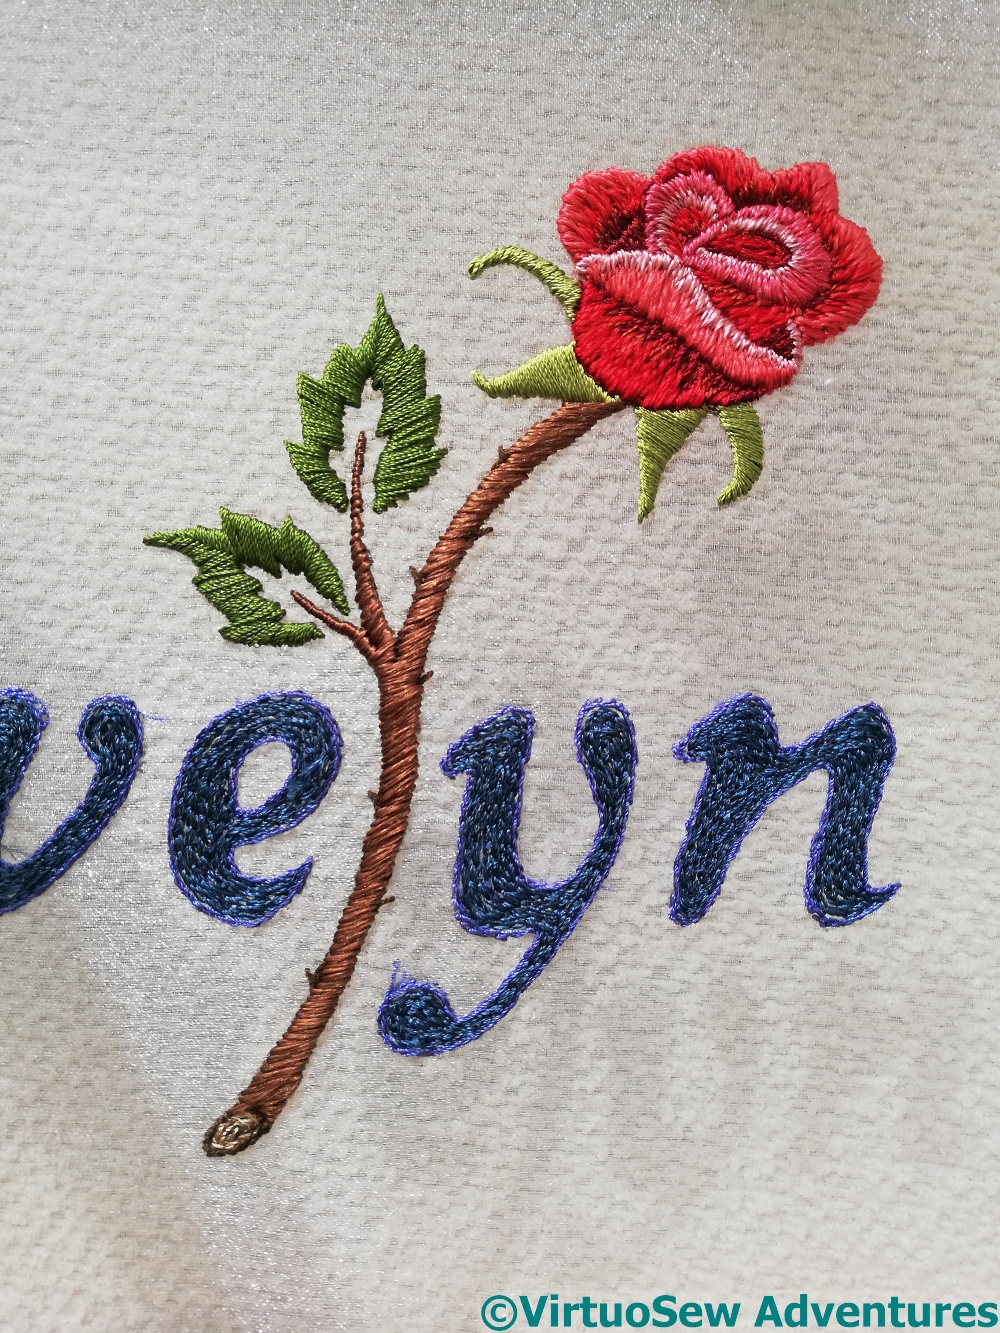
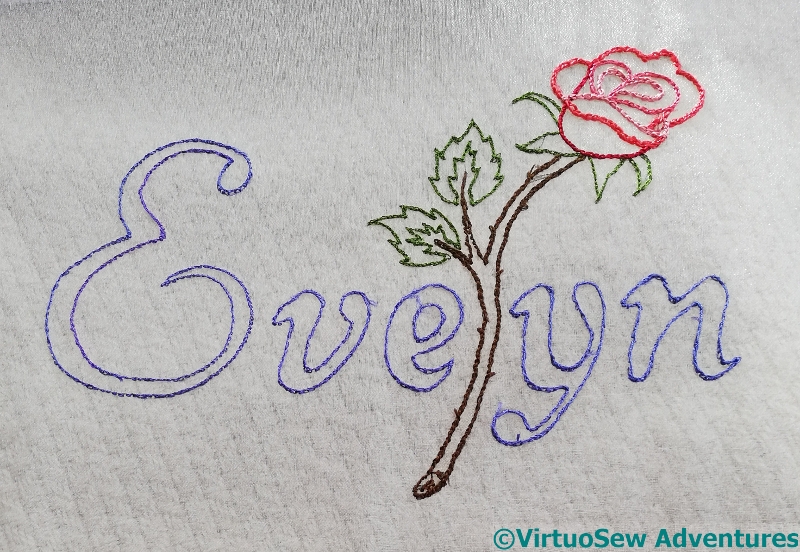
Evelyn Rose – Finished
I’ve only just realised you’ve not seen the finishing of Evelyn Rose – I wrote the post then didn’t schedule it!
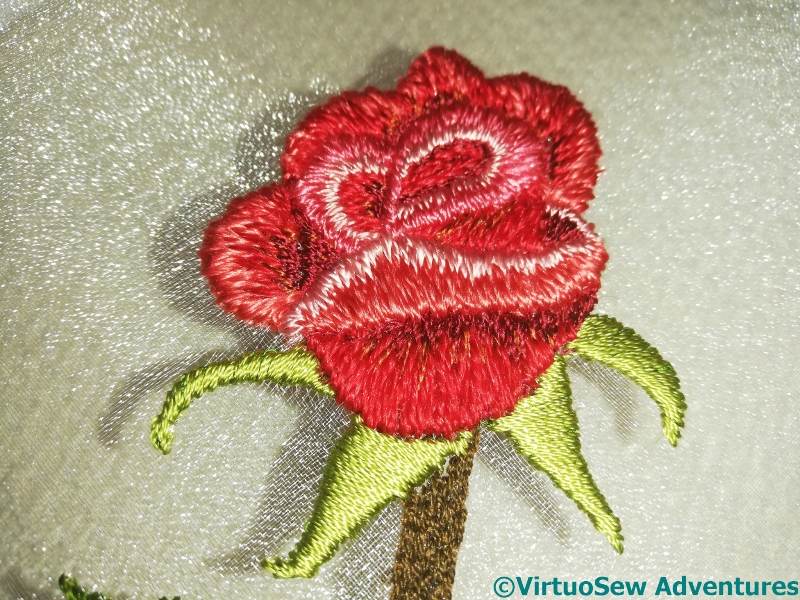
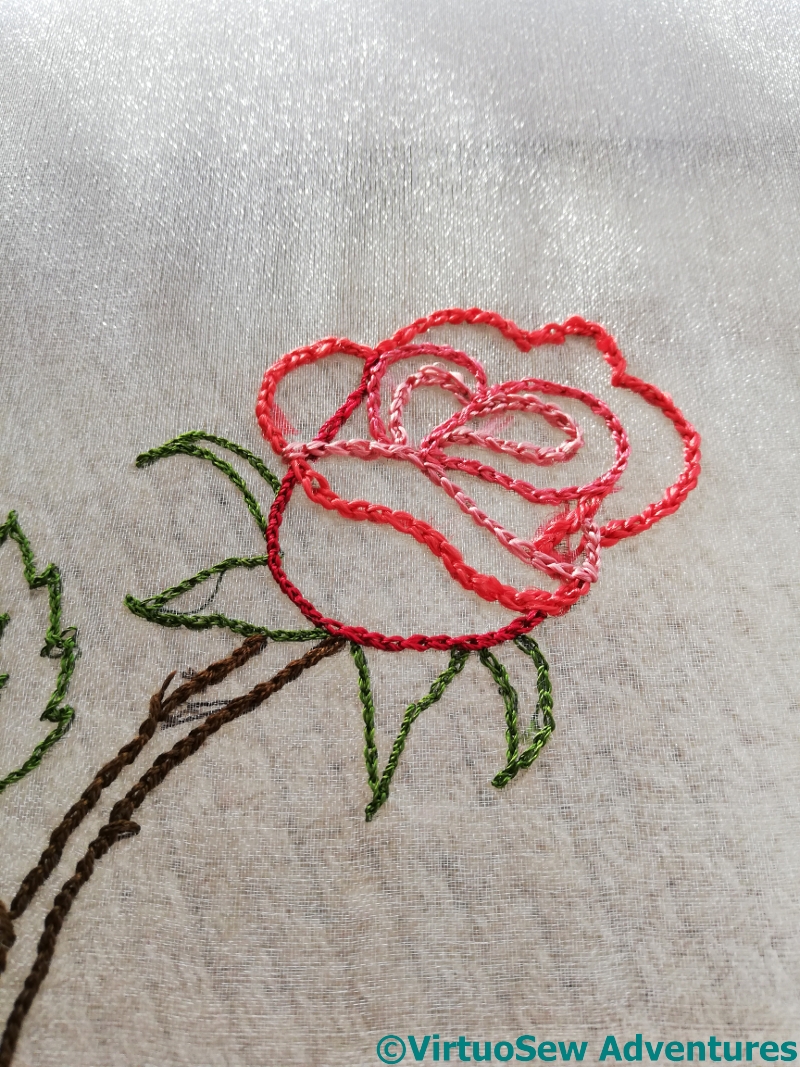
The glint of the gauze shows up particularly well in this photograph of the rose, and you can see, too, the various different silk threads I’ve used to get the effect and shade I wanted. Tricky, because I didn’t want a naturalistic, Redouté-style rose, but – because, as I said, they don’t work with stems – I didn’t want a canal-art style rose, either. I think I got it right, and I’m rather pleased!
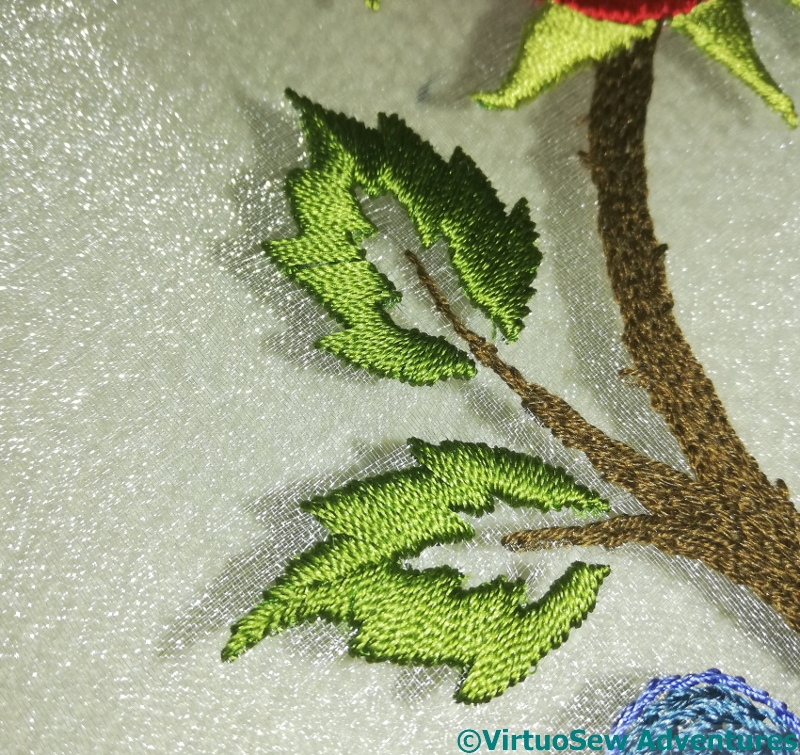
This slightly “stencilled” type of leaf helps to keep the balance between “naturalistic” and “stylised”. It also provides an opportunity for some rather striking shadows when the light is right, and I was delighted, throughout the stitching, to have moments like this, when it became clear that the idea was going to work just as I had hoped!
I knew that Evelyn’s father, in particular, would be very disappointed if he discovered later about my usual Morse Code signature, and I hadn’t done it for Evelyn, but making it small enough, and neat enough, and showing the stitches at the back as little as possible, was a little tricky. I twisted together several colours to get a fine, caterpillary thread, and worked my stitches as close to the stem as I could get them. In real life, it’s very hard to see my signature, but I promise you, it’s there!
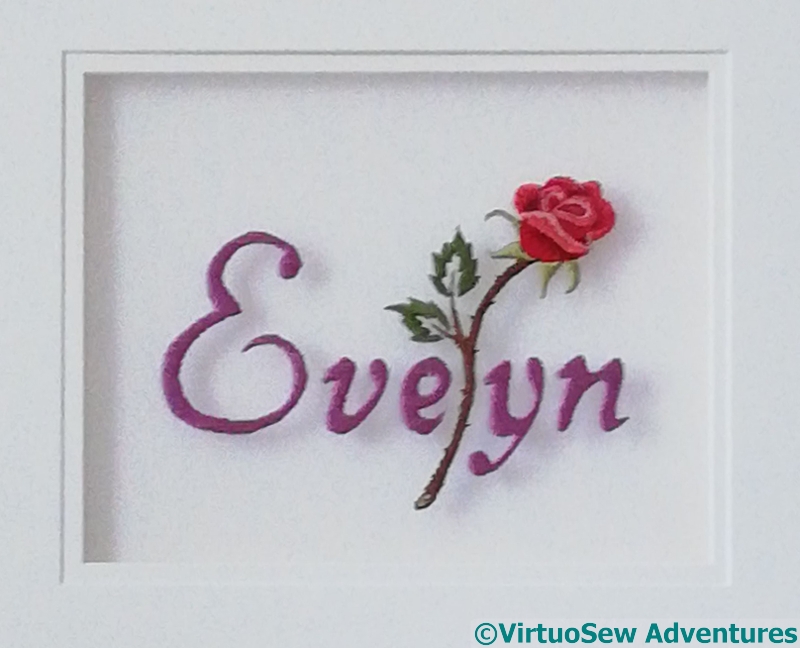
The next challenge was to mount it. All this was happening only just pre-lockdown, so I went to see my wonderful framer, who goes by the (entirely deserved) name of Framing Genius. Between us, we came up with a way to create a sort of “sealed unit” of the embroidery and the mounts, so that I could post it overseas to our friends, who would then have something displayable until they can find a framer when such things are possible again.
Now, the next post in SlowTV Stitchery is now live – Episode Eighteen – on the desirability of imperfection and the likeness of mathematicians to cats!
Finishing the Faience Necklace
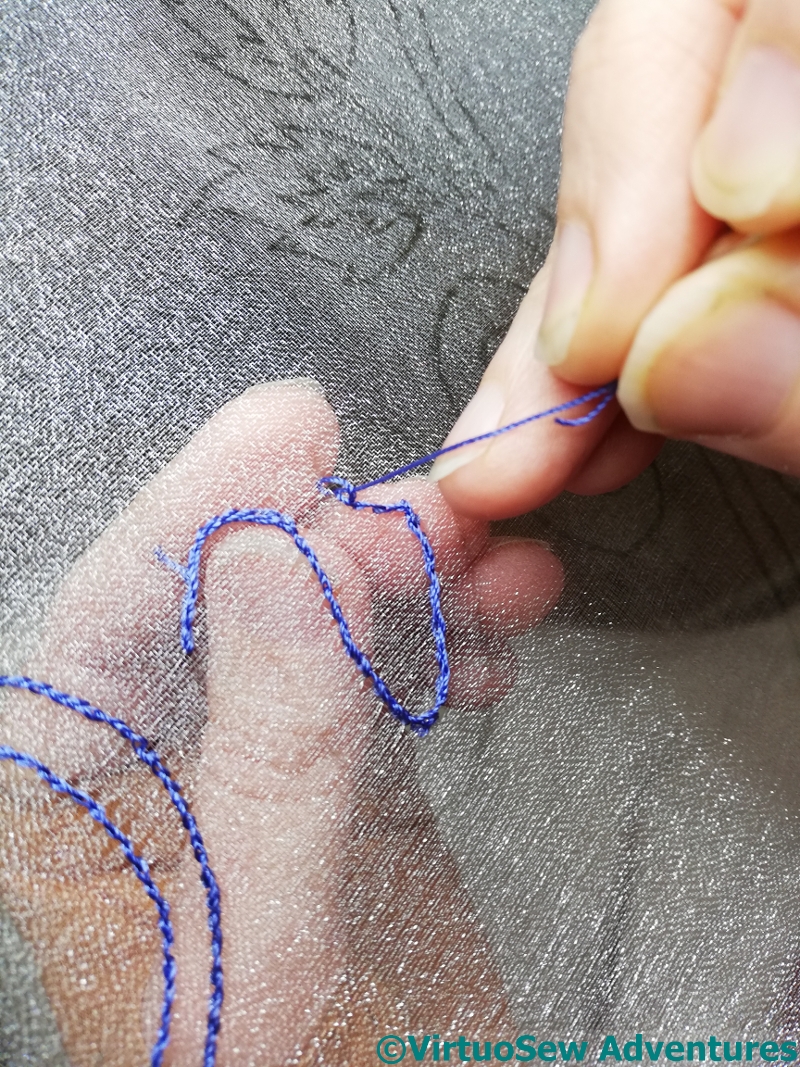
In the end, I unpicked both of the previous attempts, and used a mass of French knots, worked again in hand twisted silk, this time combining some of the very fine silk from a Frostings box with my Japanese Flat silk.
I think these work well, especially at the small scale of the piece.
I’d been rather dreading the large lotus flower, representing the shaped endpieces of a broad collar necklace, because I was remembering the struggle I’d had with the “Fragment of Tile That Started It All“.
Then I had an epiphany of my own, and used the difference in appearance and reflectance of twisted silk compared with flat silk to help distinguish the shapes of the petals and bring the foremost ones forwards. I’m very pleased with how that turned out!
And now, finally, it’s done!
This one is almost certainly going to be one of the “spots” around one of the big panels, because although I like it, and it represents what I want it to, I don’t think it has the visual strength to stand alone.
But then, if all the pieces could stand on their own, I wouldn’t be able to assemble the panels I want to, would I!
Finally, Episode 14 of SlowTV Stitchery is now live, discussing design thoughts, music and musicians. Do drop in and see how I’m getting on!
Steps forward, steps back
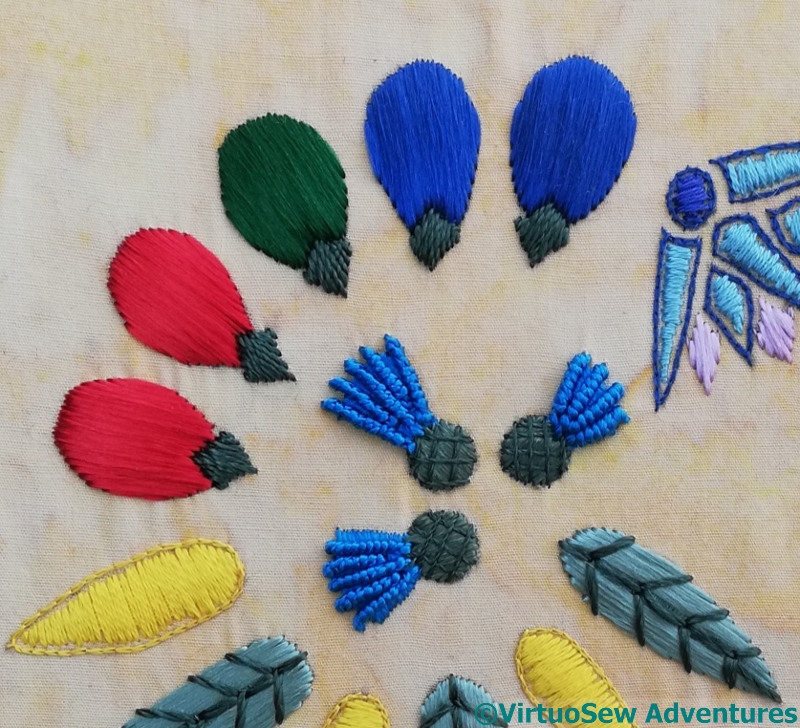
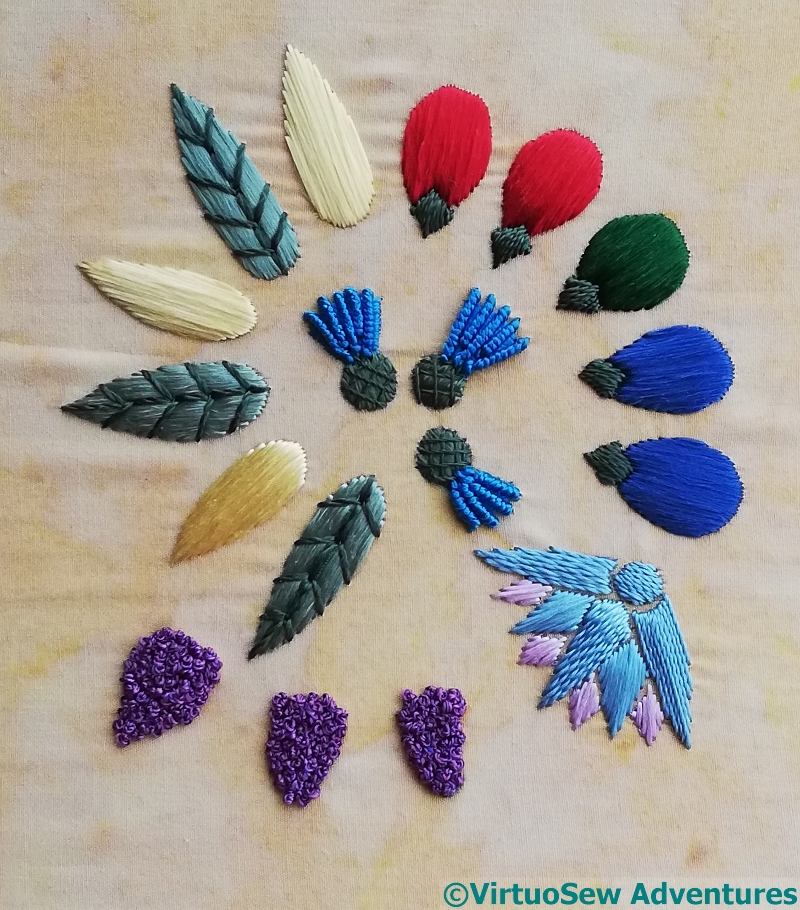
The necklace description that Mary Chubb was asked to transcribe, after her epiphany in the cellar, includes a row of dates in a repeating colour pattern of two red, one green, two blue.
So here they are, in satin stitch in flat silk for the main fruit, and more satin stitch, but this time using hand-twisted threads, for the stem. I found a rich and vibrant green for the main green fruit and used a greyish-green for the stem. Again, I’m trying to balance echoing the faience with echoing the real fruits, leaves and flowers, which is making for some interesting puzzles!
I wanted to try blending the silk filaments for one of the elements, to help recall the slightly iridescent effect of some glazes, and spent a wonderfully painstaking (exasperating!) afternoon splitting my silk. And then recombining it, and using it to stitch the first of the lotus petals in long-and-short stitch.
Only to sit back and glare at it. It’s looking congested, chunky, and not at all what I was looking for. What’s more, it’s buckling the fabric in spite of the calico support.
Snip, snip, out it comes, and now I need to think again.
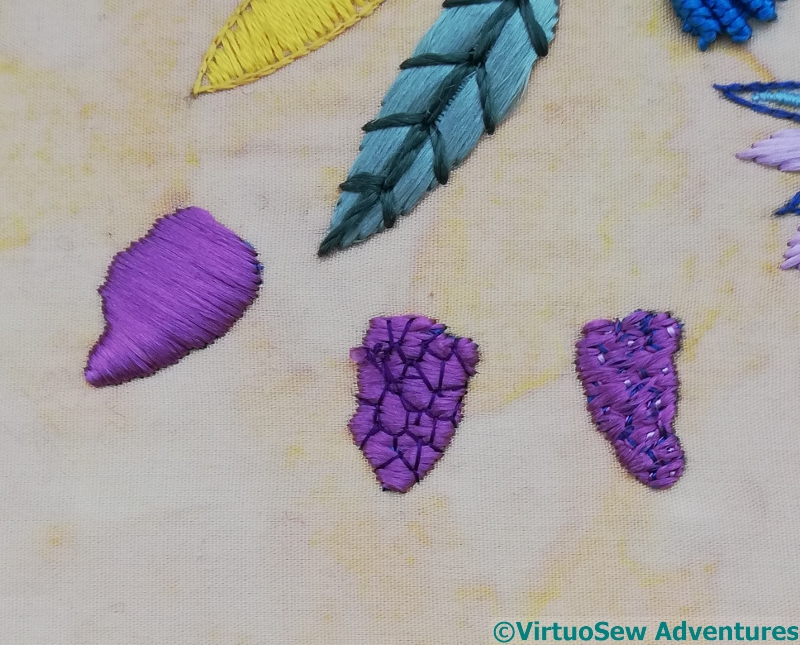
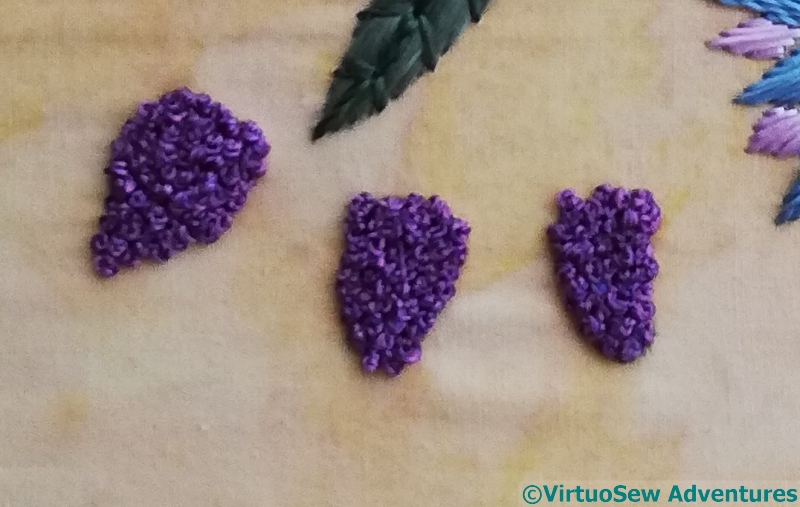
Meanwhile I have another element to think about as well. You can see the underlayer of satin stitch on the shapes which are supposed to be recollections of bunches of grapes, and then two attempts to give them a more defined appearance. I think I prefer the middle version, which was the second I did.
That, however, means I have to unpick my first attempt. Sigh.
There was a problem with uploading my video last week, so here it is, somewhat delayed: Episode 10 of SlowTVStitchery. And, just so we don’t get too far behind ourselves: Episode 11 as well!
Progress on Evelyn Rose
I decided to understitch all the elements, and then concentrate on the rose, stem and leaves.
However, in this photo, you can see not only the finished rose on its stem, but also the understitched lettering, and the beginning of the effect I want, with the sunlight casting a shadow through the gauze to the surface beneath.
Then I had to decide how to stitch the top layer of the lettering.
I took a photocopy of my painted design in black and white, printed it out twice, fished out a white gel pen, and began to experiment with stitch direction. I decided that the constantly changing angles of the slanting version would end up terribly “busy”.
So, horizontal it is, then. And I’m using Japanese Flat Silk, which at least makes the satin stitch easier to make work!
And while you think about how that is going to go – Episode Nine of SlowTVStitchery is now up, in which the first edge is reached, and it is agreed that the sight of colours against gold is worth getting up for!! Happy watching, happy stitching, and stay safe.
Getting Started on “Evelyn Rose”
I found a gauze with a slight glint to it, stretched it on my frame and drew the design on to it. And at this point, the primary challenge I was going to face made itself felt – finding the angle from which to see the lines on the fabric, so that I could do the stitching. Add in the glint on the fabric, and sometimes I could see the lines, sometimes I could see the fabric, and sometimes I wasn’t sure I could see either… I knew it would be this difficult, by the way, but I thought the end result would be worth it!
The stitching is going to be very simple, mainly satin stitch (yes, I know!) because the main characteristic I want here is the magical effect of the embroidery floating above the backing surface.
Obviously, the first thing to do was to outline every element. I’m using a mixture of silk thread, some vintage, and some from Thistle Threads courses.
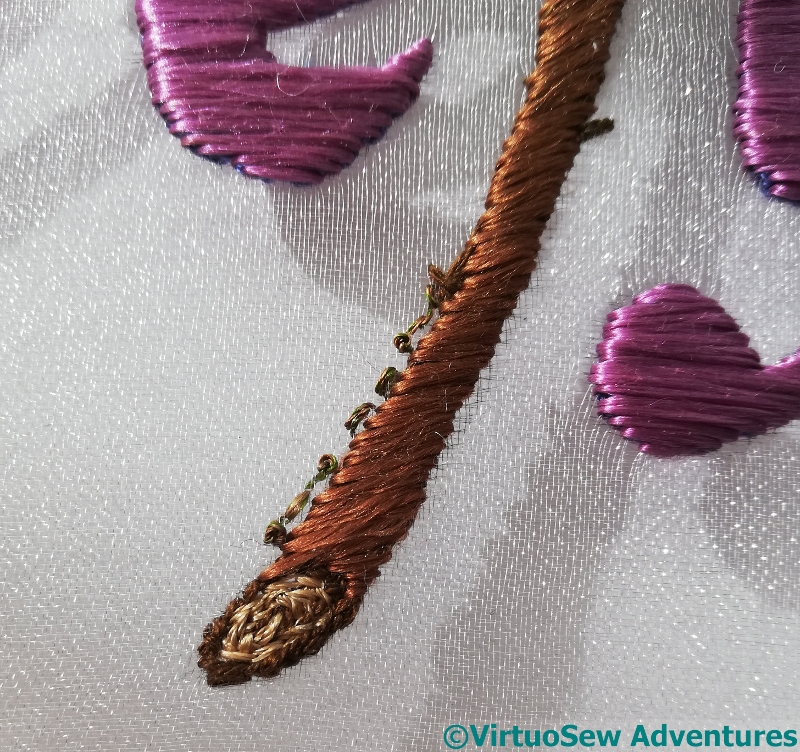
So here you are – all outlined, and the thorns already in place on the stem. You can see the fabric I have over my worktable through the gauze in this picture, and you can see that glint in the sunshine as well.
The next episode of SlowTV Stitchery – Episode Seven – is now up. It explains why “Slow TV Stitchery” and offers memories of an astronaut. I hope you enjoy it.
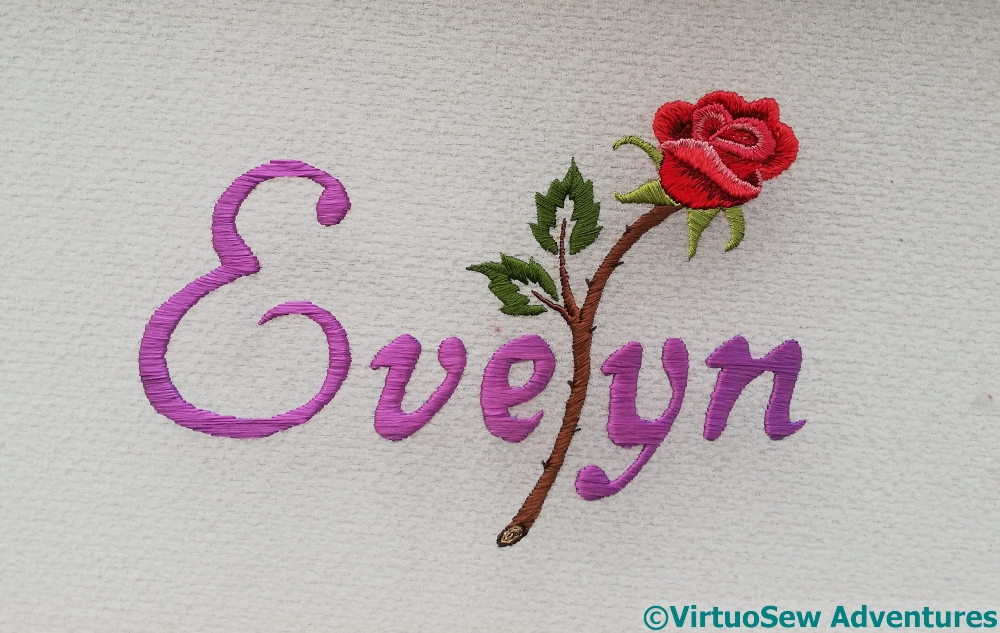
A Commission for an Embroidered Panel – “Evelyn Rose”
Earlier this year a dear friend and his wife produced a baby girl, who they’ve named Evelyn Rose. We were, of course, thrilled for them, and sent many congratulations, and even managed to speak to them (they’re in a different time zone). During that conversation, they said, “We love what you do, and we’d love you to do something for Evelyn!”.
Well, I didn’t have another commission looming, and the Faience Necklace wasn’t framed up ready to go yet, so that fell very pat. I asked what they had in mind, and this is the sketch that came back.

That gave us a lot to think and talk about. I played with a variety of typefaces, and finally settled on a cursive style. Then I thought about roses. My first thought was stylised canal art roses, but they never have stems, so I thought some more. Unusually for me, at this point I got out my paints, found some photos of roses, and started experimenting with simplifying them and really understanding the forms of them and the way the petals fold.
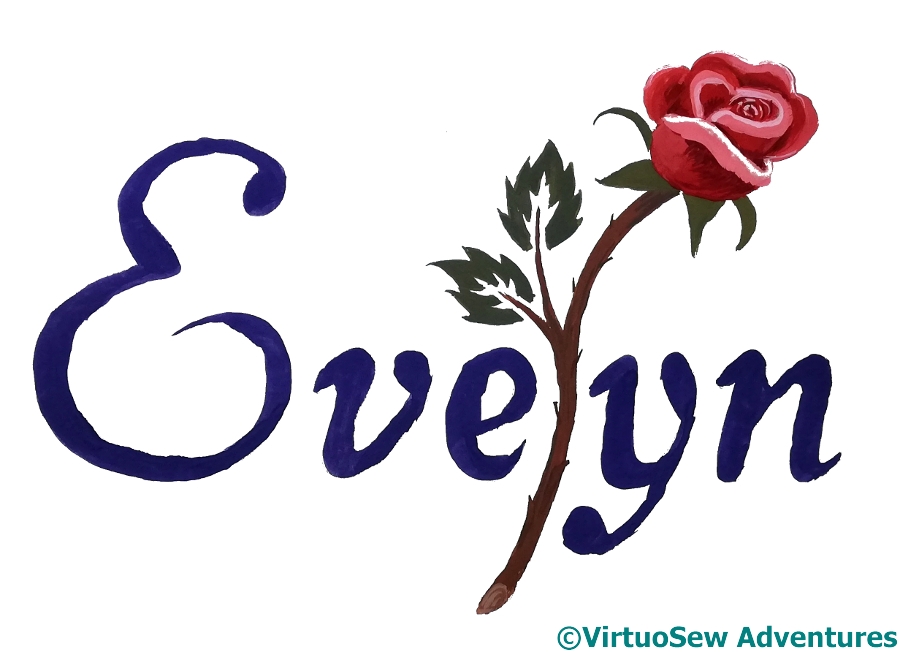
I ended up with this basic design – the name in an elegant cursive font, and the “l” replaced by a single stemmed half-open rose. Then I thought of the embroidery on gauze I experimented with a few years ago. It seemed to me that this was a perfect opportunity to play with this technique, and it has the advantage of producing something sufficiently grown up that in 20 years time, Evelyn probably won’t be embarrassed to have it on show…
Episode Six of “Slow TV Stitchery” is now up. Please take a look, and ask me any questions that occur to you…
More progress on the Faience Necklace
There is another episode of SlowTV Stitchery up – Episode Three. I’ve also done two shorts, one introducing the Dreams of Amarna project as a whole, and one, for the Amarna Family Group in particular. Please ask me any questions you like, either here in the comments, or by email, and I will try to answer them in one of the later episodes. It might take a while, though, because people have been stacking up questions like cordwood!
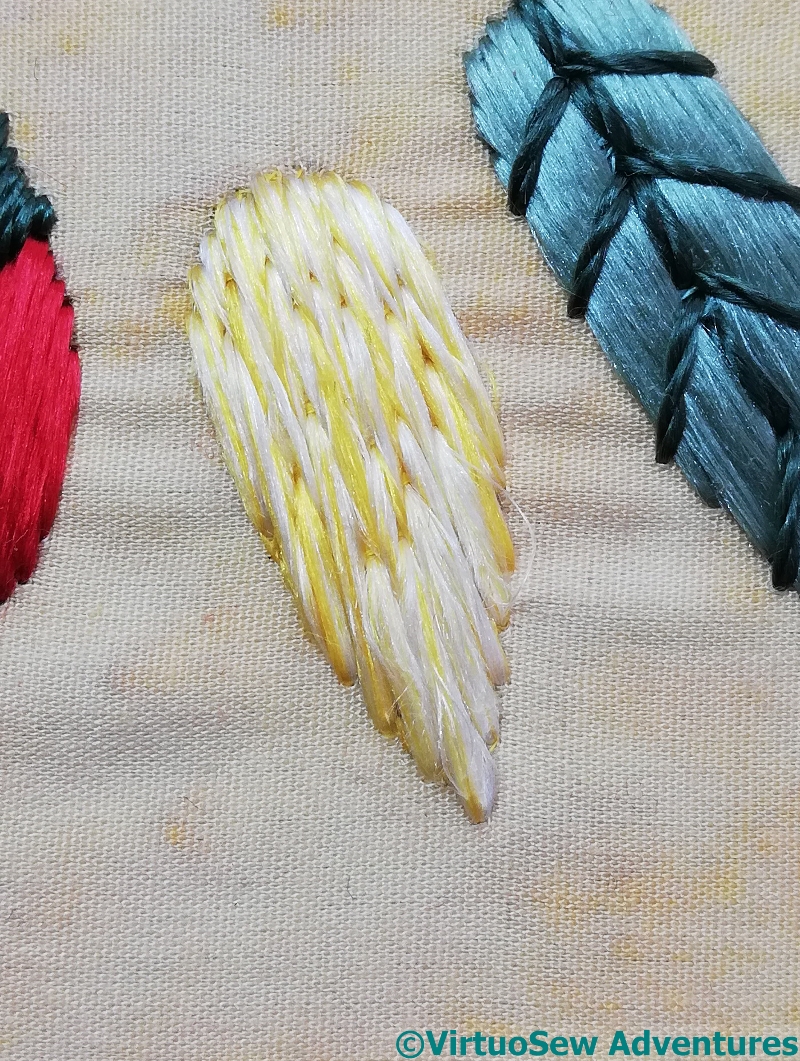
Now, back to the Faience Necklace, which I’ve neglected… The first elements I decided to do were among the simplest – the three palm leaves.
First layer, as I said, is plain satin stitch in flat silk. Satin stitch makes me nervous, but flat silk spreads and blends together, which makes it about as easy as it can be for me.
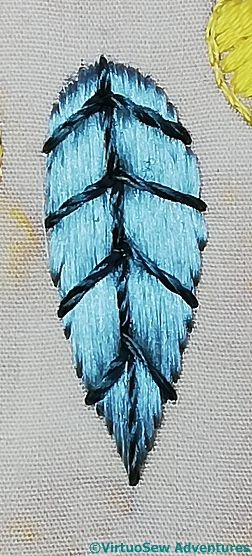
The next stage was to hand-twist a two ply perlé -type thread to stitch the veins, using straight stitches. In this case, I used two of the strands of filaments for each ply, and I tried not to over-twist the final assembly.
That made for a lovely thread, with a bit of body and “lift”. A pleasure to use!
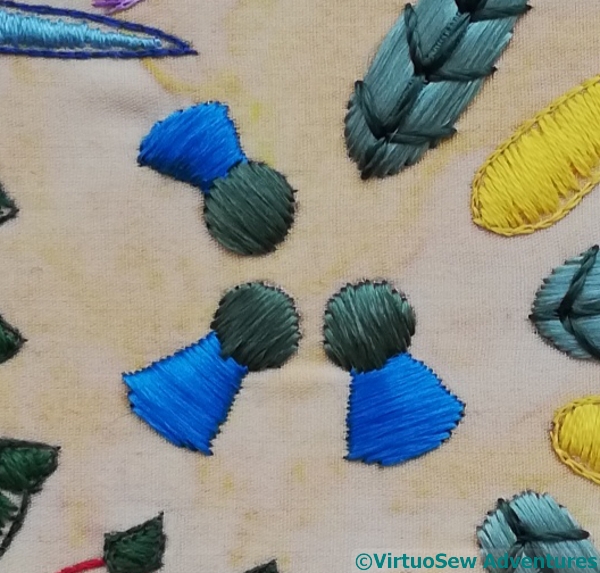
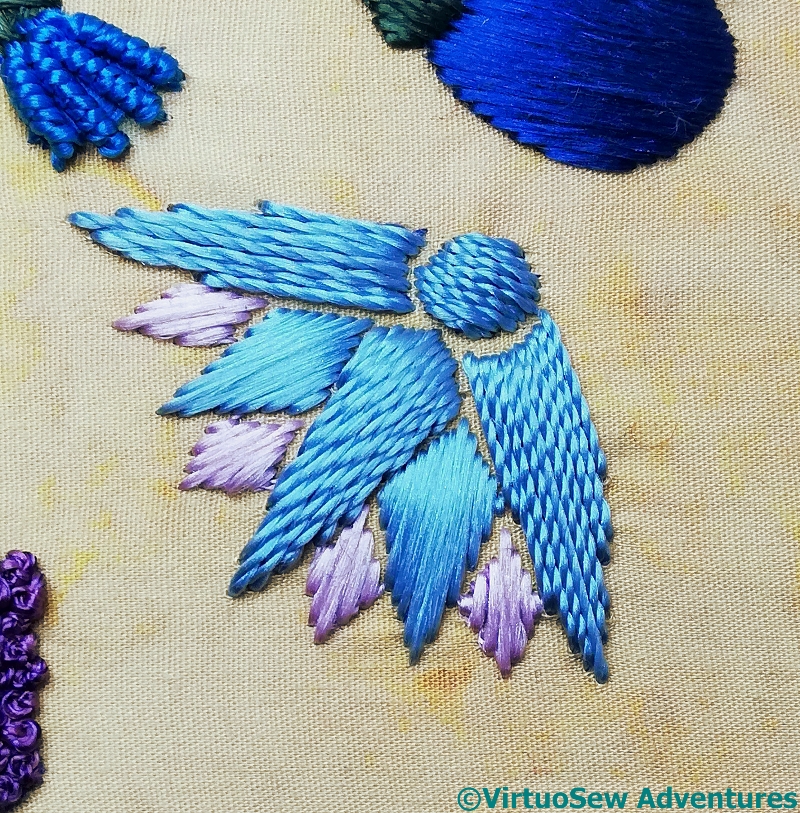
If I have correctly interpreted the description that Mary Chubb typed out on that first afternoon, when she came back from her epiphany in the cellar, this shape was described as a cornflower, so I went with my brightest blue, and the middle greyish-green shade for the calyx.
You will notice that the stitching on the two sections is at right angles one to the other. I realise that the stitching on the “petals” is not going in the obvious correct direction, but wait – there’s more…!
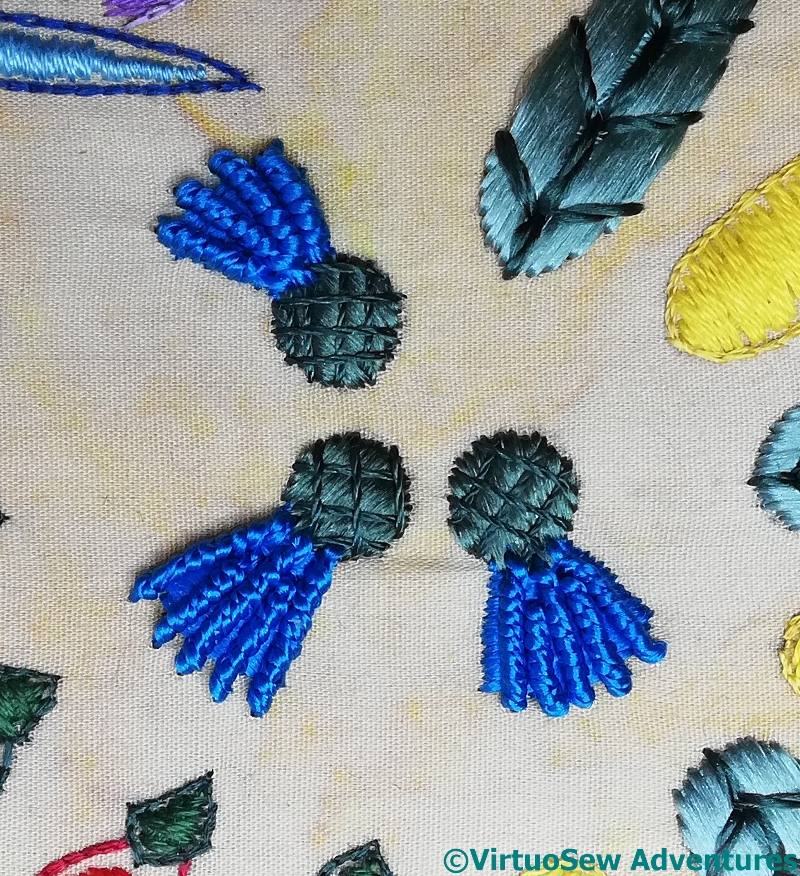
Quite a lot more, in fact.
First, trellis couching on the calyx, using a fine 2-ply thread twisted using a half-strand of flat silk for each ply, and twisted as tightly as I could manage without snarls or tangles.
Then, using the bright blue, I twisted another 2-ply thread, this time using three strands for each ply, and again, trying not to over-twist. Then I could use it to work some long bullion knots, creating the slightly fluffy effect of an opening flower.
I think this is going well so far!